Introduction to Candy Cane Peppermint Cupcakes
There’s something magical about the holiday season, isn’t there? It’s like the world transforms, and everything sparkles a little brighter, especially when you whip up a batch of Candy Cane Peppermint Cupcakes! These delightful treats are not only easy to make, but they also bring a festive cheer to your home. As a busy mom, I know how valuable time is, and that’s why I love this simple recipe. It’s the perfect solution for grabbing your loved ones’ attention without turning the kitchen upside down! Let’s spread some joy with these tasty bites this season!
Why You’ll Love This Candy Cane Peppermint Cupcakes
These Candy Cane Peppermint Cupcakes are a holiday dream come true! They’re incredibly quick to whip up, making them a lifesaver for busy days. The vibrant swirls of red and white frosting not only look festive but also taste heavenly with that hint of peppermint. Plus, they’re a hit with everyone—from your picky eater to your in-laws—delighting every guest at your holiday gatherings!
Ingredients for Candy Cane Peppermint Cupcakes
Before you dive into the delicious world of Candy Cane Peppermint Cupcakes, let’s gather our ingredients! This list has everything you need to create these festive treats. You can find exact measurements at the bottom of the article for your convenience.
- White cake mix: This is the base of our cupcakes. It’s light, fluffy, and makes baking a breeze! Just grab a box, and you’re halfway there.
- Gel food coloring: A splash of red gel coloring adds that cheerful holiday spirit. You can adjust the amount based on how vibrant you want your batter to be.
- Unsalted butter: Softened butter is essential for the frosting. It adds that creamy goodness that makes every bite melt in your mouth.
- Kosher salt: This ingredient balances the sweetness in your frosting, bringing all the flavors together in harmony.
- Confectioners’ sugar: The heart of your frosting! This fine sugar creates a sweet, smooth topping that everyone loves.
- Heavy cream: A splash of heavy cream contributes to the frosting’s luxurious texture, making it fluffy and rich.
- Pure vanilla extract: You can never go wrong with pure vanilla. It adds warmth and depth to your frosting, tying everything together.
- Peppermint extract: This is where the magic happens! A hint of peppermint gives the cupcakes their delightful holiday flavor.
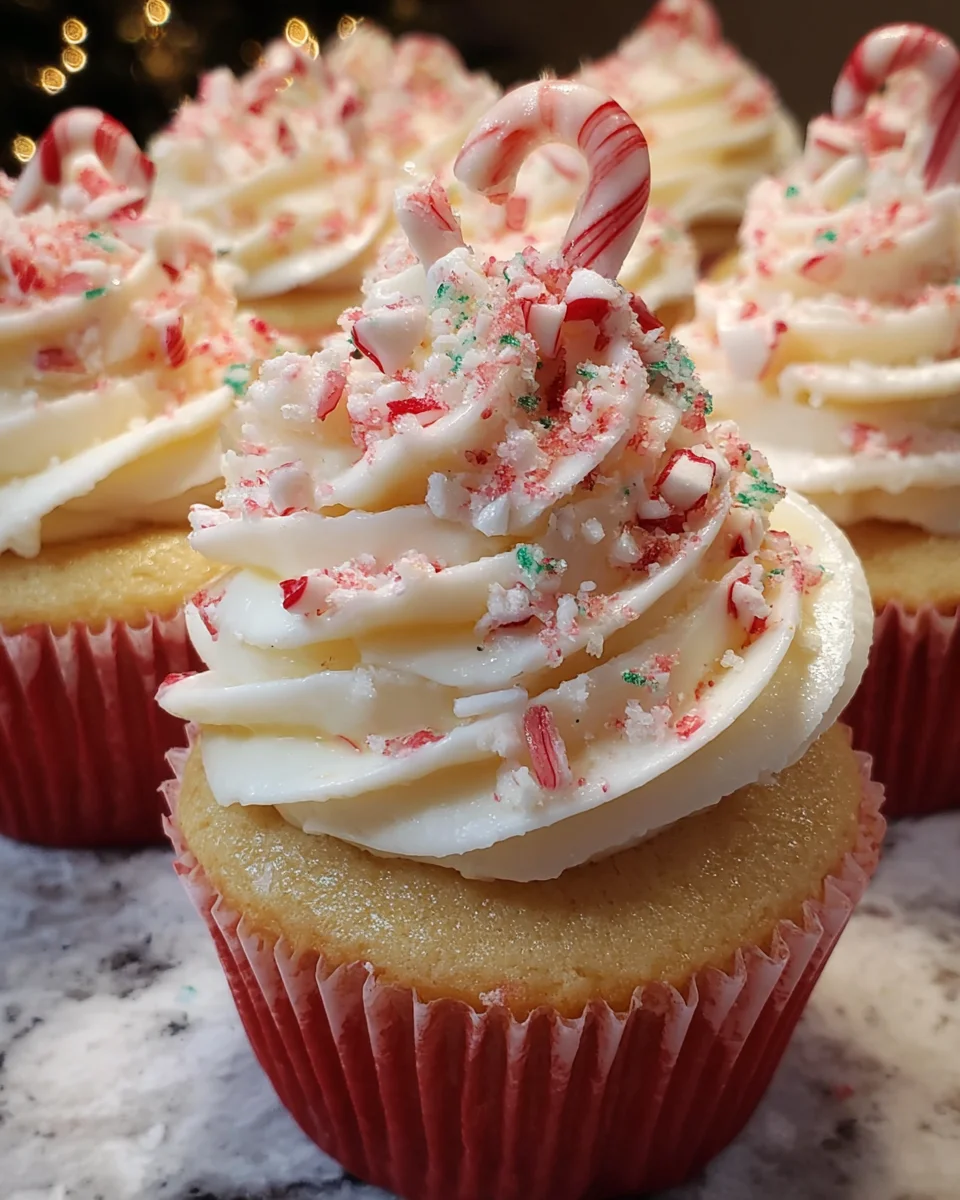
- Mini candy canes or peppermint sugar: Use these for garnish. They’re perfect for adding a cute touch on top of your cupcakes!
Now that you have gathered your ingredients, it’s time to get baking! Each ingredient plays a crucial role, ensuring your Candy Cane Peppermint Cupcakes bring joy to your holiday celebrations.

How to Make Candy Cane Peppermint Cupcakes
Step 1: Prepare Your Baker’s Station
Let’s get our kitchen ready! First, position your oven racks in the upper and lower thirds. Preheat your oven to 350°F. Meanwhile, line 18 cupcake cups across two 12-cup muffin tins with festive paper liners. This way, you ensure a smooth sailing process as we dive into baking these Candy Cane Peppermint Cupcakes!
Step 2: Mix the Cake Batter
Now, it’s time to make the magic happen! Prepare the white cake mix according to the package directions. Once ready, divide the batter evenly into two bowls. Add red gel food coloring to one bowl until you reach that gorgeous candy cane hue. The vibrant colors will make your cupcakes as delightful to look at as they are to eat!
Step 3: Fill the Cupcake Liners
Get ready for some fun! Take a spoon and alternate spooning the white and red batter into each lined cupcake liner. Fill each a little less than halfway, about 3 tablespoons per liner. These fun swirls of color will create a beautiful pattern when baked, making your Candy Cane Peppermint Cupcakes incredibly eye-catching!
Step 4: Bake to Perfection
Time to bake! Place your muffin tins in the oven and let them bake for about 18 to 20 minutes. Halfway through, rotate the pans for even baking. To check if they’re done, insert a toothpick into the center. If it comes out clean, your cupcakes are all set! Let them cool completely before frosting—this avoids a gooey mess!
Step 5: Prepare the Frosting
Frosting time! In a mixing bowl, beat the softened unsalted butter with kosher salt using an electric mixer on medium speed for about 2 minutes. Gradually add the confectioners’ sugar in two batches, mixing thoroughly after each addition. Then, add heavy cream, pure vanilla, and peppermint extract. Beat at medium-high speed for around 2 minutes until you achieve a light, fluffy consistency that’s just perfect for spreading!
Step 6: Decorate Your Cupcakes
Let’s take your cupcakes to the next level! To frost, grab a piping bag and use a small brush or skewer to paint two red lines of gel food coloring inside the bag. Fill it with your lovely frosting and pipe it onto the cooled cupcakes in a swirly design. Finish with mini candy canes or a sprinkle of peppermint sugar on top for that festive touch!
Tips for Success
- Ensure your butter is fully softened for easy frosting consistency.
- Chill your cupcakes for a few minutes after baking to make frosting easier.
- Adjust the amount of red gel food coloring based on your desired intensity.
- Use an offset spatula for smooth and even frosting application.
- Don’t skip the toothpick test; it’s the best way to ensure perfect doneness!
Equipment Needed
- Muffin tins: Two 12-cup muffin tins are perfect for baking your cupcakes. If you only have one, bake in batches!
- Cupcake liners: Use colorful paper liners for a festive touch. Silicone liners are a great reusable alternative!
- Electric mixer: This saves time when beating butter and frosting. A whisk works too, but it’ll take some elbow grease!
- Piping bag: A piping bag makes frosting a breeze. If unavailable, a zip-top plastic bag with the corner snipped works well!
Variations of Candy Cane Peppermint Cupcakes
- Dairy-Free Option: Substitute unsalted butter with a dairy-free margarine and use a dairy-free heavy cream alternative like coconut cream for a delicious treat that everyone can enjoy.
- Gluten-Free Version: Use a gluten-free white cake mix instead! This way, those who are gluten sensitive can join in on the holiday fun!
- Chocolate Cake Base: For a twist, swap the white cake mix with chocolate cake mix. The peppermint frosting combined with chocolate is a match made in heaven!
- Mini Cupcakes: Make mini versions of these cupcakes for bite-sized delights. Just decrease the baking time to about 10-12 minutes for perfectly dainty treats.
- Flavored Frostings: Try different flavor extracts, like almond or orange, in the frosting for a delightful twist! This will give your cupcakes a unique character.
Serving Suggestions for Candy Cane Peppermint Cupcakes
- Pair these delightful cupcakes with a warm mug of hot cocoa topped with whipped cream for a cozy treat.
- Serve alongside a platter of festive cookies for an inviting dessert table at holiday gatherings.
- Present them on a decorative cake stand, garnished with fresh mint leaves for a beautiful display.
- Consider offering flavored coffee or peppermint tea to complement the cupcakes’ festive taste.
FAQs about Candy Cane Peppermint Cupcakes
Can I make these Candy Cane Peppermint Cupcakes ahead of time?
Absolutely! You can bake the cupcakes up to a day in advance. Just store them in an airtight container. Frosting them the day of serving will ensure the frosting stays fluffy and fresh!
How should I store leftover cupcakes?
Leftover cupcakes can be stored in an airtight container at room temperature for up to three days. If you’re looking to extend their freshness, you can refrigerate them for up to a week. Just remember to bring them back to room temperature before serving!
Can I use regular sugar instead of confectioners’ sugar for the frosting?
While it’s best to use confectioners’ sugar for a smooth frosting, you can make a quick alternative by blending granulated sugar until it’s fine. This will mimic the texture but may not be as silky as regular frosting.
What if I don’t have peppermint extract?
No worries! If you’re out of peppermint extract, substitute it with an equal amount of vanilla extract for a different flavor. It won’t have the same minty kick, but it’ll still be delicious!
Can I freeze my Candy Cane Peppermint Cupcakes?
Yes! You can freeze the unfrosted cupcakes. Wrap each one in plastic wrap and store them in a freezer-safe bag for up to three months. When you’re ready to enjoy them, simply thaw at room temperature and frost when fully defrosted!
Final Thoughts on Candy Cane Peppermint Cupcakes
The holiday season is the perfect time to embrace joy and creativity in the kitchen, and these Candy Cane Peppermint Cupcakes are the ultimate expression of that spirit. Each bite transports you to a winter wonderland filled with warmth and cheer. The swirl of colors and the delightful peppermint taste make these cupcakes a festive centerpiece for any gathering. Plus, I love how they bring people together, sparking smiles and sweet memories. So, whether you’re hosting a holiday party or just enjoying family time, these cupcakes will surely light up the season!
Print
Candy Cane Peppermint Cupcakes
- Prep Time: 30 minutes
- Cook Time: 20 minutes
- Total Time: 50 minutes
- Yield: 18 cupcakes 1x
- Category: Dessert
- Method: Baking
- Cuisine: American
- Diet: Vegetarian
Description
Deliciously festive Candy Cane Peppermint Cupcakes perfect for holiday celebrations.
Ingredients
- 1 box (15.25 oz) white cake mix with required ingredients as per package
- Red gel food coloring as needed
- 12 oz unsalted butter, softened
- 1/2 teaspoon kosher salt
- 12 oz confectioners’ sugar
- 2 tablespoons heavy cream
- 1 teaspoon pure vanilla extract
- 1/2 teaspoon peppermint extract
- Mini candy canes or coarse white and red peppermint sugar for garnish
Instructions
- Position oven racks in the upper and lower thirds and preheat oven to 350°F. Line 18 cupcake cups across two 12-cup muffin tins with paper liners.
- Prepare cake mix according to package directions. Divide batter evenly; tint one half with red gel food coloring until desired shade is reached.
- Alternate spooning white and red batter into liners, filling each about halfway (approximately 3 tablespoons per liner).
- Bake for 18 to 20 minutes, rotating pans halfway through baking. Test doneness by inserting a toothpick; it should come out clean. Cool cupcakes completely before frosting.
- Beat softened butter and kosher salt with an electric mixer at medium speed until creamy, about 2 minutes. Gradually add confectioners’ sugar in two batches, mixing thoroughly after each addition.
- Add heavy cream, vanilla, and peppermint extracts; beat at medium-high speed for 2 minutes until light and fluffy.
- Using a small brush or skewer, paint two lines of red gel food coloring inside a piping bag fitted with a 1/2 inch round tip. Fill bag with frosting, pipe over cooled cupcakes, and garnish with mini candy canes or sprinkled peppermint sugar.
Notes
- Ensure the butter is softened for easy mixing.
- Adjust the quantity of red gel food coloring based on desired color intensity.
- Chill the cupcakes for a few minutes after baking for easier frosting.
Nutrition
- Serving Size: 1 cupcake
- Calories: 250
- Sugar: 22g
- Sodium: 200mg
- Fat: 12g
- Saturated Fat: 7g
- Unsaturated Fat: 4g
- Trans Fat: 0g
- Carbohydrates: 34g
- Fiber: 0g
- Protein: 2g
- Cholesterol: 30mg


