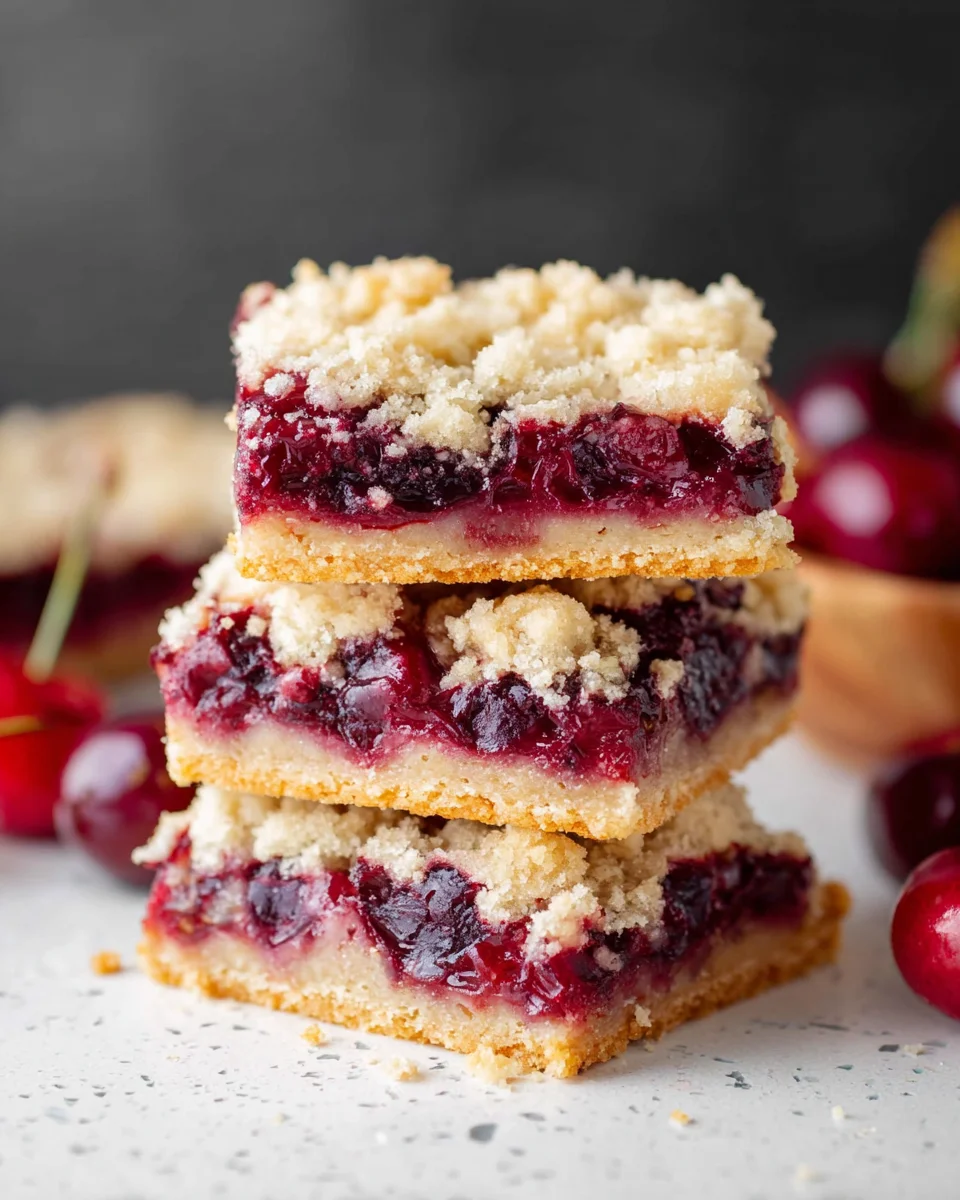
Introduction to Cherry Crumb Bars
There’s something undeniably comforting about the aroma of baked cherry crumb bars wafting through the kitchen. They remind me of summer gatherings, warm sunsets, and family laughter. These cherry crumb bars are more than just a treat; they’re a quick solution for busy days when you need a sweet pick-me-up or a delightful dessert to impress your loved ones. With a buttery shortbread base topped with luscious cherries, every bite is a little burst of joy. Trust me, this is the kind of recipe that brings a smile to everyone’s face!
Why You’ll Love This Cherry Crumb Bars
These cherry crumb bars are the ultimate crowd-pleaser! Not only are they easy to whip up, but they also bake in no time, making them perfect for busy moms and professionals like me. Their sweet and tart cherry filling sits atop a tender shortbread base, creating a delightful balance of flavors. Plus, whether you’re enjoying them on a cozy afternoon or at a gathering, these bars are sure to bring joy to any moment!
Ingredients for Cherry Crumb Bars
Gathering the right ingredients is the first step to creating your cherry crumb bars. They say great recipes start with quality ingredients, and in this case, it couldn’t be more true. Here’s what you’ll need:
- Cherries: Fresh, pitted cherries steal the spotlight here. They provide that juicy, tart sweetness we all crave. You can also use frozen cherries, just be sure to thaw and drain them well.
- Sugar: Regular granulated sugar sweetens the cherry layer. For those sour cherries, a bit more sugar will bring balance. You might also have a sweet tooth, so a sprinkle of brown sugar in the crumb topping adds a hint of caramel flavor.
- Cornstarch: This acts as a thickening agent for the cherry filling, giving it that perfect texture. It’s a pantry staple that really does wonders.
- Lemon juice: A splash of freshness! It brightens up the cherry filling and enhances those flavors beautifully.
- Unsalted butter: The essential fat for the shortbread base. It adds richness and ensures your bars are perfectly tender. If you’re in a pinch, you can substitute with coconut oil for a dairy-free alternative.
- All-purpose flour: This is the foundation of your shortbread and crumb topping, giving it structure. If you’re looking to make it gluten-free, a blend of almond flour and coconut flour can work, but adjust the ratios slightly.
- Salt: Just a touch helps enhance all the flavors in this buttery treat.
- Brown sugar: Adding a little brown sugar to the crumb topping gives it that lovely depth of flavor, complementing the cherries so well.
Don’t worry about keeping track of exact measurements, as they’re available at the bottom of this article for easy printing. Ready to dive into this sweet adventure? Let’s get cooking!

How to Make Cherry Crumb Bars
Now that you have all your ingredients ready, let’s dive into the magical world of baking these cherry crumb bars! I promise, the steps are simple, and I’m here to guide you every step of the way.
Step 1: Preheat and Prepare the Pan
First up, preheat your oven to 325°F (170°C). This might seem like a small step, but it sets the stage for perfectly baked bars. While the oven warms up, grab an 8×8 inch (20×20 cm) baking pan. Line it with parchment paper, allowing some overhang. This makes it easy to lift the bars out later. Trust me; you’ll thank yourself!
Step 2: Prepare the Cherry Filling
Next, let’s prepare that delicious cherry layer. In a medium bowl, toss together 2 cups of pitted and halved cherries with 1 tablespoon of sugar, 2 tablespoons of cornstarch, and a squeeze of lemon juice. This mixture will turn into a sweet and tart delight! Let it sit while you tackle the shortbread base.
Step 3: Make the Shortbread Base
Now it’s time to whip up the shortbread! In a large bowl, combine 1 3/4 cups of all-purpose flour, 2/3 cup of granulated sugar, 3 tablespoons of cornstarch, and 1/4 teaspoon of salt. Give it a good mix! Then, stir in 3/4 cup of melted unsalted butter until the mixture becomes crumbly. It should resemble wet sand—perfect for holding together our delicious bars!
Step 4: Create the Base Layer
With your shortbread mixture ready, take a little more than half and press it firmly into the prepared pan. Make sure it’s even across the bottom. Bake it in your preheated oven for about 15-20 minutes, or until the top looks set. This step is crucial as it creates a wonderful base for our cherries!
Step 5: Add the Cherry Layer
Once the shortbread base is out of the oven, carefully spoon your cherry mixture on top. Spread it evenly over the warm shortbread! The combination of warm cherries and butteriness is just heavenly. Don’t skip this step; it’s where the magic happens!
Step 6: Finish with Crumb Topping
Now, take the remaining shortbread mixture and add 1 tablespoon of brown sugar. Crumble this delicious topping over the cherry layer; it should look rustic and inviting. Pop it back into the oven and bake for about 25 minutes, until the top is golden. Your kitchen is about to smell fantastic!
Step 7: Cooling and Slicing
Finally, here comes the hardest part—waiting! Allow the cherry crumb bars to cool completely for about 3-4 hours. Patience is key. Once they’re cool, use a sharp knife to slice them into squares, making sure to cut all the way through the base. There you have it! Perfectly baked cherry crumb bars ready to be devoured.
Tips for Success
- Always use fresh, ripe cherries for the best flavor; they make a noticeable difference!
- For a thicker layer of cherry, you can double the amount of cherries in the filling.
- Don’t rush the cooling process; it helps the bars set nicely, ensuring cleaner slices.
- If you’ve got picky eaters, feel free to swap cherries with blueberries or apples!
- Store leftover bars in an airtight container to keep them fresh for days.
Equipment Needed
- 8×8 inch baking pan: Alternatively, an 9×9 inch pan works, but adjust baking time slightly.
- Parchment paper: This helps with easy removal. Wax paper can be a substitute in a pinch.
- Medium & large mixing bowls: Any size will do, just have enough room for mixing!
- Whisk or spatula: Use either to combine ingredients; both are efficient for mixing.
- Sharp knife: Vital for slicing your finished bars neatly!
Variations of Cherry Crumb Bars
- Sour Cherry Variation: Switch to sour cherries for a more tart flavor. Adjust the sugar to your preference for a delicious twist!
- Gluten-Free Option: Use a gluten-free flour blend instead of all-purpose flour. Almond or oat flour can also create a delightful texture.
- Vegan-Friendly: Replace the butter with coconut oil or plant-based butter, and use a flaxseed egg for binding.
- Nutty Addition: Stir in chopped nuts like almonds or walnuts into the crumb topping for added crunch and flavor.
- Spiced Up: Incorporate cinnamon or nutmeg into the shortbread base for a cozy spice that complements the cherries beautifully.
Serving Suggestions for Cherry Crumb Bars
- Ice Cream: Serve warm cherry crumb bars with a scoop of vanilla or almond ice cream for a delightful contrast.
- Whipped Cream: Top each bar with a dollop of freshly whipped cream for added richness.
- Tea or Coffee: Pair with a cup of herbal tea or freshly brewed coffee for a cozy afternoon treat.
- Festive Presentation: Dust with powdered sugar before serving for a beautiful finishing touch!
FAQs about Cherry Crumb Bars
As with any delightful recipe, questions often arise! Here are a few frequently asked questions about cherry crumb bars that I’m excited to share answers to:
Can I use frozen cherries for this recipe?
Absolutely! Frozen cherries work well, just make sure to thaw and drain them thoroughly before using. This prevents excess moisture in your cherry filling.
How do I store leftover cherry crumb bars?
Store your cherry crumb bars in an airtight container at room temperature for up to three days. If you want to keep them longer, refrigerate for about a week!
Can I make the cherry crumb bars ahead of time?
You sure can! These bars hold up wonderfully, so you can prepare them a day or two in advance. Just allow them to cool completely before storing.
What can I substitute for butter in the crust?
If you’re looking for a non-dairy option, coconut oil is a great substitute for butter in the crust. It adds a subtle coconut flavor that pairs beautifully with cherries.
Can I customize the fruit in these bars?
Definitely! Feel free to experiment with other fruits like blueberries, raspberries, or peaches. Just remember to adjust the sugar based on the sweetness or tartness of the fruit you choose.
Final Thoughts
As you take that first bite of your homemade cherry crumb bars, I hope you feel a rush of joy, conjuring cherished memories of family gatherings and sunny afternoons. There’s just something about the perfect blend of buttery shortbread and sweet cherries that warms the heart. This recipe isn’t just about baking; it’s about creating moments that you can share with loved ones. Whether you enjoy them at a backyard barbecue or as an afternoon snack, these bars are bound to create smiles and inspire new traditions. Here’s to delightful baking adventures and sweet surprises!
Print
Cherry Crumb Bars
- Prep Time: 20 minutes
- Cook Time: 45 minutes
- Total Time: 4 hours 5 minutes
- Yield: 16 bars 1x
- Category: Dessert
- Method: Baking
- Cuisine: American
- Diet: Vegetarian
Description
Delicious cherry crumb bars with a sweet shortbread base, perfect for dessert or a sweet snack.
Ingredients
- Cherry Layer
- 2 cups pitted cherries
- 1 tablespoon granulated sugar (3 tablespoons for sour cherries)
- 2 tablespoons cornstarch
- 1 tablespoon lemon juice
- Shortbread Base & Crumb Topping
- 3/4 cup unsalted butter, melted
- 1 3/4 cup all-purpose flour
- 2/3 cup granulated sugar
- 3 tablespoons cornstarch
- 1/4 teaspoon salt
- 1 tablespoon brown sugar
Instructions
- Preheat the oven to 325F (170C).
- Line an 8×8 inch (20×20 cm) pan with parchment paper, leaving an overhang around the edges.
- Ensure your cherries are pitted and slice each cherry in half or quarters.
- In a medium bowl, toss together the cherry filling ingredients: cherries, 1 tablespoon sugar, 2 tablespoons cornstarch, and fresh lemon juice. Set aside.
- In a separate large bowl, whisk together the dry ingredients for the shortbread layer: 1 3/4 cups all-purpose flour, 2/3 cup granulated sugar, 3 tablespoons cornstarch, and 1/4 teaspoon salt.
- Stir/whisk the melted butter into the flour mixture until crumbly.
- Press a little more than half of the shortbread layer into the prepared pan.
- Bake in the preheated oven for 15-20 minutes, or until the top looks set. Remove from the oven, but leave the oven turned on.
- Add the reserved shortbread mixture, stir in 1 tablespoon of brown sugar.
- Carefully spoon the cherry mixture on top of the baked shortbread base.
- Crumble the remaining shortbread/crumb mixture over the cherry layer.
- Bake for about 25 minutes or until the top looks baked and slightly golden yellow.
- Cool the bars completely (3-4 hours).
- Slice using a sharp knife, ensuring to cut all the way through the shortbread base.
Notes
- Using a cherry pitter makes pitting cherries easier.
- For a more tart flavor, use sour cherries and increase sugar accordingly.
- Let the bars cool completely for better slicing.
Nutrition
- Serving Size: 1 bar
- Calories: 180
- Sugar: 14g
- Sodium: 60mg
- Fat: 8g
- Saturated Fat: 5g
- Unsaturated Fat: 2g
- Trans Fat: 0g
- Carbohydrates: 24g
- Fiber: 1g
- Protein: 2g
- Cholesterol: 30mg


