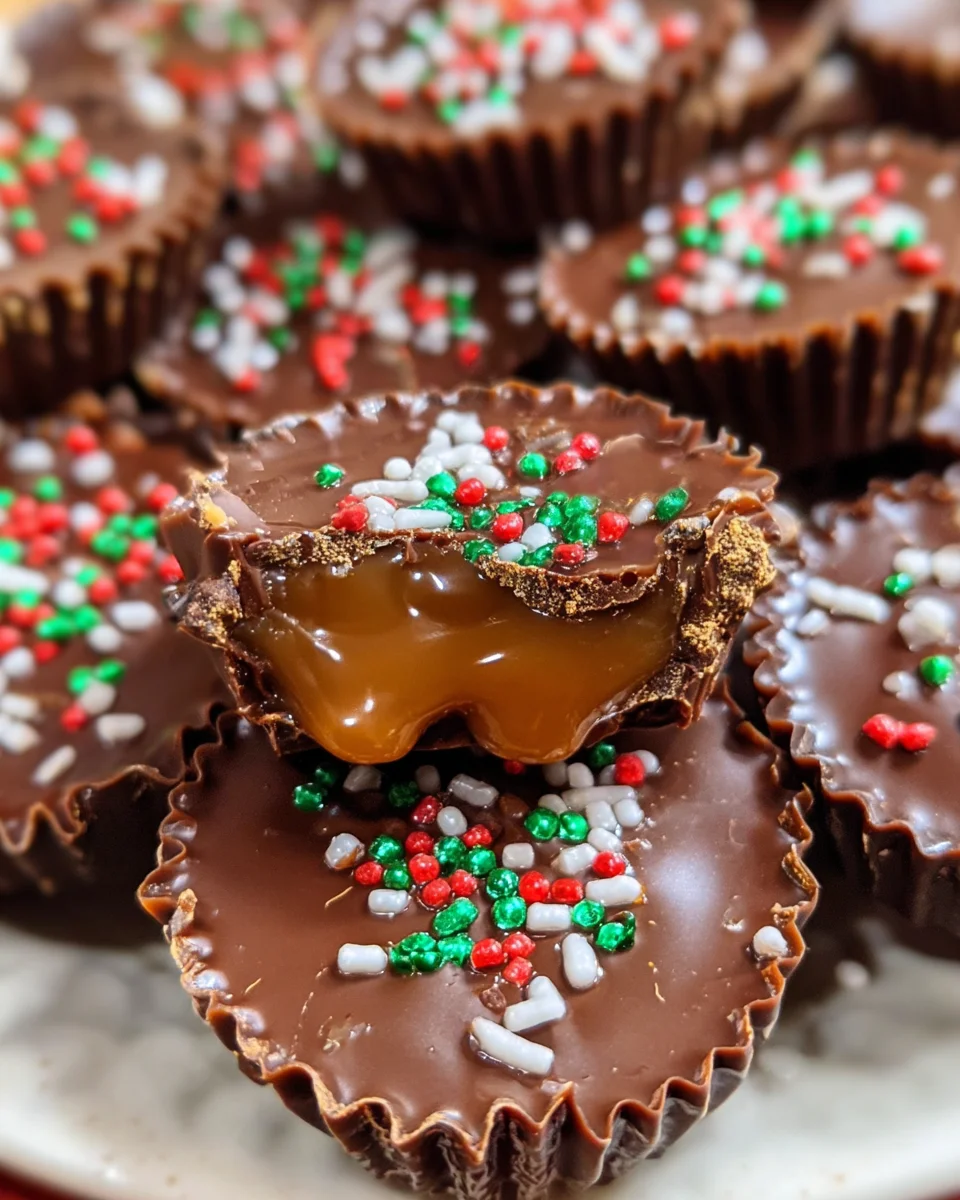
Introduction to Christmas Chocolate Caramel Cups
Ah, the holidays! A time filled with laughter, lights, and an overwhelming abundance of delectable treats. This year, I’m thrilled to share a festive delight that promises to bring joy to your holiday gatherings: Christmas Chocolate Caramel Cups! They’re like little bites of happiness, perfect for busy moms and professionals looking to add a sweet touch to the celebrations. These charming cups fill your kitchen with a warm, inviting aroma while being simple enough to whip up, even on the busiest days. Let’s dive in and discover how these delightful treats can brighten your festive season!
Why You’ll Love This Christmas Chocolate Caramel Cups
These Christmas Chocolate Caramel Cups are the perfect blend of indulgence and convenience. You’ll love how easy they are to make, especially when you’re juggling holiday tasks. Plus, each bite offers a delightful mix of rich chocolate and gooey caramel that simply melts in your mouth. They’re a fabulous treat for gatherings, ensuring smiles all around without spending hours in the kitchen. What’s not to love?
Ingredients for Christmas Chocolate Caramel Cups
Gathering the right ingredients is half the fun! For your Christmas Chocolate Caramel Cups, you’ll need:
- Sugar: This sweetener is vital for creating that luscious caramel that fills each cup.
- Heavy Cream: Adds richness and a silky texture to the caramel, making it divine.
- Chocolate Almond Bark: This candy coating brings a delicious chocolatey taste and is easy to melt, perfect for making the cups.
- Holiday Sprinkles: These colorful additions not only make your treats festive but also add a whimsical charm!
Feel free to get creative! You can swap the chocolate almond bark for dark chocolate or a dairy-free alternative if you prefer. I often enjoy adding a pinch of sea salt atop the caramel before sealing; it truly elevates the flavor. If you’re feeling adventurous, consider personalized sprinkles for different occasions. Exact measurements can be found at the bottom of this article for easy printing.

How to Make Christmas Chocolate Caramel Cups
Now comes the fun part: making these Christmas Chocolate Caramel Cups! Follow these simple steps, and you’ll be rewarded with mouthwatering treats that are perfect for any holiday gathering. Take your time, and enjoy the process — the sweet rewards are totally worth it!
Prepare Your Cupcake Liners
Set up the Tin
Start by placing 36 mini cupcake liners in a mini cupcake tin. This step sets the stage for your delightful creations. Make sure they’re well spaced to allow for a smooth pouring of chocolate and easy removal later!
Melt the Chocolate
Using the Microwave Method
Next, it’s time to melt half of your chocolate almond bark. Break it into smaller pieces and place it in a microwave-safe bowl. Microwave in 30-second increments, stirring between each session. This technique prevents burning and ensures a smooth consistency. Once it’s silky and fully melted, you’re ready for the next step!
Create the Chocolate Cups
Spoon and Coat the Liners
Using a small spoon or a pastry brush, scoop the melted chocolate into each cupcake liner. Spread the chocolate up the sides, creating a nice coating. Aim for a thick enough layer to hold the caramel without leaking. Setting the stage for a rich treat is essential! Let these cute little cups harden for about 10-15 minutes at room temperature.
Make the Caramel
Cooking Sugar to Amber
While the chocolate sets, let’s work on the caramel. In a heavy-bottom pot, melt your sugar over medium heat. Stir occasionally until it turns a lovely amber color. Be patient; it’s like watching a sunset unfold! Once achieved, remove from the heat and carefully whisk in the heavy cream. Stand clear of the steam—it can be intense! This magical mixture creates the rich caramel flavor you adore!
Fill the Chocolate Cups
Thicken and Spoon in Caramel
Transfer your freshly made caramel to a bowl and refrigerate it for about 30 minutes until it thickens. When ready, carefully spoon the caramel into your chocolate cups, filling them almost to the top. The gooey goodness is simply irresistible!
Seal the Cups
Using Remaining Chocolate
Now, melt the remaining chocolate almond bark just like before. Once melted, spoon it over the caramel layer to seal each cup. Smooth it out with your spoon or brush, ensuring no caramel is exposed. We want these to be delightful surprises!
Add the Final Touches
Sprinkles and Refrigeration
Before the chocolate sets completely, add some holiday sprinkles on top for a festive flair. After decorating, refrigerate your caramel cups for at least one hour. This will help them set completely, making them perfect for your holiday festivities!
Tips for Success
- Ensure your chocolate coats the sides of the cupcake liners well; it makes popping them out easier.
- Use a candy thermometer when making caramel for precision. Aim for a temperature of 350°F for the perfect amber hue.
- If the caramel is too runny, let it cool longer in the fridge before filling the cups.
- Don’t rush the cooling process; it’s vital for those beautiful layers!
Equipment Needed
- Mini Cupcake Tin: Essential for holding your liners; a regular cupcake tin can work, but cups will be larger.
- Microwave-Safe Bowl: Perfect for melting chocolate; you could also use a double boiler if preferred.
- Small Spoon or Pastry Brush: For coating the liners; a kitchen spatula can substitute if needed.
- Heavy-Bottom Pot: Crucial for making caramel; a non-stick pan works well too!
Variations for Christmas Chocolate Caramel Cups
- Dark Chocolate Cups: Swap the chocolate almond bark for dark chocolate for a richer, more intense flavor.
- Nutty Delight: Add crushed nuts like pecans or walnuts to the caramel for a crunchy texture contrast.
- Minty Fresh: Incorporate a few drops of peppermint extract into the chocolate for a festive minty twist.
- Seasonal Flavors: Experiment by adding spices like cinnamon or nutmeg to the caramel for a cozy holiday vibe.
- Vegan Adaptation: Use coconut cream instead of heavy cream and dairy-free chocolate for a vegan version.
Serving Suggestions for Christmas Chocolate Caramel Cups
- Pair with a warm cup of spiced cider for a cozy treat during holiday gatherings.
- Presentation matters! Place the cups on a festive platter with colorful holiday decor.
- Serve alongside peppermint bark for a delightful dessert spread.
- Consider a drizzle of chocolate sauce for an extra indulgent twist.
- Combine with fresh fruit like strawberries to balance the sweetness!
FAQs about Christmas Chocolate Caramel Cups
As I’ve made these delectable Christmas Chocolate Caramel Cups over the years, I’ve gathered a few common questions from fellow home cooks. Let’s explore those!
Can I use different types of chocolate for these cups?
Absolutely! While I love using chocolate almond bark for its ease, feel free to experiment with milk, dark, or even white chocolate. Each will impart its unique flavor and charm to your Christmas Chocolate Caramel Cups.
How do I know when the caramel is ready?
The caramel should reach an amber color, which typically occurs at around 350°F. If you don’t have a thermometer, keep a close eye on the sugar as it melts. Once it transforms into a golden hue—you’ve got caramel perfection!
Can I make these cups ahead of time?
You bet! These treats keep beautifully in the fridge for several days. I often whip up a batch a week in advance. Just store them in an airtight container, and they’ll be ready for your holiday gatherings!
What if my caramel turns out too hard?
If your caramel gets too hard, don’t fret. It’s common to overcook it. You can break it into shards and use it as a topping! For future batches, reduce your cooking time for a softer result.
Can I add fillings inside the caramel cups?
Absolutely! Adding a layer of whipped cream, crushed cookies, or even fruit preserves can bring an exciting twist to your Christmas Chocolate Caramel Cups. Feel free to get creative!
Final Thoughts
Indulging in Christmas Chocolate Caramel Cups is more than just treating your taste buds; it’s about creating cherished memories during the festive season. Each bite is a delightful experience filled with the rich flavor of chocolate and the creamy goodness of caramel, igniting the holiday spirit. As you share these sweet delights with family and friends, you’ll fill your home with warmth and laughter. So, gather your loved ones around, savor the sweet moments, and treasure the joy that comes from homemade treats. After all, nothing brings people together quite like delicious desserts during the holidays!
Print
Christmas Chocolate Caramel Cups
- Prep Time: 15 minutes
- Cook Time: 30 minutes
- Total Time: 1 hour 45 minutes
- Yield: 36 chocolate caramel cups 1x
- Category: Dessert
- Method: Baking
- Cuisine: American
- Diet: Vegetarian
Description
Delightful chocolate cups filled with rich caramel, perfect for Christmas festivities!
Ingredients
- 1 cup sugar
- ⅔ cup heavy cream
- 1 pound chocolate almond bark
- Holiday sprinkles
Instructions
- Place 36 mini cupcake liners in a mini cupcake tin.
- Melt half of the chocolate almond bark in 30-second intervals until smooth.
- Spoon a little chocolate into each liner and spread it up the sides with a small spoon or brush.
- Let the chocolate cups harden.
- In a heavy-bottom pot, melt the sugar over medium heat until amber in color.
- Remove from heat and slowly whisk in the heavy cream to make caramel.
- Transfer caramel to a bowl and refrigerate for 30 minutes to thicken.
- Spoon thickened caramel into the chocolate cups, almost to the top.
- Melt the remaining almond bark and spread it over the caramel to seal.
- Add holiday sprinkles on top.
- Refrigerate for 1 hour until fully set.
Notes
- For extra flavor, consider adding a pinch of sea salt on top of the caramel before sealing.
- Ensure the chocolate coats the sides of the liners well for easier removal.
- Can be personalized with different types of sprinkles for different holidays.
Nutrition
- Serving Size: 1 cup
- Calories: 150
- Sugar: 20g
- Sodium: 15mg
- Fat: 7g
- Saturated Fat: 4g
- Unsaturated Fat: 2g
- Trans Fat: 0g
- Carbohydrates: 22g
- Fiber: 1g
- Protein: 1g
- Cholesterol: 5mg


