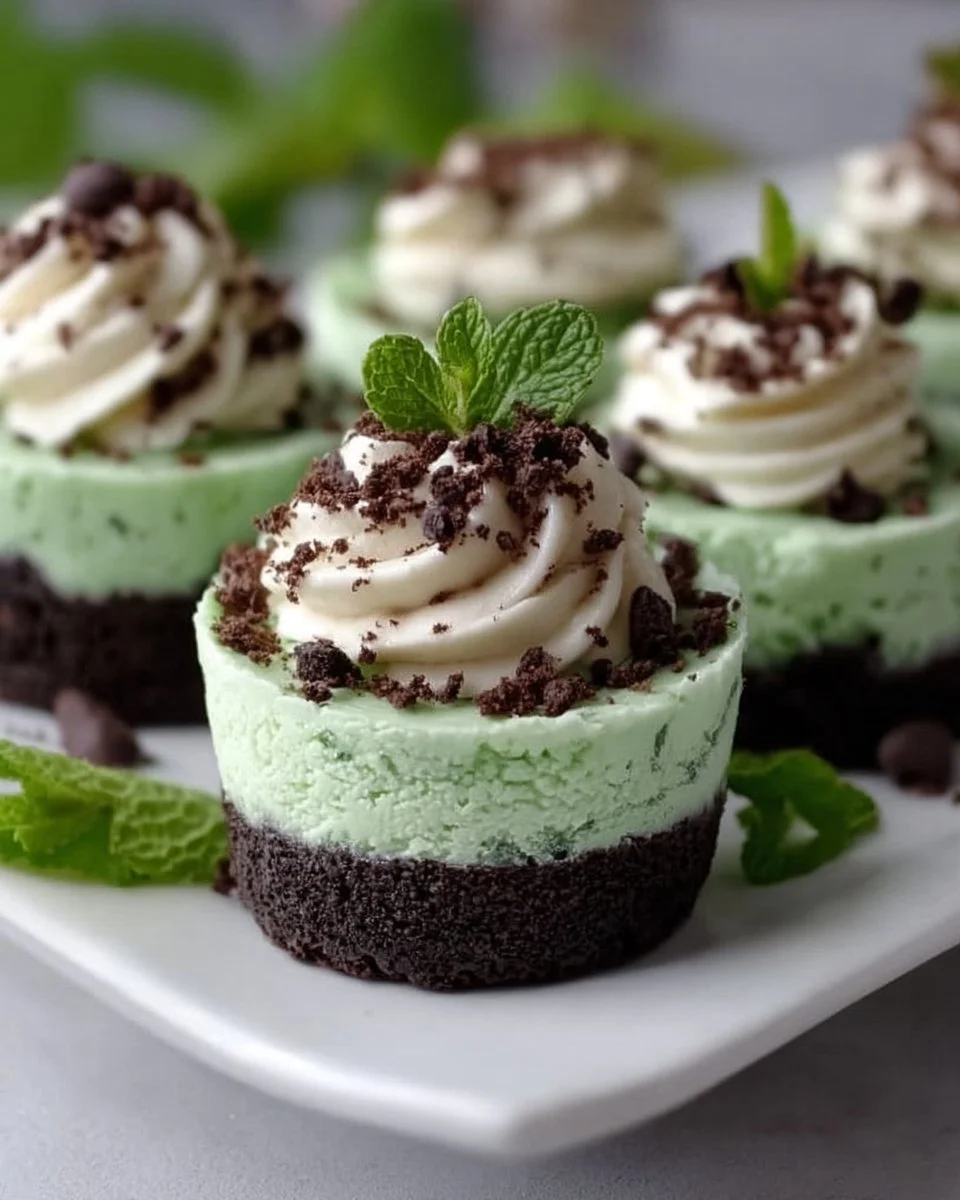
The first bite of these minty cheesecake cups surprises you — cool, silky cheesecake melts against a crisp Oreo crunch, and a bright peppermint whisper wakes up your palate. Each spoonful balances creamy richness and an uplifting green tint that feels as festive as a parade; the mini chocolate chips add playful pops of bittersweet delight. You will smile before you swallow.
These cups feel fancy but behave like a weeknight miracle: no baking, almost no fuss, and they set up in the fridge while you tidy the kitchen. If you love the texture of classic cheesecake but crave an individual, grab-and-go format, these St Paddy’s Mint Cheesecake Cups deliver. For another crowd-pleasing, make-ahead dessert idea, I often pair them with the flavor profile from my best cheesecake bars ever recipe when planning a dessert table.
Why You’ll Love This Deliciously Simple St Paddy’s Mint Cheesecake Cups
You will love these cheesecake cups because they fuse two beloved dessert worlds: the velvety tang of cheesecake and the nostalgic crunch of an Oreo crust. The peppermint extract wakes the palate without overwhelming it; it acts like a breath of cool air that brightens each bite. They look adorable in mini cups, so they elevate any celebration from casual to charming in minutes.
They stand out because they require no water bath, no oven timing, and no gelatin. That simplicity makes them perfect for last-minute guests, potlucks, or a festive St. Patrick’s Day dessert line-up. Also, you can dial the mint intensity up or down, add color for fun, or sneak in chocolate chips for texture — small changes produce big personality shifts.
Preparation Phase & Tools to Use
A few well-chosen tools make this recipe smooth and fast:
- Food processor or a sturdy zip-top bag and rolling pin: Use a food processor to blitz Oreos into fine crumbs quickly; if you don’t have one, crush cookies in a bag with a rolling pin until evenly ground.
- Mixing bowls: Use one medium bowl for crust and a larger bowl for the filling to ensure ample room for whipping and folding.
- Electric hand mixer or stand mixer: Beat the cream cheese until ultra-smooth and whip the heavy cream to soft peaks. These tasks become frustrating with a whisk alone.
- Muffin tin and paper liners, or 4–6 ounce plastic or glass serving cups: Muffin liners help form tidy little crusts; clear cups show off the layers beautifully.
- Rubber spatula and small cookie scoop or piping bag: A spatula prevents waste, and a scoop or piping bag gives neat, consistent portions.
Practical preparation tips:
- Soften the cream cheese to room temperature before starting; it blends silky and smooth that way.
- Chill your mixing bowl and beaters briefly in the fridge before whipping cream for faster, more stable peaks.
- Prepare the crust and press it firmly into liners; a flat-bottomed measuring spoon or small glass gives you even, compact bases.
Ingredients for Deliciously Simple St Paddy’s Mint Cheesecake Cups
- 20 cookies Oreo Cookies (crushed)
- 4 tablespoons Butter (melted)
- 8 ounces Cream Cheese (softened)
- 1 cup Powdered Sugar (adjust based on taste)
- 1 cup Heavy Cream (whipped)
- 1 teaspoon Peppermint Extract (adjust quantity to preference)
- 1 teaspoon Vanilla Extract (or almond extract)
- few drops Green Food Coloring (optional)
- 1 cup Mini Chocolate Chips (optional)
Key ingredient notes and substitutions:
- Oreo Cookies: Use classic Oreos for that chocolate-cocoa backbone. For gluten-free cups, use gluten-free chocolate sandwich cookies.
- Butter: Melted butter binds the crumbs. For a dairy-free option, use melted coconut oil, but the flavor will shift slightly.
- Cream cheese: Full-fat gives the best texture and flavor. Low-fat versions may create a thinner mouthfeel.
- Powdered sugar: Adjust based on how sweet you like mint. For less processed sweetness, substitute with sifted powdered coconut sugar and taste as you go.
- Heavy cream: Whips to light peaks and folds in for that cloudlike texture. For a lighter filling, use stabilized whipped cream (add a little gelatin) if serving in warm climates.
- Peppermint extract: Start with 1 teaspoon; if you prefer a delicate hint, reduce to 1/2 teaspoon. Peppermint can quickly dominate.
- Green food coloring: Totally optional — a few drops create a festive look without affecting flavor.
- Mini chocolate chips: They add a crunchy, chocolate contrast. Chop regular chips if you only have those.
How to Make Deliciously Simple St Paddy’s Mint Cheesecake Cups
Prepare the Cheesecake Cups
-
Crush the Oreos: Pulse the 20 Oreo cookies in a food processor until fine crumbs form. If using a bag and rolling pin, crush consistently until no large chunks remain. Tip: Keep a few cookie pieces if you like extra texture in the crust.
-
Make the crust: Pour the crumbs into a bowl and stir in 4 tablespoons melted butter until everything resembles wet sand and holds together when pressed. Divide the mixture among 12 muffin liners or 8–10 small cups and press firmly into an even layer using the bottom of a measuring spoon or a small glass. Tip: Pressing firmly prevents a crumbly crust when you scoop the cups.
-
Chill the crusts: Place the crust-lined muffin tin or cups in the refrigerator for at least 10 minutes to help them firm up while you make the filling. This step improves texture.
-
Beat the cream cheese: In a large mixing bowl, beat 8 ounces of softened cream cheese with 1 cup powdered sugar until completely smooth and free of lumps. Scrape the bowl often to ensure even mixing. Tip: If the cream cheese has any lumps, heat it on very low in short bursts—then cool slightly—before beating.
-
Flavor the filling: Add 1 teaspoon peppermint extract and 1 teaspoon vanilla extract to the cream cheese mixture. Add a few drops of green food coloring if using and beat until the color distributes evenly. Taste and adjust the peppermint: add a little more if you want a brighter mint note, but proceed cautiously.
-
Whip the cream: In a separate chilled bowl, whip 1 cup heavy cream to soft peaks using an electric mixer. It should form peaks that gently hold their shape but still fold in easily.
-
Fold to combine: Gently fold the whipped cream into the cream cheese mixture in two additions. Use a spatula to fold, preserving the airy texture. If using mini chocolate chips, gently fold in about 1 cup now for little chocolate pockets in the filling. Tip: Overfolding breaks down the whipped cream and ruins the light texture—fold just until streaks disappear.
-
Assemble the cups: Spoon or pipe the mint cheesecake filling into each chilled crust, filling to the top and smoothing the surface. Add a sprinkle of extra crushed Oreos, a few extra mini chips, or a small piece of mint as garnish.
-
Chill to set: Refrigerate the assembled cups for at least 2 hours to firm up. For best texture, chill 4 hours or overnight. Serve chilled. Tip: If you’re in a hurry, pop the cups into the freezer for 30–45 minutes—watch closely so they don’t freeze solid.
Chef’s Notes & Helpful Tips
Make-ahead tips:
- Assemble fully and refrigerate up to 48 hours ahead for parties. Keep them covered with plastic wrap or a tight lid to prevent absorption of fridge odors.
- Freeze completed cups for up to 1 month. Thaw in the refrigerator for 2–3 hours before serving.
Cooking alternatives:
- Oven: You don’t need an oven for this no-bake recipe. If you prefer a firmer crust, bake crusts in a preheated 350°F (175°C) oven for 4–6 minutes before filling. Let cool completely.
- Air fryer: An air fryer can gently toast the crust if you press crumbs into silicone molds and air-fry at 300°F for 3–4 minutes; allow to cool before filling. Avoid using the air fryer for the filling.
- For a totally cooked cheesecake experience, transfer filling to a springform pan and bake as a classic cheesecake, then top with chopped mint candies.
Customization ideas:
- Swap peppermint for 1 teaspoon of orange extract and omit green coloring for a chocolate-orange twist.
- Stir 2 tablespoons of crushed Andes mints into the filling for a luxurious, thin-mint effect.
- Make layers: Add a thin layer of chocolate ganache between crust and filling for a richer bite.
- Turn them seasonal: Use red or pastel coloring and change extract to almond for other holidays.
Common Mistakes to Avoid
- Using cold cream cheese: Cold cream cheese lumps and creates an uneven texture. Always soften to room temperature.
- Overwhipping the cream: Whipping the heavy cream to stiff peaks makes folding difficult and can yield a grainy filling. Aim for soft peaks.
- Adding too much peppermint: Peppermint extract packs a punch. Add gradually and taste; the chill of the fridge often tames intensity.
- Pressing the crust too lightly: A loosely pressed crust crumbles when served. Press firmly and chill before filling.
- Skipping the chilling time: Serving too soon gives you a loose, unstructured filling. Plan for at least 2 hours of chilling.
What to Serve With Deliciously Simple St Paddy’s Mint Cheesecake Cups
- Fresh berries (strawberries, raspberries): Their bright acidity cuts the richness and adds color contrast.
- Espresso or strong coffee: Bitterness of coffee balances the sweetness and enhances chocolate notes.
- Irish cream liqueur or a drizzle of Bailey’s over coffee: Pairing flavors tie beautifully into a St. Patrick’s Day theme.
- Mint tea or peppermint tea: A warm mint beverage echoes the dessert’s flavor without adding sugar.
- Shortbread cookies: Add buttery crunch that complements the Oreo base.
- Vanilla ice cream: A scoop on the side transforms this into a decadent duo.
- Chocolate-dipped strawberries: They match the chocolate chips and add romance to the presentation.
- Sparkling cider or prosecco: Bubbles cleanse the palate between creamy bites.
Storage & Reheating Instructions
Fridge:
- Store assembled cups in an airtight container or covered tray in the refrigerator for up to 48 hours. Keep lids snug to avoid absorbing other flavors.
Freezer:
- Freeze individual cups on a baking sheet until solid, then transfer to a freezer-safe container for up to 1 month. Place parchment between layers to prevent sticking.
Thawing/reheating:
- Thaw frozen cups overnight in the refrigerator. Don’t warm these in the microwave; they will lose the creamy texture. Serve chilled for best mouthfeel.
Estimated Nutrition Information
Approximate per cheesecake cup (makes ~12 cups):
- Calories: 300–350 kcal
- Total fat: 22–26 g
- Saturated fat: 12–15 g
- Carbohydrates: 26–32 g
- Sugars: 20–24 g
- Protein: 3–5 g
These values are estimates based on typical ingredients and serving sizes. Nutritional content will vary with brand choices and portion size.
FAQs
Q: Can I make these dairy-free or vegan?
A: Yes. Use dairy-free cream cheese (made from cashews or soy) and coconut cream whipped to soft peaks. Swap butter for melted coconut oil and choose dairy-free sandwich cookies. Texture shifts slightly — expect a silkier, less tangy profile — but flavor remains irresistible.
Q: How can I stabilize the whipped cream so the filling holds up for longer events?
A: To stabilize, sprinkle 1 teaspoon of powdered gelatin over 2 tablespoons cold water, let bloom for 2 minutes, warm gently until dissolved, then let cool slightly and add to the whipped cream as you whip. Alternatively, fold in 2 tablespoons of mascarpone or 2 tablespoons of instant vanilla pudding mix into the cream cheese mixture for structure.
Q: My filling turned out grainy. What went wrong?
A: Graininess often comes from partially melted or overworked cream cheese, or from overmixing after adding cold ingredients. Always fully soften cream cheese, beat until smooth before adding other ingredients, and fold in the whipped cream gently.
Q: Can I use a different cookie for the crust?
A: Absolutely. Chocolate wafers or chocolate graham crackers work well. Ginger snaps create a spicier contrast, while shortbread gives a buttery backdrop. Adjust sugar in the filling if you choose a very sweet or very spicy cookie.
Q: How do I keep the cups from sweating when serving at a party?
A: Keep them chilled until the last possible moment and serve them on a cold tray. If they sit at room temperature for longer than 30–45 minutes, they may start to soften and release moisture. For outdoor parties on warm days, serve them from a cooler or keep them on ice.
Q: Can I make these in larger portions, like a 9-inch pan?
A: Yes. Multiply quantities accordingly and press the crust into the pan. Spread the filling evenly and chill for several hours. You may need a slightly longer setting time for thicker cheesecakes.
Conclusion
These Deliciously Simple St Paddy’s Mint Cheesecake Cups offer bright mint, silky cheesecake, and satisfying crunch in one playful bite — an ideal treat to celebrate, share, or savor alone. They come together quickly, hold their shape beautifully, and let you tailor sweetness and mint to your taste. If you’re planning a festive dessert table, you might also enjoy this roundup of 30 Delicious St. Patrick’s Day Desserts You NEED to Make for more seasonal inspiration. Give these cups a try and watch how fast they disappear.
Print
Deliciously Simple St Paddy’s Mint Cheesecake Cups
- Prep Time: 15 minutes
- Cook Time: 0 minutes
- Total Time: 120 minutes
- Yield: 12 servings 1x
- Category: Dessert
- Method: No-Bake
- Cuisine: American
- Diet: Vegetarian
Description
These minty cheesecake cups surprise with a crisp Oreo crust and a creamy filling, perfect for festive occasions without any baking hassle.
Ingredients
- 20 cookies Oreo Cookies (crushed)
- 4 tablespoons Butter (melted)
- 8 ounces Cream Cheese (softened)
- 1 cup Powdered Sugar (adjust based on taste)
- 1 cup Heavy Cream (whipped)
- 1 teaspoon Peppermint Extract (adjust quantity to preference)
- 1 teaspoon Vanilla Extract (or almond extract)
- few drops Green Food Coloring (optional)
- 1 cup Mini Chocolate Chips (optional)
Instructions
- Crush the Oreo cookies in a food processor until fine crumbs form.
- Make the crust by mixing the crumbs with melted butter until it resembles wet sand, then press into muffin liners or cups.
- Chill the crusts in the refrigerator for at least 10 minutes.
- Beat the softened cream cheese with powdered sugar until smooth.
- Add peppermint and vanilla extracts to the cream cheese mixture and mix until evenly colored.
- Whip heavy cream to soft peaks in a separate bowl.
- Fold the whipped cream into the cream cheese mixture until combined.
- Spoon the filling into the chilled crusts, smoothing the tops.
- Chill the assembled cups for at least 2 hours to set.
Notes
For best texture, chill for 4 hours or overnight. Customize mint intensity and use alternative flavor extracts for variations.
Nutrition
- Serving Size: 1 cup
- Calories: 325
- Sugar: 22g
- Sodium: 200mg
- Fat: 24g
- Saturated Fat: 14g
- Unsaturated Fat: 10g
- Trans Fat: 0g
- Carbohydrates: 30g
- Fiber: 1g
- Protein: 4g
- Cholesterol: 35mg