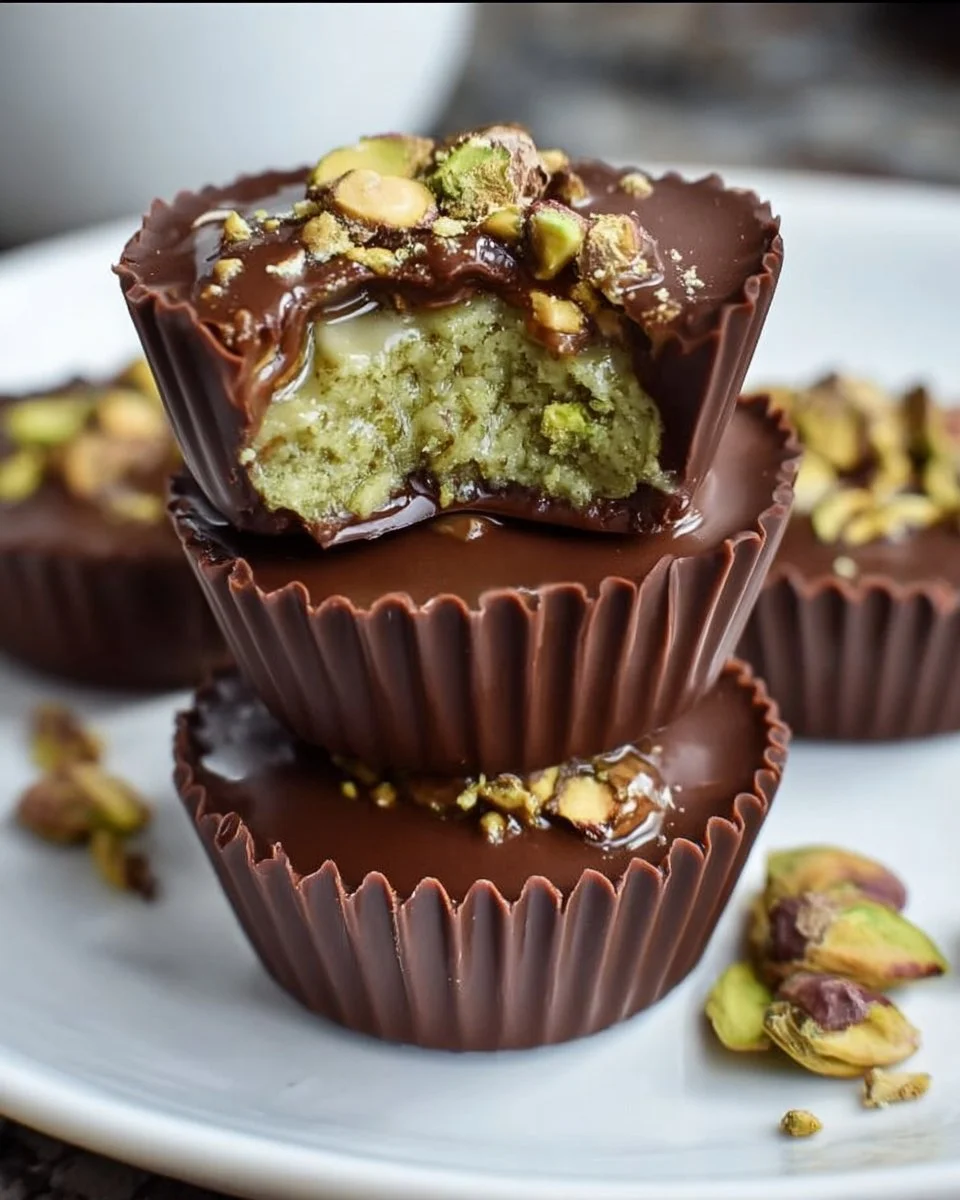
As you step into your kitchen, a wave of anticipation washes over you. The air fills with the sweet scent of melting chocolate, teasingly promising the indulgence that awaits. You can already imagine the delightful crunch of the chocolate shell giving way to a creamy, luscious filling harmonized with crunchy pistachios, a flavor explosion that transports you to the vibrant streets of Dubai. Each bite of the DIY Dubai Chocolate Cups takes you on a luxurious journey, celebrating rich traditions and modern indulgences.
The luxuriousness of these chocolate cups rests not only in their enchanting taste but also in their stunning appearance. Elegant and inviting, each cup showcases a glistening, dark façade that gleams under the kitchen lights. The brilliant green of the crushed pistachios peeks through the center, hinting at the gourmet experience captured within. Perfect for any occasion—whether a sophisticated dinner party, a cozy family gathering, or a sweet surprise gift—these delightful treats are sure to impress.
Why You’ll Love This DIY Dubai Chocolate Cups
These DIY Dubai Chocolate Cups aren’t just a treat; they evoke a sense of joy and celebration with every bite. Imagine enjoying a rich, velvety chocolate cup that encapsulates both the smoothness of cream and the crunchiness of pistachios. This elegant dessert becomes a luxurious end to a meal or a mid-afternoon pick-me-up. The combination of dark and milk chocolate complements the nutty flavor of pistachios, creating a unique tapestry of taste and texture that stands out among typical dessert options.
Not only are these cups a delight to the palate, but they also beckon creativity; you can easily adapt them with your favorite fillings or mix-ins, making them as unique as you are. The versatility of this recipe allows you to switch up flavors for any occasion, ensuring you and your guests experience something special every time. Plus, their eye-catching presentation makes them perfect for impressing anyone, from children devouring sweets after school to sophisticated guests at your next dinner party.
Preparation Phase & Tools to Use
Creating your own Dubai Chocolate Cups requires a few essential tools, each contributing to the perfect dish.
- Heatproof Bowl: This serves as the melting pot for your chocolate. Opt for glass or ceramic as they handle heat beautifully without scorching the chocolate.
- Muffin Tin: Use this to shape your chocolate cups. Standard-sized tins work wonderfully, giving you just the right size for individual servings.
- Cupcake Liners: These protect the chocolate and help when it’s time to peel the cups away. Choose vibrant colors to enhance the visual appeal!
- Spatula: A good spatula is essential for smoothing the chocolate and filling the cups with cream. Flexibility in the spatula helps ensure even distribution without breaking the delicate chocolate.
Preparation tips include:
- Gather all your ingredients before starting to streamline the process.
- Chocolate is temperamental, so use a low heat to melt it slowly to maintain its beautiful luster and prevent it from seizing.
Ingredients for DIY Dubai Chocolate Cups
To embark on this delicious journey, gather the following ingredients:
- 200g dark chocolate: Rich with a deep flavor, this creates the outer shell.
- 100g milk chocolate: Adds a delightful creaminess to balance the robust taste of the dark chocolate.
- 1/2 cup crushed pistachios: These wonderful green gems introduce a pleasant crunch and nutty sophistication.
- 1/4 cup cream: Cream brings a luscious, silky filling that envelops the pistachios.
- 1 tablespoon butter: Enhances the richness, making each bite irresistibly smooth.
- Pinch of salt: A touch of salt elevates the sweetness of the chocolate, bringing everything together in a harmonious blend.
You can substitute dark chocolate with semi-sweet chocolate or use white chocolate if that’s your preference. Experiment with different nuts like almonds or hazelnuts for a unique twist!
How to Make DIY Dubai Chocolate Cups
Melt the Chocolate: Combine the dark and milk chocolate in a heatproof bowl set over a pot of simmering water. Stir gently until completely smooth.
Prepare Muffin Tin: Line each cup of a muffin tin with cupcake liners, ensuring each cup is adequately covered.
Coat the Liners: Pour a generous layer of the melted chocolate into each liner. Use a spatula to coat the sides evenly.
Chill: Place the muffin tin in the refrigerator for about 10 minutes, allowing the chocolate to harden.
Prepare the Filling: In a bowl, mix the cream, butter, and crushed pistachios until combined and creamy.
Fill the Cups: Spoon the pistachio mixture into the hardened chocolate cups, filling each one to the brim.
Seal Them Up: Pour the remaining melted chocolate over the filled cups, covering the pistachio mixture to seal in the flavor.
Final Chill: Return the muffin tin to the fridge and chill for an additional 30 minutes until fully set.
Enjoy: Once set, gently peel away the cupcake liners to reveal your stunning DIY Dubai Chocolate Cups, and savor every delightful bite!
Chef’s Notes & Helpful Tips
- Make-Ahead: These delightful cups can be made in advance and stored in the refrigerator for up to a week, making them a perfect option for gatherings.
- Cooking Alternatives: While melting chocolate over simmering water is traditional, you can use a microwave. Heat in short bursts, stirring in between to avoid scorching.
- Customization Ideas: Feel free to experiment! You could add orange zest for a fresh twist, or try a different nut for varying flavors.
Common Mistakes to Avoid
- Scorched Chocolate: Always melt your chocolate over low heat. If it gets too hot, it can seize. Keep stirring for a smooth finish.
- Too Much Filling: Avoid overfilling; leaving a little space allows for easier sealing with the chocolate lid.
- Inadequately Chilled: Be patient! If you skip chilling times, your cups might crumble when you bite into them.
What to Serve With DIY Dubai Chocolate Cups
Pair your chocolate cups with any of the following for a delightful experience:
- Fresh Berries: The acidity of raspberries or strawberries cuts through the richness.
- Espresso: A strong coffee enhances the chocolate flavors and adds a touch of bitterness.
- Vanilla Ice Cream: The cold creaminess complements the rich chocolate and adds a contrast in temperature.
- Sweet Wine: A dessert wine, like Moscato, balances the rich chocolate with its fruity sweetness.
- Charcuterie Board: Serve alongside salty cheeses and meats for a sophisticated snack spread.
- Herbal Tea: Chamomile or mint can provide a refreshing counterpoint to the sweet and richness.
Storage & Reheating Instructions
Store your DIY Dubai Chocolate Cups in an airtight container in the fridge. They can last for up to a week. If you wish to keep them longer, you can freeze them for up to two months. Thaw them in the fridge before serving—no need to reheat, as they taste divine chilled!
Estimated Nutrition Information
Approximate values per serving:
- Calories: 150
- Fat: 10g
- Carbohydrates: 15g
- Protein: 2g
Disclaimer: Values may vary based on ingredients used and portion sizes.
FAQs
Can I use milk chocolate alone for these cups?
While milk chocolate can be used entirely, it may result in a sweeter flavor than intended. A mix of dark and milk chocolate offers a perfect balance.
Can I substitute cream in the filling?
Yes! You can use coconut cream for a dairy-free alternative. Just ensure it is well whipped for a creamy texture.
What if I don’t have a muffin tin?
You can use silicone molds, disposable cup liners, or even small ramekins to achieve a similar effect.
How do I prevent the chocolate from cracking?
Ensure you chill your chocolate cups properly in between layers to reinforce their structure and prevent cracking upon assembly.
Can I add additional fillings like fruit or other nuts?
Absolutely! Feel free to get creative. Just keep in mind the overall texture and flavor balance.
Conclusion
As you savor each delightful bite of your DIY Dubai Chocolate Cups, you find yourself immersed in a culinary adventure that few desserts can replicate. This rich blend of chocolate and pistachios offers both indulgence and sophistication, truly making it a standout treat. Elevate your confectionery skills and impress your loved ones by making these exquisite chocolate cups. You might very well find that this becomes a beloved go-to recipe in your home. Happy creating!
Print
DIY Dubai Chocolate Cups
- Prep Time: 20 minutes
- Cook Time: 40 minutes
- Total Time: 60 minutes
- Yield: 12 servings 1x
- Category: Dessert
- Method: Chilling
- Cuisine: Middle Eastern
- Diet: Vegetarian
Description
Indulge in these luxurious chocolate cups filled with creamy pistachios, offering a delightful flavor and elegant presentation.
Ingredients
- 200g dark chocolate
- 100g milk chocolate
- 1/2 cup crushed pistachios
- 1/4 cup cream
- 1 tablespoon butter
- Pinch of salt
Instructions
- Melt the Chocolate: Combine the dark and milk chocolate in a heatproof bowl set over a pot of simmering water. Stir gently until completely smooth.
- Prepare Muffin Tin: Line each cup of a muffin tin with cupcake liners, ensuring each cup is adequately covered.
- Coat the Liners: Pour a generous layer of the melted chocolate into each liner. Use a spatula to coat the sides evenly.
- Chill: Place the muffin tin in the refrigerator for about 10 minutes, allowing the chocolate to harden.
- Prepare the Filling: In a bowl, mix the cream, butter, and crushed pistachios until combined and creamy.
- Fill the Cups: Spoon the pistachio mixture into the hardened chocolate cups, filling each one to the brim.
- Seal Them Up: Pour the remaining melted chocolate over the filled cups, covering the pistachio mixture to seal in the flavor.
- Final Chill: Return the muffin tin to the fridge and chill for an additional 30 minutes until fully set.
- Enjoy: Once set, gently peel away the cupcake liners to reveal your stunning DIY Dubai Chocolate Cups, and savor every delightful bite!
Notes
These cups can be made in advance and stored in the refrigerator for up to a week. Experiment with different flavor add-ins like orange zest or various nuts.
Nutrition
- Serving Size: 1 cup
- Calories: 150
- Sugar: 10g
- Sodium: 50mg
- Fat: 10g
- Saturated Fat: 5g
- Unsaturated Fat: 5g
- Trans Fat: 0g
- Carbohydrates: 15g
- Fiber: 1g
- Protein: 2g
- Cholesterol: 5mg