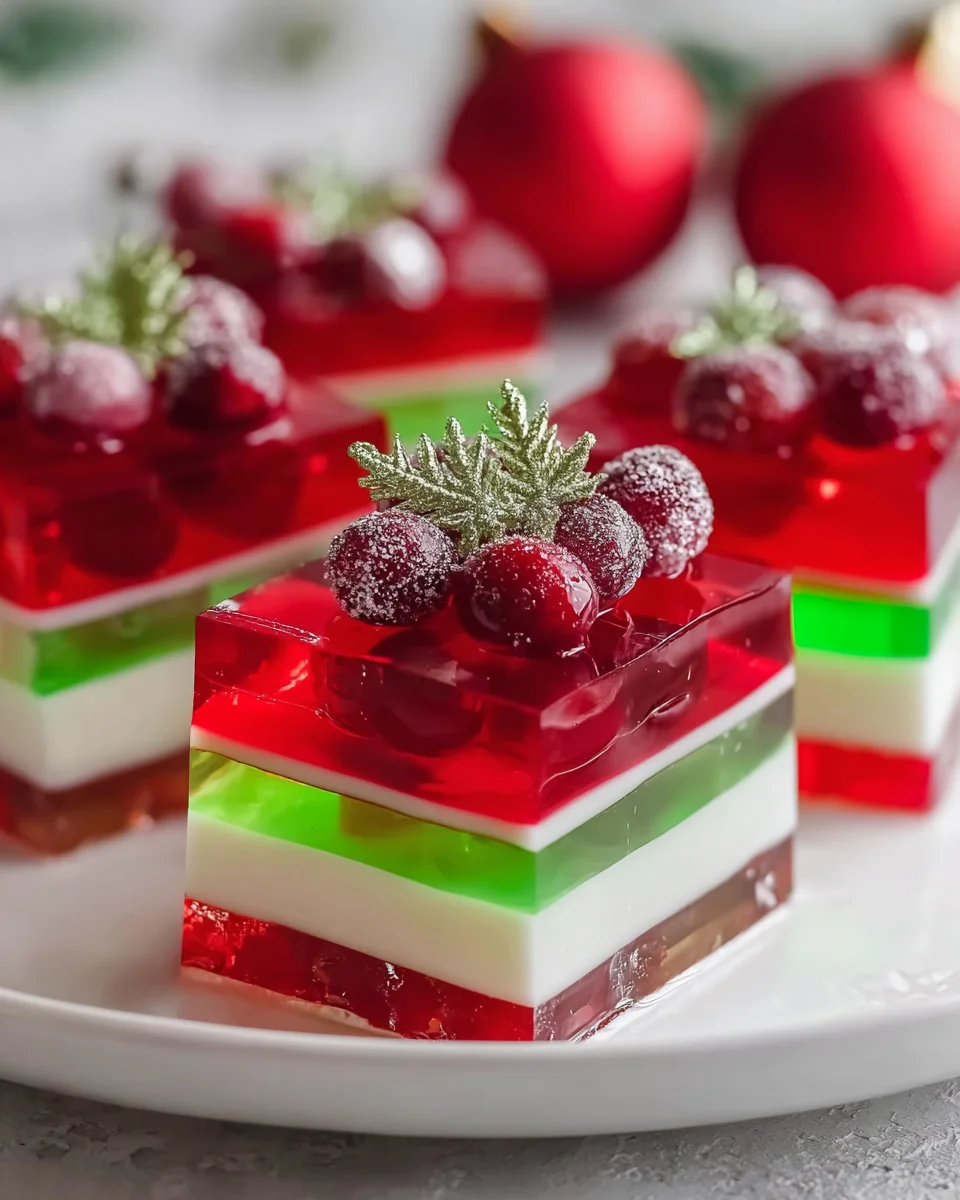
Introduction to Easy Layered Christmas Jello
As the holiday season rolls around, I find myself reminiscing about the vibrant desserts that brought joy to many festive gatherings. One of my favorites is the Easy Layered Christmas Jello. It’s not just a dessert; it’s a celebration trapped in a dish! This recipe offers a dazzling array of cherry and lime flavors, perfect for impressing your loved ones without spending hours in the kitchen. Whether you’re juggling work, family, or seasonal chaos, this jello is a quick and delightful solution. Let’s dive into creating this colorful holiday treat together!
Why You’ll Love This Easy Layered Christmas Jello
This Easy Layered Christmas Jello is a game changer for busy moms and professionals alike. It comes together quickly, allowing you to whip up a stunning dessert without a lot of fuss. The delightful blend of cherry and lime flavors adds a festive flair that will make your gatherings memorable. Plus, it’s a fun way to involve the kids in the kitchen, creating lasting holiday memories!
Ingredients for Easy Layered Christmas Jello
Gathering the right ingredients is essential for making your Easy Layered Christmas Jello. Each element plays a vital role in crafting that festive charm and delightful taste.
- Cherry Flavored Gelatin Powder: This vibrant base brings a pop of color and a sweet, fruity flavor that is instantly recognizable.
- Lime Flavored Gelatin Powder: Adds a refreshing twist, balancing the sweetness of the cherry layer with a zesty kick.
- Unflavoured Gelatin: It helps create the velvety smooth white layer. This is your secret weapon for that perfect creamy texture.
- Sweetened Condensed Milk: This rich ingredient lends a creamy sweetness to the dessert, creating a lush layer that soaks up all the holiday spirit.
- Boiling Water: Essential for dissolving your gelatin, it activates those fabulous flavors and ensures a proper set.
- Cold Water: This helps cool the dissolved gelatin, preventing melting of the previous layers when poured.
- Optional ingredients: Feel free to experiment with different flavored gelatin powders or even add a hint of whipped cream for an extra touch of luxury.
You’ll find exact quantities for all these must-have ingredients listed at the bottom of the article, where you can easily print the recipe for your holiday cooking adventures!

How to Make Easy Layered Christmas Jello
Ready to bring some festive flair into your kitchen? Making the Easy Layered Christmas Jello is a delightful journey through colors and flavors. Let’s get started with these simple steps that will make your dessert a holiday star. And remember, every step counts towards creating that perfect showstopper!
Step 1: Prepare the Cherry Layer
Begin by dissolving the cherry-flavored gelatin powder in a bowl using 240 ml of boiling water. Stir it well until the mixture is completely dissolved. Next, add 120 ml of cold water and mix it in. This combination not only enhances the flavor but helps in cooling the gelatin.
Once it’s mixed, pour the vibrant cherry mixture into a 23×33 cm glass dish. This is your first layer! Place it in the refrigerator and let it set for about 30–45 minutes. This wait will reward you with a bright, solid cherry layer.
Step 2: Bloom the Unflavoured Gelatin
While the cherry layer is setting, grab a bowl and evenly sprinkle the unflavoured gelatin over 120 ml of cold water. Let it sit for about 5 minutes. This process, known as blooming, allows the gelatin to absorb the water, ensuring a smooth texture in your creamy layer.
Step 3: Create the Milk Layer
After the blooming is complete, add 360 ml of boiling water to the bowl. Stir until the gelatin has completely dissolved. Now, it’s time to blend in the sweetened condensed milk! This will create a luscious, creamy texture that will delight every spoonful.
Allow this milk mixture to cool slightly. This step is crucial because you want it to be warm enough to pour, yet cool enough to prevent it from melting the cherry layer below.
Step 4: Layer the Milk Mixture
Gently pour the milk mixture over the set cherry layer. Be careful during this step, as you want to preserve the beautiful red while adding a creamy white layer. Return the dish to the refrigerator and let it chill until this layer is firm. It usually takes about 30 minutes.
Step 5: Prepare the Lime Layer
Once the milk layer is set, it’s time to prepare the lime layer. In a clean bowl, dissolve the lime-flavored gelatin powder in 240 ml of boiling water, just like you did with the cherry. Add 120 ml of cold water, mixing it well.
Again, allow it to cool slightly before moving on to the next step. We don’t want any melting mishaps here!
Step 6: Pour the Lime Layer
Now comes the fun part—carefully pour the cooled lime gelatin over the set milk layer. This vibrant green will create a stunning contrast and finish your Easy Layered Christmas Jello in style!
Return the dish to the refrigerator and let it set completely for about an hour. After it’s firm, take it out to cut into squares and serve chilled. Enjoy the colorful delight that’s sure to impress!
Tips for Success
- Ensure each layer is completely set before adding the next. Patience pays off here!
- Use a light touch when pouring each layer to keep the colors distinct.
- Dab excess moisture off the dish with a paper towel if layers start to merge.
- Prepare this dessert a day ahead to save time and impress your guests!
- Get the kids involved—layering is a fun task for little hands!
Equipment Needed
- 23×33 cm glass dish: This is perfect for layering. A similar-sized plastic dish works too!
- Bowl: A medium mixing bowl for each layer. Any mixing bowl will do.
- Whisk: To stir the mixtures. A spoon or spatula can work in a pinch.
- Refrigerator: Essential for setting each layer. An ice bath can speed up the process!
Variations
- Flavor Swaps: Experiment with different flavored gelatin such as grape, orange, or blue raspberry for unique color combinations.
- Fruit Add-ins: Add chopped fruits like strawberries or kiwi in between layers for added texture and freshness.
- Vegan Option: Substitute the sweetened condensed milk with coconut cream for a dairy-free version that’s equally festive!
- Sugar-Free Version: Use sugar-free gelatin and a sugar-free condensed milk alternative to create a lighter treat without sacrificing taste.
- Holiday Colors: Use red and green colors for Christmas or pastel shades for springtime festivities to match your occasions.
Serving Suggestions
- Festive Platters: Arrange the squares on a beautiful serving tray, garnished with fresh mint leaves for an eye-catching touch.
- Pair with Drinks: Serve alongside sparkling water or a light fruit punch to complement the sweetness of the jello.
- Creative Presentation: Use clear dessert cups for individual servings, allowing the colorful layers to shine through.
FAQs about Easy Layered Christmas Jello
Can I use different gelatin flavors for Easy Layered Christmas Jello?
Absolutely! Feel free to swap out the cherry and lime gelatin for your favorite flavors. Just imagine the possibilities—a rainbow of flavors that can delight any palate!
How long can I keep Easy Layered Christmas Jello in the fridge?
This festive dessert can last about 4–5 days in the fridge if kept covered. Just be sure to keep it stored in an airtight container to maintain freshness!
Can I make Easy Layered Christmas Jello ahead of time?
Yes! This dessert is perfect for making a day ahead. It allows the flavors to meld, and you can save valuable time on the day of your gathering.
Is Easy Layered Christmas Jello suitable for dietary restrictions?
This dessert can be made vegetarian, and you can adapt it for vegan or sugar-free diets with the right substitutions. Explore flavors and ingredients that match your dietary needs!
How can I enhance the visual appeal of Easy Layered Christmas Jello?
Consider adding fresh fruits or whipped cream between layers or as a garnish on top. This not only adds color but also texture and taste for an extra festive touch!
Final Thoughts
Crafting the Easy Layered Christmas Jello has been a delightful journey filled with color, flavor, and a sprinkle of holiday magic. Imagining the smiles on my family’s faces as they delve into this vibrant treat warms my heart. It’s more than just a dessert; it’s about creating cherished memories together. This jello offers a perfect blend of fun and festivity, all while being simple enough for anyone to make. So grab your ingredients, roll up your sleeves, and start layering! Let this delicious creation be part of your holiday celebrations, bringing joy and sweetness to your table.
Print
Easy Layered Christmas Jello
- Prep Time: 30 minutes
- Cook Time: 0 minutes
- Total Time: 1 hour 30 minutes
- Yield: 12 servings 1x
- Category: Dessert
- Method: Refrigeration
- Cuisine: American
- Diet: Vegetarian
Description
A festive layered dessert featuring vibrant cherry and lime flavors, perfect for holiday celebrations.
Ingredients
- 85 g cherry flavoured gelatin powder
- 85 g lime flavoured gelatin powder
- 2 packets unflavoured gelatin
- 397 g sweetened condensed milk
- 475 ml boiling water, divided
- 237 ml cold water, divided
- 120 ml cold water (for blooming gelatin)
Instructions
- Dissolve the cherry gelatin powder in 240 ml boiling water, stirring thoroughly. Incorporate 120 ml cold water. Pour into a 23×33 cm glass dish and refrigerate until fully set, approximately 30–45 minutes.
- Evenly sprinkle unflavoured gelatin over 120 ml cold water in a bowl. Allow to bloom for 5 minutes. Add 360 ml boiling water, stirring to dissolve completely.
- Blend sweetened condensed milk into the dissolved gelatin mixture. Allow to cool slightly to avoid melting the red layer.
- Gently pour the milk mixture onto the set red gelatin layer. Refrigerate until firm.
- Dissolve lime gelatin powder in 240 ml boiling water. Add 120 ml cold water and cool slightly.
- Carefully pour the cooled green gelatin over the set white layer. Refrigerate until completely set, about 1 hour.
- Cut into squares and serve chilled.
Notes
- Ensure each layer is completely set before adding the next layer for best results.
- This dessert can be prepared a day in advance for convenience.
- Feel free to customize the colors and flavors for different occasions.
Nutrition
- Serving Size: 1 square
- Calories: 140
- Sugar: 24 g
- Sodium: 40 mg
- Fat: 3 g
- Saturated Fat: 2 g
- Unsaturated Fat: 1 g
- Trans Fat: 0 g
- Carbohydrates: 27 g
- Fiber: 0 g
- Protein: 2 g
- Cholesterol: 5 mg


