Introduction to Grinch Bark
Ah, the holiday season! A magical time filled with delightful treats and laughter. When I think of festive desserts, Grinch Bark always comes to mind. This colorful creation isn’t just eye-catching; it’s a lifesaver for busy moms like us! With a quick prep time and simple ingredients, you can whip up this spectacular dessert in no time. Whether you’re hosting a holiday gathering or seeking a sweet surprise for your loved ones, Grinch Bark is the perfect solution. Let’s dive into this cheerful recipe and spread some holiday joy!
Why You’ll Love This Grinch Bark
You’re going to adore Grinch Bark for several reasons! First off, it’s incredibly easy to make. Seriously, if you can melt chocolate, then you can create this festive treat. It also comes together in just under two hours, perfect for busy schedules. Plus, the taste? It’s a delightful blend of creamy white chocolate and sweet green candy melts that makes every bite a joyful experience. You’ll want to share this with everyone!
Ingredients for Grinch Bark
Gathering the right ingredients is half the fun! For your Grinch Bark, you’ll need:
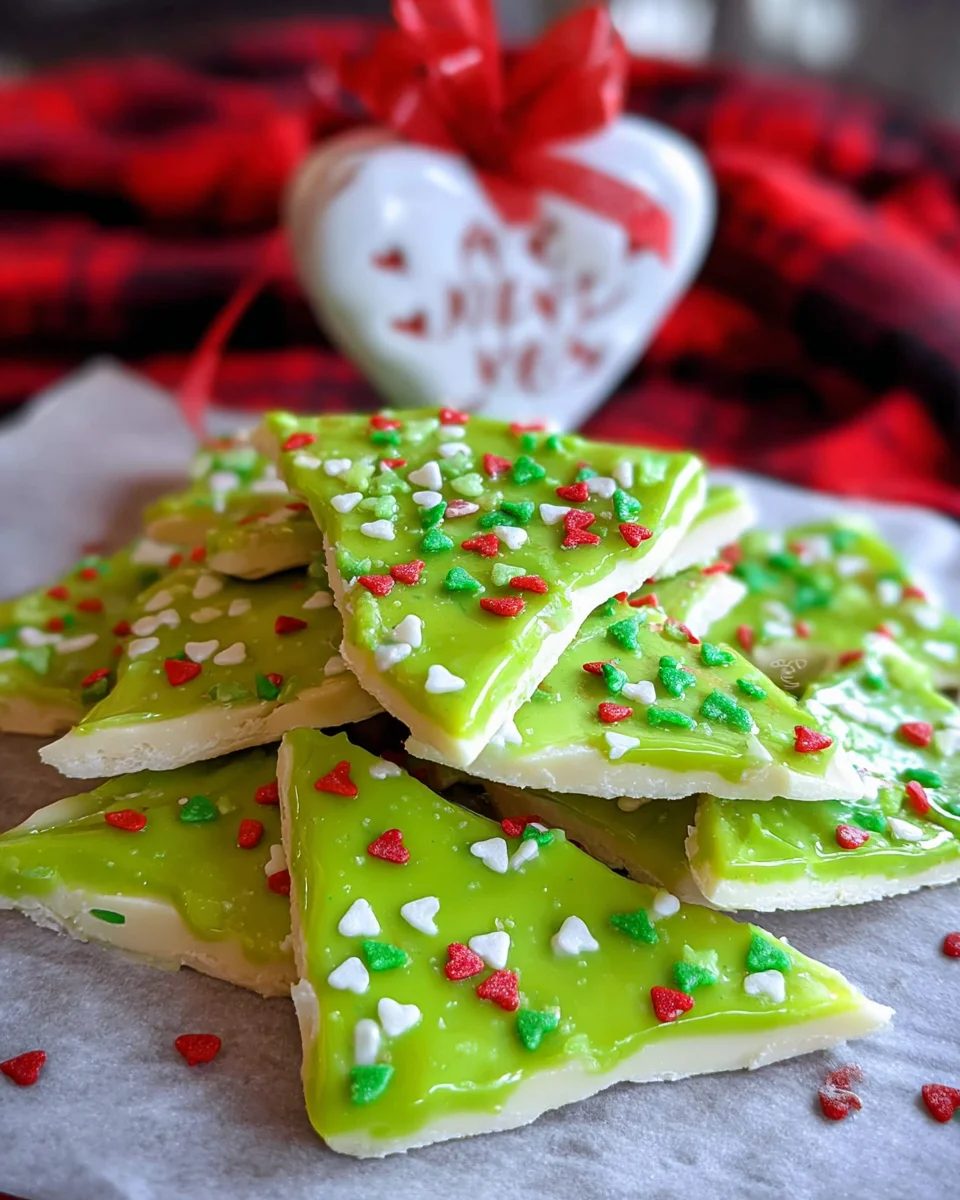
- White chocolate melting wafers: These creamy wafers provide the foundation of our bark. They melt easily and lend a rich, sweet flavor.
- Vibrant green candy melts: This stunning green layer is where the magic happens! They bring that joyful holiday color and a sweet candy taste that children and adults alike love.
- Green sprinkles: These add a festive crunch and extra cheer to your bark. Feel free to get creative with different shapes or sizes!
- Heart sprinkles: Adding these festive touches makes your Grinch Bark even more delightful, perfect for expressing holiday love.
Curious about variations? You could swap the white chocolate for yogurt-covered ones for a tangier taste or use other colors of candy melts to match your holiday theme! For exact quantities, check out the bottom of the article where you can find everything conveniently available for printing.

How to Make Grinch Bark
Making Grinch Bark is a delightful adventure! Each step brings you closer to a festive treat that’ll light up your holiday gatherings. Let’s break it down into simple steps.
Prepare Your Baking Sheet
First things first, line a baking sheet with parchment paper. This simple step keeps your bark from sticking, making it super easy to lift off when it’s time to break it into pieces. Trust me; it saves you from a sticky situation later!
Melt the White Chocolate
Now, grab a microwave-safe bowl and add your white chocolate melting wafers. Place them in the microwave, heating in 30-second intervals. After each interval, take a moment to stir. This helps prevent burning and ensures a smooth melt. Stick with it for about 90 to 120 seconds total, and you’ll end up with a creamy, luscious mixture that’s perfect for our base!
Create the Base Layer
Once your white chocolate is melted, pour it onto the lined baking sheet. Use a spatula to spread it into a thin, even layer. The trick here is to make sure the white chocolate covers the baking sheet nicely—it’s your foundation! Smooth out any bumps, aiming for a surface that’s as even as possible. Let it chill in the refrigerator for 10 minutes so it can set properly.
Add the Green Candy Layer
While the white chocolate is chilling, let’s melt that vibrant green candy! Follow the same method as before—heat in 30-second bursts, stirring well between each. Once melted, pour the green candy over the set white chocolate. Again, use that spatula to even it out. This green layer is what gives Grinch Bark its signature look and flavor!
Cool and Set
After you’ve spread the green candy, it’s time for the mighty chill! Pop the baking sheet back into the refrigerator for at least 90 minutes. This step is crucial! It allows everything to meld together, creating the perfect texture. When it’s fully set, the bark will easily peel off the parchment paper, ready for you to break it into festive pieces!
Tips for Success
- Be patient while melting your chocolate. Stir often to avoid burning.
- For easier cleanup, line your baking sheet with a silicone mat instead of parchment paper.
- Feel free to mix in different sprinkles for variety. The more colorful, the better!
- Let the bark cool completely to ensure it breaks easily into pieces.
- Store any leftovers in an airtight container to keep them fresh longer.
Equipment Needed
- Microwave-safe bowl: Any heatproof bowl works fine if you don’t have one.
- Parchment paper: A silicone baking mat is a great alternative for lining.
- Spatula: A butter knife will do in a pinch for spreading.
- Baking sheet: You can use any flat tray that fits your fridge.
Variations of Grinch Bark
- Try a chocolate twist: Use dark or milk chocolate melting wafers for a richer flavor.
- Make it gluten-free: Ensure all ingredients are certified gluten-free, especially the sprinkles.
- Nutty Delight: Add crushed almonds or walnuts for a delightful crunch.
- Minty Fresh: Sprinkle crushed peppermint candies on top for a refreshing holiday twist.
- Fruit Burst: Toss in some dried cranberries or cherries for a sweet and tangy addition.
Serving Suggestions for Grinch Bark
- Pair your Grinch Bark with a warm cup of hot cocoa for a cozy treat.
- Serve it alongside holiday cookies on a themed dessert platter.
- For added flair, place bite-sized pieces in festive cupcake liners.
- Gift them in clear bags tied with a ribbon for a sweet surprise.
FAQs about Grinch Bark
Can I make Grinch Bark ahead of time? Absolutely! In fact, Grinch Bark can be made a few days in advance. Just store it in an airtight container at room temperature to keep it fresh for your holiday events.
What are some fun ideas for custom sprinkles? Get creative! You can use festive shapes like stars, snowflakes, or even crush up candy canes. Anything that adds a splash of color will make your Grinch Bark even more delightful!
Is Grinch Bark suitable for kids? Yes, it’s perfect for kids! The colorful layers and fun sprinkles make it a hit among little ones. Plus, making it together could turn into a wonderful holiday tradition in your home!
Can I use other types of chocolate? Of course! While white chocolate and green candy melts are traditional, feel free to experiment with milk or dark chocolate. Just remember they may melt differently, so keep an eye on them while heating.
How do I store leftover Grinch Bark? For keeping it fresh, store any leftovers in an airtight container. It will last for about a week on your kitchen counter—if it lasts that long!
Final Thoughts
Creating Grinch Bark is more than just making a dessert; it’s about weaving joy into your holiday celebrations. Each colorful layer brings a splash of cheer, inviting smiles from those you share it with. I love how this simple yet delightful treat can spark conversations and create memories with family and friends. Plus, it’s so easy to whip up, even on the busiest of days! So, let’s make this holiday season a little sweeter with homemade Grinch Bark. Indulge in its festive spirit, and watch it vanish before your eyes—just like that naughty Grinch stealing Christmas!
Print
Grinch Bark
- Prep Time: 15 minutes
- Cook Time: 5 minutes
- Total Time: 1 hour 50 minutes
- Yield: Approximately 12 servings 1x
- Category: Dessert
- Method: Microwave
- Cuisine: American
- Diet: Vegetarian
Description
Grinch Bark is a festive and colorful treat perfect for the holiday season, combining white chocolate and vibrant green candy melts topped with sprinkles.
Ingredients
- 10 ounce White chocolate melting wafers
- 12 ounce Vibrant Green Candy Melts
- Green sprinkles
- Heart sprinkles
Instructions
- Line a baking sheet with parchment paper and set it aside.
- Add the white vanilla wafers to a microwave-safe bowl. Microwave in 30-second increments, stirring well between each, until melted (this should take 90-120 seconds total).
- Pour the white melted candy onto the parchment paper and use a spatula to smooth into a thin, even layer. Place the baking sheet in the refrigerator for 10 minutes to allow the candy to harden.
- Melt the green candy melts in the microwave, following the same process as you did with the white wafers in step 2. Pour the melted green candy over the white candy, smoothing it into an even layer with a spatula. Add sprinkles.
- Refrigerate for at least 90 minutes to set. The bark is ready when it easily peels off the parchment paper.
- Once set, remove the bark from the parchment paper and break it into pieces.
Notes
- Make sure to stir well between microwave intervals to avoid burning the chocolate.
- You can customize the sprinkles with any festive options you prefer.
Nutrition
- Serving Size: 1 piece
- Calories: 150
- Sugar: 12g
- Sodium: 30mg
- Fat: 8g
- Saturated Fat: 5g
- Unsaturated Fat: 2g
- Trans Fat: 0g
- Carbohydrates: 20g
- Fiber: 0g
- Protein: 1g
- Cholesterol: 5mg


