Introduction to Halloween Candy Apples
Ah, Halloween! A time when the air is crisp and excitement bubbles like a pot of witches’ brew. For busy moms and professionals, I know it can be a whirlwind of costume prep and decorating. But fear not, because Halloween Candy Apples are here to save the day! They’re not only a quick solution for a sweet treat, but they also make your loved ones beam with delight. Imagine the joy on your kids’ faces as they munch on these colorful, festive delights. Let’s dive into creating these scrumptious candies together!
Why You’ll Love This Halloween Candy Apples
These Halloween Candy Apples are a delightful blend of simplicity and festivity. In just 40 minutes, you can whip up a batch that brings smiles to faces of all ages. The crunchy tartness of Granny Smith apples paired with gooey sugary goodness creates a taste explosion. Plus, you can customize them with your favorite colors and sprinkles—perfect for getting the little ones involved and creating magical memories together!

Ingredients Halloween Candy Apples
Creating these delightful Halloween Candy Apples requires just a handful of ingredients, each playing a key role in this sweet adventure!
- Granny Smith apples: Their tartness beautifully contrasts with the sugary coating, and they hold up well for dipping.
- Caster sugar: This superfine sugar dissolves quickly in the syrup, creating a smooth coating that’s a joy to munch on.
- Water: Helps dissolve the sugar and create the sugary syrup needed for the candy apples.
- Liquid glucose or light corn syrup: This adds shine to the candy coating and prevents it from crystallizing. No one likes a gritty bite!
- White vinegar: Just a splash helps to stabilize the sugar mixture, ensuring a perfect hard crack stage.
- Food coloring: An easy way to unleash your creativity! Choose your favorite colors to give the apples a fun, festive vibe.
Don’t forget, if you want to mix it up, you could use different varieties of apples for unique flavors or even add toppings like nuts or coconut. For precise measurements, check the end of the article for the print-friendly version!
How to Make Halloween Candy Apples
Preparation and Setup
To start your Halloween Candy Apples journey, let’s create a cozy workspace. First, grab a large baking sheet and line it with baking paper. This little step will save you from a sticky disaster later!
Next, set out small bowls with sprinkles. Make them a bit larger than the apples for easy dipping. Having everything ready makes the process smoother, especially when you have little helpers eager to join. Trust me, an organized setup makes it more fun—the excitement fills the air as the magic unfolds.
Preparing the Apples
Now, onto the apples! Give those Granny Smith beauties a good wash to remove any waxy coating. Trust me, a clean apple is key to great candy apples.
Once washed, dry them thoroughly; moisture won’t help our candy coating set.
Next, it’s time to remove the stems and push in a thick skewer or popsicle stick. The stick should go in neatly to allow for easy dipping later. This is where the fun begins! Picture your kids ready with their sprinkles, eagerly anticipating the sweet experience.
Making the Candy Coating
Now, let’s make the candy coating. In a large, heavy-based saucepan, add the caster sugar, water, liquid glucose, and white vinegar. Place this over very low heat.
Stir constantly until the sugar completely dissolves; patience is key here. No one likes crunchy bits in their coating! Once dissolved, bring the mixture to a rolling boil.
This is where a candy thermometer shines—it helps you watch for that magical hard crack stage, which is reached at 150°C (302°F).
Keep an eye on it as it bubbles! When it reaches that temperature, remove the pan from heat.
Carefully mix in your chosen food coloring. Let any bubbles settle before starting the fun part—dipping those apples!
Dipping the Apples
Diving into the candy coating is where the magic happens! Hold each apple by the stick and tip it into the syrup at a slight angle.
Turn the apple to coat evenly; you want that beautiful, glossy covering all over.
Let the excess syrup drip off for a moment. A gentle spin can help remove any extra sugar.
This step ensures each apple has a luscious, even coat. Get ready—it’s about to look like a Halloween wonderland!
Finishing Touches
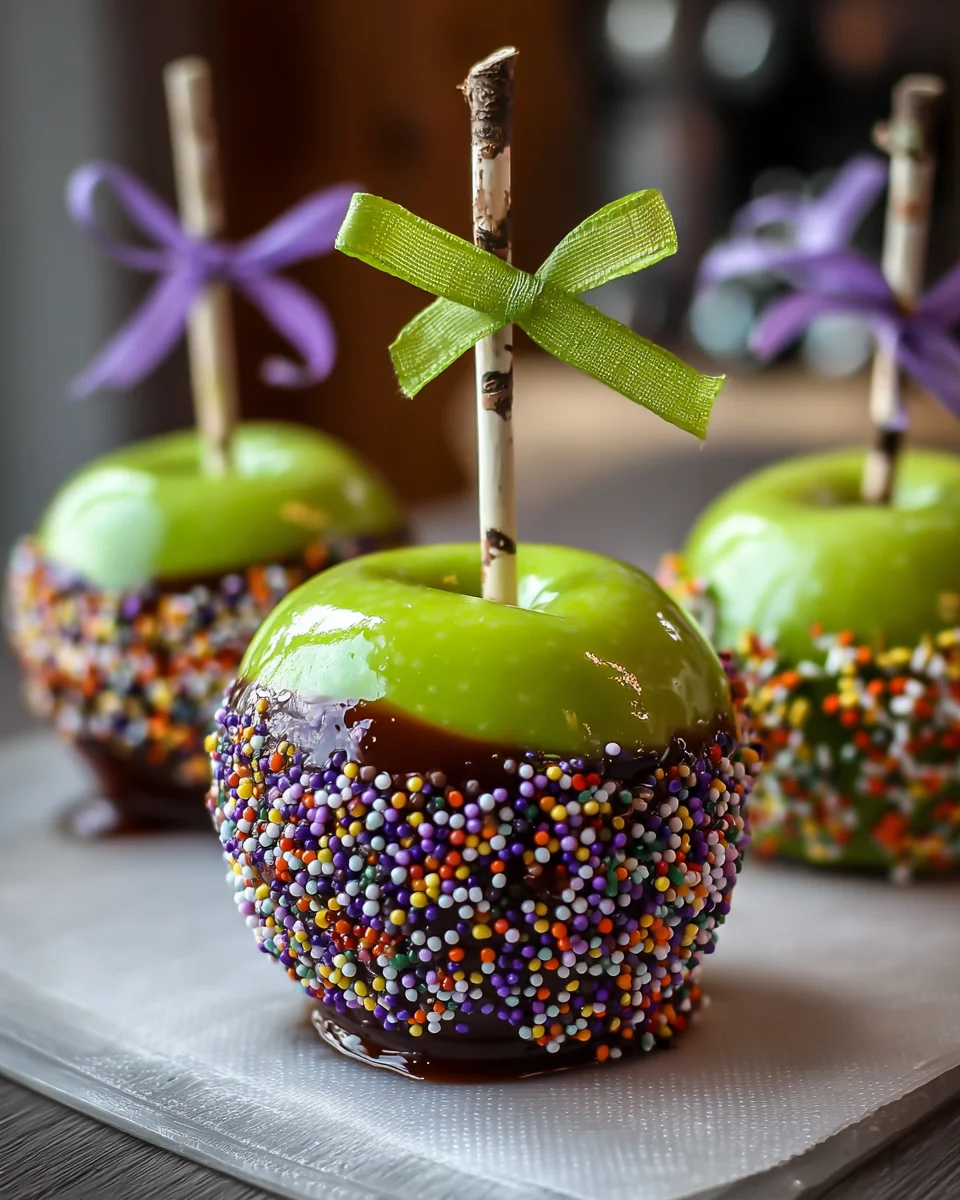
Once dipped, it’s time for sprinkles! Quickly roll or dip the apple into the sprinkles while the syrup is still tacky. This makes the sprinkles stick perfectly for a festive look.
Now, place the apples, apple end down, on your prepared baking tray. Let them set for about 20 minutes. It’s like watching little miracles harden right before your eyes!
Once cooled, you can wrap each apple in cellophane, securing them with tape or a cute ribbon. These treats are perfect for sharing, but remember to eat them within two days for the best flavor. Happy munching!
Tips for Success
- Use a clean pastry brush to remove any sugar crystals from the pan sides. This keeps your syrup smooth.
- If using twigs, make sure they’re clean and safe for your little ones to enjoy.
- Have your sprinkles ready before dipping to move quickly.
- Keep the candy apples in a cool, dry place to avoid melting.
- Don’t rush the cooling process; the longer they set, the better they harden!
Equipment Needed
- Large heavy-based saucepan: A non-stick pot works well, too.
- Candy thermometer: If you don’t have one, you can use the cold water test method.
- Baking sheet: Use any large flat surface that can hold the apples as they set.
- Parchment paper: Wax paper or aluminum foil can serve as alternatives.
- Wooden skewers or popsicle sticks: Clean twigs make a charming rustic option!
Variations
- Change up the apples! Try Fuji or Honeycrisp for a sweeter twist.
- Dip in dark or milk chocolate before sprinkling for a decadent treat.
- Mix in crunchy toppings like crushed nuts or toffee bits for extra texture.
- Drizzle with caramel sauce for a gooey layer under the candy coating.
- Use seasonal colors—think orange and black for Halloween or even pastel for spring!
- Try flavored candies by mixing extracts like vanilla or almond into the syrup.
- For a healthier option, swap sugar for natural sweeteners like honey or maple syrup (though this may affect the consistency).
Serving Suggestions
- Pair these Halloween Candy Apples with hot apple cider for a cozy touch.
- Serve alongside pumpkin-flavored muffins for a delicious fall-themed dessert table.
- Display the apples on a spooky-themed platter, garnished with faux spider webs for added fun.
- Include colorful napkins for a festive accent that screams Halloween!
FAQs about Halloween Candy Apples
If you’re diving into the world of Halloween Candy Apples for the first time, you might have some questions. Don’t worry; I’ve got you covered! Here are some frequently asked questions to help you along the way.
How long do Halloween Candy Apples last?
Typically, these delightful treats stay fresh for about two days. After that, the candy coating may lose some of its crispness. Enjoy them while they’re at their best!
Can I make Halloween Candy Apples ahead of time?
Absolutely! You can prepare these apples a day in advance. Just wrap them tightly in cellophane and store them in a cool, dry place. They’ll be ready for your Halloween festivities!
What if I don’t have a candy thermometer?
If a candy thermometer isn’t in your kitchen arsenal, no worries! You can use the cold water test: drop a small amount of syrup into cold water. If it forms a hard ball that’s easily moldable, you’ve reached the hard crack stage!
Can I customize my Halloween Candy Apples?
Definitely! Get creative with toppings! You can use various sprinkles, nuts, or drizzle melted chocolate on top for an added flair. The more, the merrier!
Are these suitable for kids?
Totally! Halloween Candy Apples are a fun and festive treat for kids. Just keep an eye on the little ones while they’re indulging, especially with the skewers.
Final Thoughts
Creating Halloween Candy Apples is more than just making a treat; it’s crafting memories. The joy on my children’s faces, their laughter as they decorate with sprinkles, and the sweet aroma filling the kitchen remind me why I love cooking. These apples not only taste incredible, but they also bring families together.
So, whether it’s a spooky gathering, a cozy night in, or simply satisfying a sweet tooth, these colorful delights will brighten your Halloween. Gather your loved ones, roll up your sleeves, and embrace the magic of homemade treats! Happy Halloween adventures await!
Print
Halloween Candy Apples
- Prep Time: 30 minutes
- Cook Time: 10 minutes
- Total Time: 40 minutes
- Yield: 8 apples 1x
- Category: Dessert
- Method: Boiling and dipping
- Cuisine: American
- Diet: Vegetarian
Description
A fun and festive recipe for making Halloween Candy Apples, perfect for a spooky celebration.
Ingredients
- 8 large Granny Smith apples
- 3 cups caster sugar (superfine sugar) (600g / 1 ⅓ pounds)
- ⅓ cup water (80ml)
- ¼ cup liquid glucose (or light corn syrup) (60ml)
- 1 teaspoon white vinegar
- Food colouring of your choice
Instructions
- Line a large baking sheet with baking paper and set aside.
- Have your sprinkles in bowls a little larger than the apples to make them easy to dip.
- Give the apples a wash, making sure if they’re waxed to remove all the wax. Remove the stems and dry well. Push in a thick skewer or popsicle stick.
- Add the sugar, water, glucose and vinegar to a large heavy-based saucepan (stainless steel best), over very low heat. Stir constantly until the sugar completely dissolves.
- Bring the syrup to a boil and sit a candy thermometer on the side of the pan. Boil until the mixture reaches hard crack stage – 150C / 302F.
- Take the pan off the heat and mix the food colouring through, then let the bubbles subside.
- Carefully, tip the saucepan on an angle and dip the apples, turning them a few times to coat well all over.
- Let the excess drip off for a few seconds and give it a spin to help.
- Quickly dip the apples on a slight angle into the sprinkles.
- Place the apples, apple end down, onto the prepared baking tray and let them set (they’ll harden completely in about 20 minutes).
- Once completely cool, wrap the apples in cellophane and secure it around the stick with sticky tape or ribbon. Eat within 2 days.
Notes
- If using twigs instead of sticks, ensure they are clean and safe.
- Use a pastry brush wet with water to brush down any sugar crystals that form on the sides of the pan.
- If you don’t have a candy thermometer, refer to the hard crack stage instructions.
Nutrition
- Serving Size: 1 apple
- Calories: 300
- Sugar: 60g
- Sodium: 5mg
- Fat: 1g
- Saturated Fat: 0g
- Unsaturated Fat: 0g
- Trans Fat: 0g
- Carbohydrates: 75g
- Fiber: 4g
- Protein: 1g
- Cholesterol: 0mg


