Introduction to Halloween Crinkle Cookies
As the vibrant leaves fall and the air turns crisp, I can’t help but get excited for Halloween. What better way to celebrate than with delightful Halloween crinkle cookies? They’re not just easy to make; they’re also a perfect treat to bring a little spooky joy to your weekdays. Busy moms and professionals like us need quick solutions, and these cookies are just that! With a perfect blend of cocoa and a pop of color, they’ll surely impress your loved ones while keeping you feeling festive amidst life’s chaos.
Why You’ll Love This Halloween Crinkle Cookies
These Halloween crinkle cookies are a game-changer for busy days. They come together in no time, allowing you to whip up something spectacular without spending hours in the kitchen. The rich chocolate flavor paired with a fun spooky appearance means they’re always a hit with kids and adults alike. Plus, who can resist those gorgeous, crackled tops? They’re the perfect sweet treat for your Halloween gatherings!
Ingredients for Halloween Crinkle Cookies
Let’s gather our magic potion! Here are the ingredients that come together to create these delightful Halloween crinkle cookies. Don’t worry; I’ll keep it simple.
- All-purpose flour: This is the backbone of our cookies, giving them structure. A 1:1 gluten-free blend can easily replace it for a gluten-free version.
- Unsweetened cocoa powder: It brings that rich chocolate flavor we all crave. Choose a good quality for the best taste!
- Baking powder: This little helper ensures our cookies rise just right, making them light and airy.
- Salt: A pinch of salt balances the sweetness and enhances the chocolate flavor beautifully.
- Granulated sugar: This is what makes our cookies sweet and gives them that delightful crunch on the outside.
- Vegetable oil: Using oil keeps the cookies moist and tender. Melted coconut oil is a fabulous alternative if you prefer a hint of coconut flavor.
- Large eggs: They act as a binder and provide moisture, creating that soft texture we adore.
- Vanilla extract: A splash of vanilla adds warmth and enhances the overall flavor profile of the cookies.
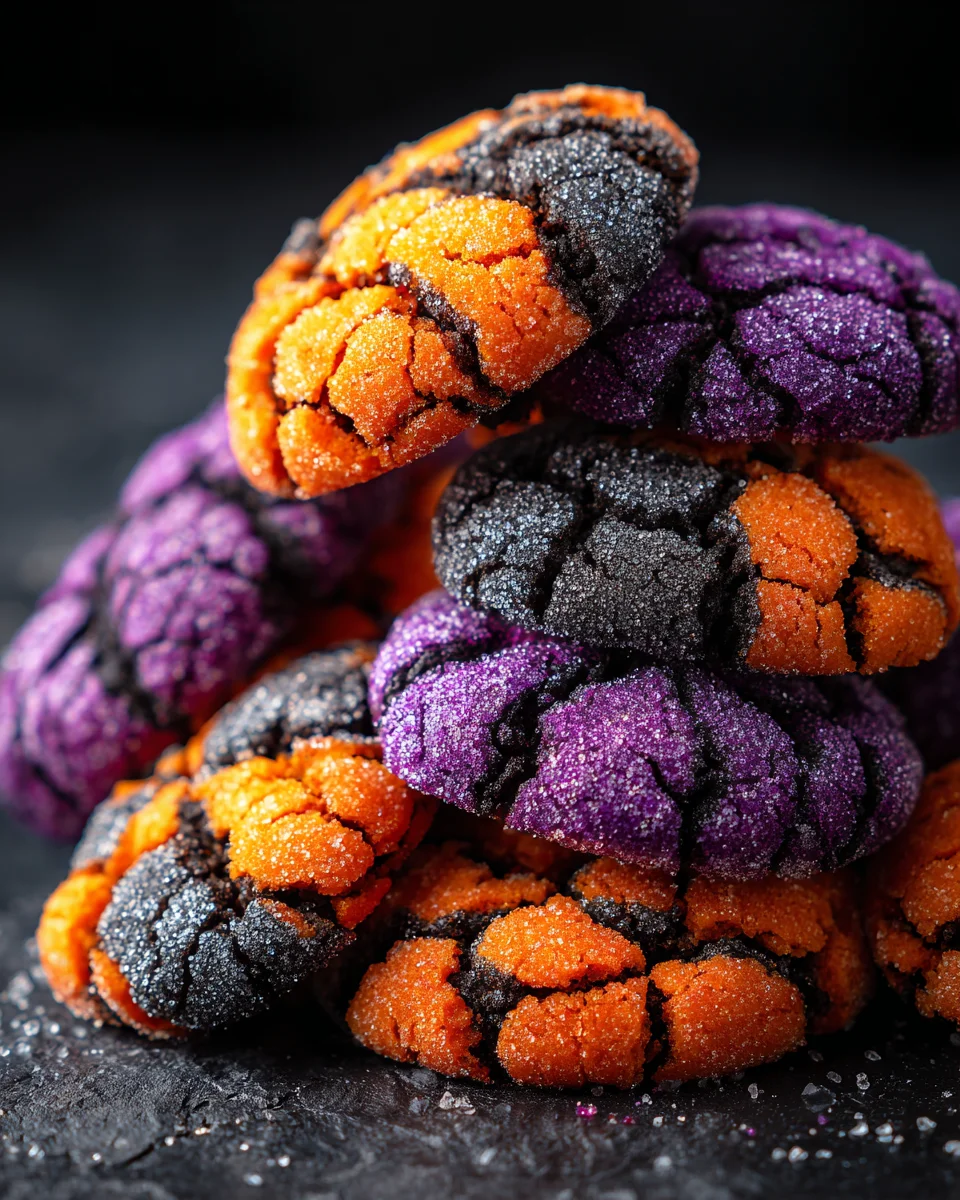
- Gel food coloring: This is where the real Halloween spirit shines! Feel free to get creative with colors like orange, purple, or black to match your spooky theme.
- Powdered sugar: We’ll use this for rolling the cookie dough balls to create that signature crackly appearance.
Exact quantities are waiting for you at the bottom of the article, so you can print out the full recipe and head straight to the kitchen!

How to Make Halloween Crinkle Cookies
Ready to embark on the delicious journey of making Halloween crinkle cookies? Let’s jump right into it! Follow these simple steps, and soon you’ll be the star of spooky gatherings.
Step 1: Mix the Dry Ingredients
First things first, take a medium-sized bowl and whisk together the all-purpose flour, cocoa powder, baking powder, and salt. This step ensures that your dry ingredients are combined perfectly. It also helps to prevent any pesky lumps of cocoa in your cookies!
Step 2: Prepare the Wet Ingredients
In a separate bowl, beat together the granulated sugar, vegetable oil, eggs, and vanilla extract. Mix until it’s smooth and creamy. Here’s where you can add in your gel food coloring. Start with a few drops and mix well. You can always add more if you want a bolder Halloween hue!
Step 3: Combine the Mixtures
Now, gently fold the dry ingredients into the wet mixture. Do this until just combined. Be careful not to overmix, as this can lead to tough cookies. We want them soft and chewy, right?
Step 4: Chill the Dough
This step is crucial! Cover your dough with plastic wrap and place it in the fridge for at least an hour. This helps the flavors meld and makes it easier to handle when shaping the cookies. No one likes sticky hands, after all! If you’re pressed for time, 30 minutes in the freezer works, too.
Step 5: Preheat the Oven
While your dough chills, go ahead and preheat your oven to 350°F (175°C). Don’t forget to line your baking sheets with parchment paper. This will prevent the cookies from sticking and make cleanup a breeze!
Step 6: Shape the Cookies
Once chilled, take a tablespoon of dough and roll it into a ball. It’s like little spooky orbs of joy! Next, generously coat each ball in powdered sugar, ensuring every surface is covered. This sugar gives your cookies that signature crackly top when baked.
Step 7: Bake and Cool
Place your coated dough balls on the prepared baking sheet, spacing them two inches apart. Bake for 10–12 minutes. You’ll know they’re done when they’ve cracked on top but still feel soft in the center. Let them sit for about 5 minutes before transferring to a wire rack to cool completely. Enjoy the delightful aroma filling your kitchen as you await your spooky treats!
Tips for Success
- Chill the dough for at least an hour to enhance texture and flavor.
- Use a cookie scoop for even sizing and uniform baking.
- Experiment with different gel colors for a personalized touch.
- Don’t skip the powdered sugar coating; it creates that magical crackly look.
- Store baked cookies in an airtight container to keep them fresh.
Equipment Needed
- Medium-sized mixing bowls for combining ingredients.
- Whisk for mixing the dry ingredients smoothly.
- Cookie scoop or tablespoon for portioning the dough.
- Baking sheets lined with parchment paper for easy cleanup.
- Wire rack for cooling the cookies post-baking.
Variations of Halloween Crinkle Cookies
- Spooky Pumpkin Spice: Add 1 teaspoon of pumpkin pie spice to the dry ingredients for a seasonal twist.
- Nutty Surprise: Incorporate ½ cup of chopped nuts, like walnuts or pecans, for added crunch and flavor.
- Minty Chocolate: Replace vanilla extract with peppermint extract for a cool, minty flavor.
- Chocolate Chip Delight: Stir in ½ cup of chocolate chips for extra chocolatey goodness.
- Colorful Confetti: Toss in Halloween-themed sprinkles to the dough for a fun and festive touch!
Serving Suggestions for Halloween Crinkle Cookies
- Pair these cookies with a warm mug of hot cocoa or pumpkin spice latte for a delightful treat.
- Present them on a spooky-themed platter adorned with Halloween decorations for a festive look.
- Serve with a scoop of vanilla ice cream for an indulgent dessert experience.
- Include them in fun treat bags for Halloween parties and gatherings.
- Top with chocolate drizzle or colorful sprinkles for an extra festive flair!
FAQs about Halloween Crinkle Cookies
Here are some frequently asked questions about Halloween crinkle cookies. I hope you find these answers helpful as you whip up these delightful treats!
Can I use another type of flour for Halloween crinkle cookies?
Absolutely! If gluten is a concern, a 1:1 gluten-free flour blend works wonderfully. You might also experiment with almond flour, but keep an eye on the cookie texture!
How do I store leftover cookies?
Store any leftover Halloween crinkle cookies in an airtight container at room temperature. They should stay fresh for about a week, but I doubt they’ll last that long in your house!
Can I freeze the dough?
Yes, you can freeze the dough! Form it into balls, coat in powdered sugar, and freeze on a baking sheet. Once firm, transfer them to a freezer bag. Bake them fresh when you’re ready!
What if I don’t have gel food coloring?
No worries! Liquid food coloring works too, but use less to avoid adding extra moisture. Or you could skip the color altogether and enjoy the classic chocolate look!
How can I prevent my cookies from spreading too much?
Chilling the dough is key! Make sure to refrigerate for at least an hour. Using parchment paper also helps prevent spreading while baking. Enjoy your perfect crinkle tops!
Final Thoughts
Bringing the joy of Halloween crinkle cookies to life in your kitchen is nothing short of magical. The combination of rich chocolate and a spirited splash of color creates treats that are perfect for family gatherings and spooky celebrations. Each bite is filled with warmth and a hint of nostalgia, reminding us of the sweetness of the season. With minimal effort, you’ll impress your loved ones while savoring these delightful cookies. I hope you enjoy making them as much as I do! Happy baking, and may your Halloween be filled with treats and laughter!
Print
HALLOWEEN CRINKLE COOKIES
- Prep Time: 20 minutes
- Cook Time: 12 minutes
- Total Time: 1 hour 32 minutes
- Yield: Approximately 24 cookies 1x
- Category: Dessert
- Method: Baking
- Cuisine: American
- Diet: Vegetarian
Description
Delicious and easy Halloween-themed crinkle cookies, perfect for spooky celebrations.
Ingredients
- 1 cup all-purpose flour (or 1:1 GF blend)
- ½ cup unsweetened cocoa powder
- 1 tsp baking powder
- ¼ tsp salt
- 1 cup granulated sugar
- ¼ cup vegetable oil (or melted coconut oil)
- 2 large eggs (room temp)
- 1 tsp vanilla extract
- Gel food coloring (orange, purple, or black)
- ½ cup powdered sugar (for rolling)
Instructions
- Whisk together flour, cocoa, baking powder, and salt in a bowl.
- In another bowl, beat sugar, oil, eggs, and vanilla until smooth. Add gel coloring.
- Stir the dry ingredients into the wet mixture until just combined.
- Cover the dough and refrigerate for at least 1 hour (or 30 minutes in the freezer).
- Preheat the oven to 350°F (175°C) and line baking sheets with parchment paper.
- Roll the dough into 1 tablespoon balls and coat generously in powdered sugar.
- Place the balls 2 inches apart on the baking sheet and bake for 10–12 minutes until cracked but still soft in the center.
- Let them sit on the baking sheet for 5 minutes before transferring to a rack to cool.
Notes
- For a gluten-free version, use a 1:1 gluten-free flour blend.
- Feel free to customize the gel food coloring to match your Halloween theme.
Nutrition
- Serving Size: 1 cookie
- Calories: 120
- Sugar: 8g
- Sodium: 50mg
- Fat: 5g
- Saturated Fat: 1g
- Unsaturated Fat: 4g
- Trans Fat: 0g
- Carbohydrates: 17g
- Fiber: 1g
- Protein: 2g
- Cholesterol: 30mg


