Introduction to Holiday Oreo Truffles
As the holiday season approaches, I often find myself on the lookout for simple, yet delightful recipes that can bring smiles to my loved ones’ faces. That’s when I discovered these incredibly festive and delicious Holiday Oreo Truffles. They’re not just easy to make; they’re a little bite of joy that can brighten any gathering! If you’re a busy mom or a professional juggling work and family, these no-bake treats are a fantastic solution for quick holiday magic. Trust me, you’ll want to keep this recipe close at hand this holiday season!
Why You’ll Love This Holiday Oreo Truffles
These Holiday Oreo Truffles are the perfect blend of simplicity and indulgence. With only a few ingredients, you can whip them up in no time. Each truffle is a burst of flavor; creamy, sweet, and deliciously festive. Plus, they make for a delightful gift or a sweet addition to any holiday spread. When you taste these treats, they’re bound to become a holiday favorite for both you and your family!

Ingredients for Holiday Oreo Truffles
Before diving into the making of these delectable Holiday Oreo Truffles, let’s gather our delightful little ingredients. Each component plays a vital role in creating that creamy, dreamy taste that we all crave during the festive season!
- Golden Oreos: These are the star of the show! Their sweet, buttery flavor forms the base of our truffles. Feel free to swap for regular Oreos if that’s what you have on hand.
- Cream Cheese: This adds a rich creaminess that perfectly balances the sweetness of the cookies. Make sure it’s softened for easy mixing.
- Green Gel Food Coloring: This fun ingredient adds a festive pop! It gives your truffles that joyful holiday spirit.
- Red Gel Food Coloring: Just like the green, this coloring enhances the visual appeal of your truffles. A little goes a long way!
- White Almond Bark: This silky coating envelops each truffle in a sweet layer, making them even more irresistible. If you can’t find almond bark, white chocolate is a good alternative.
- Mini Holiday M&Ms: These are for decoration and a fun crunch! Their vibrant colors add to the festive vibe of your treats.
You’ll find precise measurements for each ingredient at the bottom of this article, perfect for printing! Now, let’s get ready to roll up our sleeves and create some holiday magic!

How to Make Holiday Oreo Truffles
Now that we’ve gathered our ingredients, it’s time to dive into the fun part: making these Holiday Oreo Truffles! Follow these straightforward steps, and you’ll be on your way to creating a delightful treat that everyone will adore.
Step 1: Prepare the Oreos
Begin by placing the golden Oreos in a food processor. Pulse them until they turn into fine crumbs. It should resemble sand; this is the base of our truffles. If you don’t have a food processor, a sturdy plastic bag and a rolling pin work wonders too!
Step 2: Mix in the Cream Cheese
Next, add in the softened cream cheese. Blend it with the Oreo crumbs until the mixture is smooth and creamy. This step is crucial—don’t hold back! You want every bite to be rich and delightful, so mix well.
Step 3: Color the Mixture
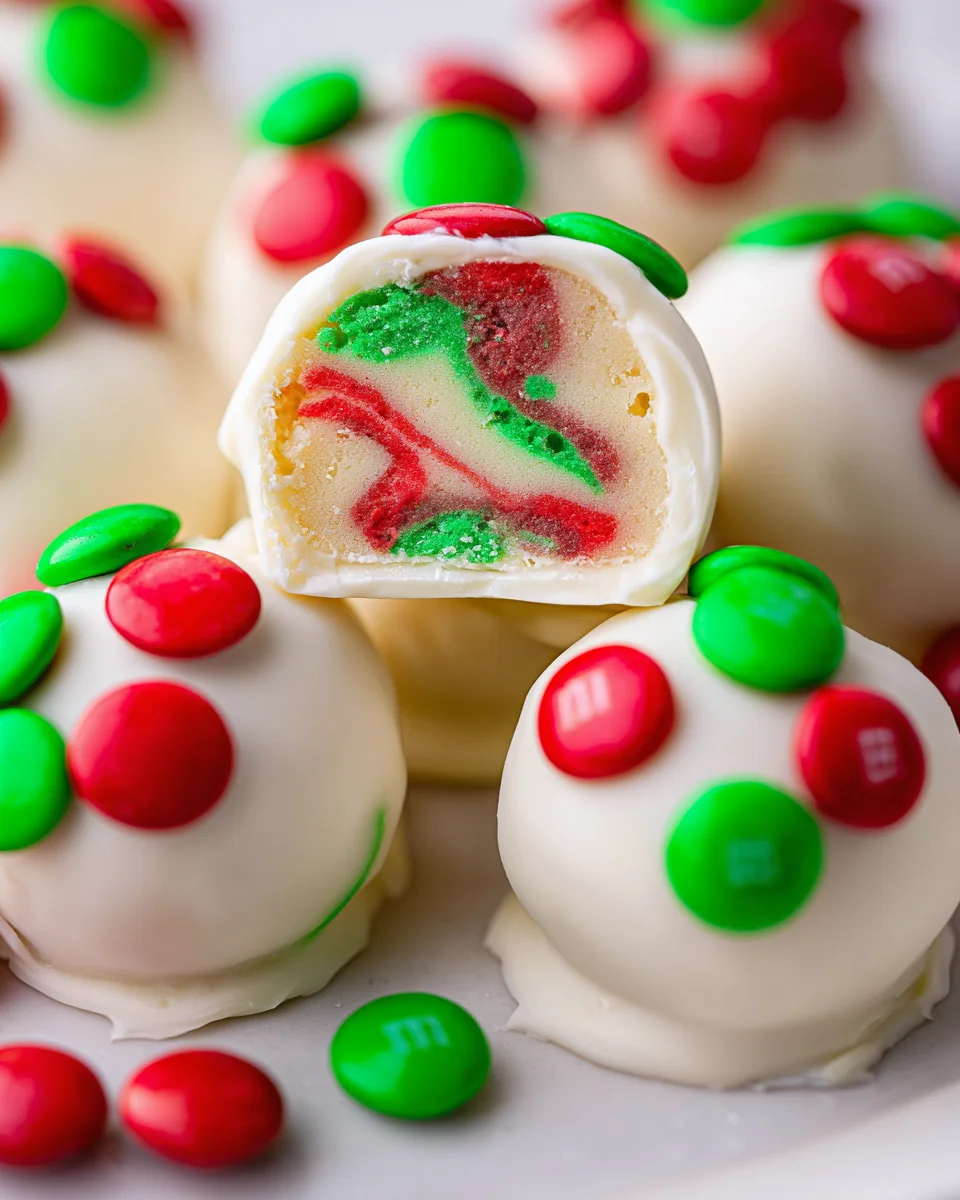
Now, let’s get creative! Divide the mixture into three bowls. Leave one bowl plain. Color the second bowl with green gel food coloring and the third with red. Mix until the colors are vibrant and evenly distributed. This fun step adds a festive flair to your truffles!
Step 4: Shape into Balls
Using a tablespoon cookie scoop, alternate scooping from each colored bowl to fill the scoop. Once filled, roll the mixture into balls. Place each ball on a parchment-lined sheet tray. This part is messy but enjoyable! Your truffles are starting to take shape.
Step 5: Freeze the Truffles
Time to chill! Freeze the sheet tray for about 3 hours or overnight. This helps the truffles firm up, making them easier to dip later. You can also double this step and freeze them until you’re ready to coat them with chocolate!
Step 6: Melt the Almond Bark
Once your truffles are frozen solid, it’s time to melt the almond bark. Follow the package instructions for melting. Be careful! If you overheat it, it might seize up. Stir until it’s smooth and creamy; this will be the delicious coat for your truffles!
Step 7: Dip the Frozen Balls
Now comes the fun part! Take each frozen ball and dip it into the almond bark, using a fork to lift it out. Allow excess bark to drip off before placing it on a clean parchment-lined cookie sheet. This creates a lovely coat of chocolate around the truffle.
Step 8: Decorate and Serve
Before the almond bark hardens, give your truffles a festive touch. Top each truffle with mini holiday M&Ms. This adds not only color but a fun crunch too! Once they’re all decorated, let them sit until the almond bark sets. And voilà, your Holiday Oreo Truffles are ready to be enjoyed!
Tips for Success
- Use room temperature cream cheese for easier mixing. It makes a world of difference!
- If you’re short on time, consider making the truffles a day in advance and store them in the fridge.
- Feel free to adjust food coloring; create unique shades to match your holiday decor!
- Keep a cookie scoop handy for uniformity; it makes rolling much easier.
- Don’t skip freezing. It helps maintain shape during the chocolate coating process!
Equipment Needed
- Food Processor: Essential for turning Oreos into crumbs. A sturdy plastic bag and rolling pin work too!
- Cookie Scoop: Great for even truffle sizes. A spoon can work in a pinch but won’t be as uniform.
- Parchment Paper: Keeps your truffles from sticking. Wax paper can also do the job.
- Microwave-Safe Bowl: For melting almond bark. A double boiler is another option if you prefer.
Variations
- Chocolate Oreo Truffles: Swap out the golden Oreos for classic chocolate Oreos for a richer taste.
- Nutty Delight: Add crushed nuts like almonds or pecans to the Oreo mixture for added crunch and flavor.
- Dairy-Free Version: Use a dairy-free cream cheese alternative and dark chocolate for the coating to accommodate dietary restrictions.
- Minty Fresh: Incorporate a few drops of peppermint extract into the Oreo mixture for a refreshing mint flavor.
- Spiced Up: Add a pinch of cinnamon or nutmeg to the cream cheese mixture for a warm holiday spice.
Serving Suggestions
- Pair your Holiday Oreo Truffles with a warm mug of spiced cider or hot chocolate for a cozy treat.
- For a festive presentation, place the truffles in decorative cupcake liners on a holiday-themed platter.
- Include fresh fruit like strawberries or raspberries as a fresh contrast to the sweetness of the truffles.
- Gifting? Arrange truffles in a clear jar tied with a ribbon for a charming homemade gift.
FAQs about Holiday Oreo Truffles
As we embark on this sweet journey together, you might have a few questions about these delightful Holiday Oreo Truffles. Let me help clear things up!
Can I use regular Oreos instead of golden Oreos?
Absolutely! Regular Oreos will bring a richer chocolatey flavor. It’s all about your taste preference!
How long can I store these truffles?
These tasty treats can be stored in the refrigerator for up to a week. Just make sure they’re in an airtight container!
Can I freeze Holiday Oreo Truffles?
You sure can! Just freeze them before dipping in almond bark. Once frozen, they’ll last for about a month. It makes for great make-ahead treats!
What if I don’t have almond bark?
No worries! You can use white chocolate as an alternative. Just melt it with care to avoid seizing!
Can I make these truffles ahead of time for a party?
Yes, these Holiday Oreo Truffles are perfect for making in advance! You can prepare them a few days before your gathering. Just keep them in the fridge until you’re ready to serve!
Final Thoughts
Creating these Holiday Oreo Truffles is more than just a baking project; it’s an opportunity to sprinkle joy into the lives of those you love. The laughter as you roll the truffles, the thrill of dipping, and the vibrant colors all enhance the holiday spirit. Whether you’re sharing them at a gathering or gifting them to a friend, these truffles embody warmth and joy. So as you embark on this sweet adventure, remember that it’s not just about the dessert, but also about the memories you create along the way!
Print
Holiday Oreo Truffles
- Prep Time: 30 minutes
- Cook Time: 10 minutes
- Total Time: 40 minutes plus freezing time
- Yield: 24 truffles 1x
- Category: Dessert
- Method: No-Bake
- Cuisine: American
- Diet: Vegetarian
Description
Delicious and festive Holiday Oreo Truffles made with golden Oreos and cream cheese, decorated for the holidays.
Ingredients
- 12 ounces golden Oreos (30 cookies)
- 8 ounces cream cheese, softened
- Green gel food coloring
- Red gel food coloring
- 24 ounces white almond bark
- ¼ cup mini holiday M&Ms
Instructions
- Place the Oreos in a food processor and process until crumbs are formed.
- Add the cream cheese and process until fully combined.
- Separate the mixture into three separate bowls. Color one bowl with green food coloring, another bowl with red food coloring, and leave the last bowl as is.
- Line a sheet tray with parchment paper.
- Using a 1 tablespoon cookie scoop, alternate adding from each colored bowl until the scoop is filled.
- Roll the mixture into balls and place on the parchment paper. Repeat with the remaining filling.
- Freeze the sheet tray for 3 hours or overnight until the balls are completely frozen.
- Melt the almond bark according to the package directions. Dip the frozen cookie balls one by one into the melted almond bark until fully coated.
- Let excess almond bark drip off and place on another parchment-lined cookie sheet. Immediately top with mini holiday M&Ms. Repeat until all are done. Serve immediately!
Notes
- Store in the refrigerator for up to a week.
- These can be made in advance and frozen before dipping in chocolate.
Nutrition
- Serving Size: 1 truffle
- Calories: 150
- Sugar: 10g
- Sodium: 50mg
- Fat: 9g
- Saturated Fat: 5g
- Unsaturated Fat: 3g
- Trans Fat: 0g
- Carbohydrates: 15g
- Fiber: 1g
- Protein: 1g
- Cholesterol: 10mg


