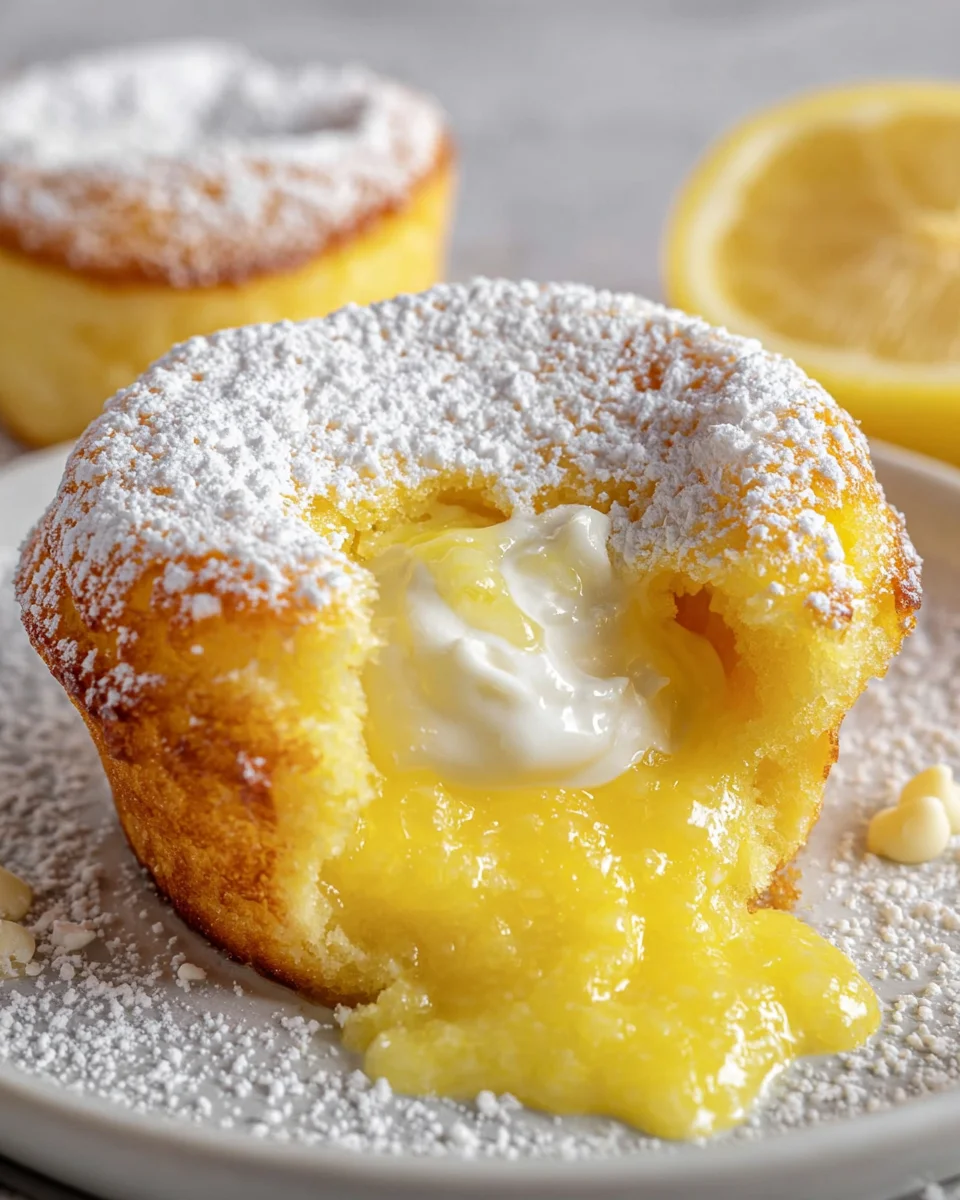
Introduction to Lemon Lava Cake Dessert
There’s something magical about dessert that can brighten even the busiest of days, and that’s why I’m excited to share my Lemon Lava Cake Dessert with you. This delightful creation is not just a treat; it’s an experience that brings warmth and joy to your table. Picture a rich chocolate base that gives way to a gooey lemon center, creating a symphony of flavors! It’s a perfect solution for those hectic evenings when you need a quick yet impressive indulgence to share with your loved ones. Trust me, this dessert will leave everyone asking for seconds!
Why You’ll Love This Lemon Lava Cake Dessert
You’re going to adore this Lemon Lava Cake Dessert for so many delightful reasons! First off, it’s incredibly easy to whip up—perfect for busy moms like us who crave something special without spending hours in the kitchen. The taste? Oh, it’s a show-stopper! The zesty lemon filling mixes beautifully with the decadent chocolate, creating an explosion of flavor that’s simply irresistible. Trust me, this dessert is guaranteed to impress everyone at your table!
Ingredients for Lemon Lava Cake Dessert
Before diving into the magic of creating this Lemon Lava Cake Dessert, let’s gather our ingredients! This dish combines rich flavors and textures, and each component plays a crucial role in making it simply delicious. Here’s what you’ll need:
- White chocolate baking chips: These are the stars of our gooey center! They melt beautifully and meld perfectly with the lemon, giving richness.
- Unsalted butter: Adds moisture and richness. Using unsalted allows us to control the saltiness of the dish.
- All-purpose flour: This helps to structure our cake, making sure it holds its form while still being fudgy.
- Granulated sugar: Sweetness is essential! This balances the tartness of the lemon beautifully.
- Large eggs: The proteins in eggs help bind the ingredients together while providing a lovely texture.
- Large egg yolks: Egg yolks add richness and enhance the flavor. They contribute to that velvety texture we adore!
- Lemon curd: This is where the magic happens! It’s tangy, sweet, and creates that delightful gooey center.
- Lemon zest: A hint of lemon zest brings an aromatic freshness that brightens the entire dessert.
- Pure vanilla extract: This rounds out the flavors, making the cake taste wholesome and homemade.
- Powdered sugar (optional): A light dusting adds a whimsical touch when serving—it’s not just tasty, it’s pretty!
For exact quantities, feel free to scroll down to the bottom of the article for easy printing. Happy cooking!

How to Make Lemon Lava Cake Dessert
Now that we have our ingredients ready, let’s dive into making this delightful Lemon Lava Cake Dessert! I promise, the process is simple, and the end result is oh-so-rewarding. Just follow these steps, and you’ll be savoring those gooey centers in no time!
Step 1: Preheat the Oven
First things first: preheat your oven to 220°C (425°F). This high temperature is key to achieving that perfect gooey center. While your oven is warming up, grab those cute little ramekins. Grease six 175 ml ramekins with nonstick spray. Arrange them evenly spaced on a baking sheet—trust me, this will make transfer to the oven a breeze!
Step 2: Melt the Chocolate and Butter
Now, let’s get to the good stuff! In a medium heatproof bowl, combine your white chocolate baking chips with the cubed unsalted butter. Place this bowl in the microwave and heat for about a minute. Stir, then continue microwaving in 15-second increments. Be sure to stir after each round until the mixture is smooth. The combination of chocolate and butter creates a luscious base that will make your Lemon Lava Cake Dessert unforgettable!
Step 3: Mix the Dry Ingredients
Once your chocolate and butter mixture is silky, it’s time to add the dry elements. Stir in the all-purpose flour, granulated sugar, and lemon zest. The zest really kicks up the flavor, making it vibrant and fresh! Mix gently until everything is just combined. You don’t want to overmix here; the texture should be nice and fluffy.
Step 4: Incorporate the Wet Ingredients
Now, we’ll bring in the richness! Gently fold in the large eggs, egg yolks, lemon curd, and vanilla extract. Mixing these in creates that dense, rich texture we adore in desserts. As you mix, be careful not to overmix. Simply blend until the batter is smooth and well incorporated. This will ensure that every bite is packed with flavor.
Step 5: Fill the Ramekins
Let’s get that batter into our ramekins! Carefully divide the luscious mixture evenly among the prepared ramekins, filling each about two-thirds full. This allows room for the cakes to rise without overflowing. Ensuring they’re filled properly will guarantee even baking, so take your time!
Step 6: Bake to Perfection
It’s game time! Place the baking sheet with the filled ramekins on the middle rack of your preheated oven. Bake for 20 to 25 minutes. You’ll know they’re ready when the tops are golden and spring back when lightly touched. Remember, we want that gooey center, so be cautious not to overbake!
Step 7: Serve and Enjoy
After baking, let those cakes stand for about 5 minutes. This gives them a chance to settle. Carefully run a knife around the inside edge of each ramekin. Gently invert them onto a plate. Let them rest for about a minute before removing the ramekin. If you’d like, dust the tops with powdered sugar for an extra special touch, then serve immediately while they’re still warm. Enjoy each gooey, delightful bite of your homemade Lemon Lava Cake Dessert!
Tips for Success
- Use high-quality chocolate for a richer flavor.
- Fill ramekins evenly to ensure consistent baking.
- Don’t rush the cooling time; it helps with easier removal.
- For a citrus twist, try adding orange zest as well.
- Serve immediately for that delightful gooey center.
Equipment Needed
- 6 ramekins or custard cups (muffin tins work in a pinch)
- Medium heatproof bowl (a glass bowl is great for melting)
- Microwave or stovetop for melting chocolate
- Baking sheet (to make transferring easier)
- Mixing spoon or spatula (a whisk works too for blending)
Variations of Lemon Lava Cake Dessert
- Lemon Raspberry Lava Cake: Add fresh raspberries to the lemon curd for a sweet-tart twist!
- Chocolate Lemon Lava Cake: Swap a portion of the white chocolate with dark chocolate for a richer flavor profile.
- Gluten-Free Option: Substitute all-purpose flour with a gluten-free blend for a celiac-friendly dessert.
- Vegan Variation: Use a vegan butter alternative and replace eggs with flaxseed meal or chia seeds mixed with water.
- Mini Lemon Lava Cakes: Make smaller, bite-sized versions by using mini ramekins or muffin tins—perfect for parties!
Serving Suggestions for Lemon Lava Cake Dessert
- Pair with fresh whipped cream for a luscious contrast.
- A scoop of vanilla ice cream complements the warmth beautifully.
- Serve alongside fresh berries for a pop of color and flavor.
- Drizzle with a raspberry sauce for an added touch of elegance.
- Garnish with mint leaves for a refreshing finish.
FAQs about Lemon Lava Cake Dessert
Can I prepare the Lemon Lava Cake Dessert ahead of time?
Absolutely! You can prepare the batter ahead of time and store it in the refrigerator. Just remember to fill the ramekins before you’re ready to bake and adjust the baking time a bit if they’re cold from the fridge.
What if I can’t find white chocolate baking chips?
If white chocolate chips are elusive, don’t worry! You can chop up a good-quality white chocolate bar instead. Just ensure it’s meant for baking, as that will give you the best melting consistency.
How do I know when the cakes are done baking?
Look for the tops to be golden brown and spring back when touched gently. They should have a slight jiggle in the center for that gooey texture, as overbaking will firm them up too much.
Can I use a different kind of citrus?
Definitely! Feel free to experiment with other citrus fruits like lime or orange. Just keep in mind that each will bring its unique flavor—delicious either way!
How should I store leftovers?
If you have any leftovers, store them in an airtight container in the fridge. Reheat them in the microwave for a few seconds to enjoy that melted center again. Just be careful not to overdo it!
Final Thoughts on Lemon Lava Cake Dessert
Creating this Lemon Lava Cake Dessert is more than just baking; it’s about sharing joy and warmth with those you love. Whether it’s a family gathering or a quiet evening treat, this dessert transforms any occasion into something special. The enchanting blend of rich chocolate and zesty lemon brings smiles and happy memories to your table. Don’t be surprised if this becomes your go-to dessert for celebrations or comforting moments alike. So grab your ramekins, and let the gooey magic unfold—your taste buds (and your loved ones) will thank you for it!
Print
Lemon Lava Cake Dessert
- Prep Time: 20 minutes
- Cook Time: 25 minutes
- Total Time: 45 minutes
- Yield: 6 servings 1x
- Category: Dessert
- Method: Baking
- Cuisine: American
- Diet: Vegetarian
Description
A delightful and indulgent dessert featuring a gooey lemon filling paired with a rich chocolate cake base.
Ingredients
- 170 g white chocolate baking chips
- 113 g unsalted butter, cubed
- 85 g all-purpose flour
- 110 g granulated sugar
- 4 large eggs
- 4 large egg yolks
- 150 g lemon curd
- 2 tbsp lemon zest (from 2 lemons)
- 1 tsp pure vanilla extract
- 2 tbsp powdered sugar for dusting (optional)
Instructions
- Preheat the oven to 220°C. Grease six 175 ml ramekins with nonstick spray and arrange them on a baking sheet.
- Combine white chocolate baking chips and cubed unsalted butter in a medium heatproof bowl. Microwave for 1 minute, stir, then continue in 15-second intervals, stirring after each, until smooth.
- Stir in all-purpose flour, granulated sugar, lemon curd, lemon zest, and vanilla extract until just combined.
- Gently mix in the eggs and egg yolks, being careful not to overmix. Ensure the batter is fully incorporated and smooth.
- Divide the batter evenly among the prepared ramekins, filling each about two-thirds full.
- Place the baking sheet on the middle oven rack and bake for 20 to 25 minutes, until surfaces are golden and spring back when touched.
- Allow the cakes to stand for 5 minutes. Run a knife tip around the inside edge of each ramekin. Invert onto a plate and let rest for 1 minute before lifting the ramekin away slowly.
- Dust the tops with powdered sugar if desired. Serve warm for a gooey centre.
Notes
- For best results, serve immediately while the center is still gooey.
- Ensure not to overbake, as this will turn the filling less gooey.
- Can be made ahead and stored in the refrigerator before baking.
Nutrition
- Serving Size: 1 cake
- Calories: 350
- Sugar: 25 g
- Sodium: 150 mg
- Fat: 20 g
- Saturated Fat: 10 g
- Unsaturated Fat: 9 g
- Trans Fat: 0 g
- Carbohydrates: 40 g
- Fiber: 1 g
- Protein: 6 g
- Cholesterol: 150 mg


