Introduction to Maple Leaf Cookie Kit
As the crisp autumn air rolls in, there’s something magical about cozying up in the kitchen with a batch of cookies. The Maple Leaf Cookie Kit is not just a seasonal treat; it’s a delightful experience waiting to unfold. This recipe is perfect for busy moms and professionals looking for a quick and enjoyable way to create memories with their loved ones. Imagine the smiles as you bake and decorate these festive maple-flavored cookies. You’ll find that each bite tastes like fall, and they’re sure to impress everyone at your next gathering!
Why You’ll Love This Maple Leaf Cookie Kit
This Maple Leaf Cookie Kit is all about simplicity and joy. With its easy-to-follow steps, you’ll be whipping up delicious cookies in no time. The warm, inviting flavor of maple syrup will have your family asking for more. Plus, the fun of decorating these cookies will keep your kids engaged and excited. It’s the perfect way to blend baking and quality family time, making every moment sweeter!
Ingredients for Maple Leaf Cookie Kit
Gathering the right ingredients is the first step to a successful baking adventure! Here’s what you’ll need for your Maple Leaf Cookie Kit:
- All-purpose flour: This is the base for your cookies, giving them structure and shape.
- Baking powder: A leavening agent that helps the cookies rise to delightful softness.
- Fine sea salt: A pinch of salt enhances the flavors and balances the sweetness.
- Unsalted butter: Ensure it’s softened; this creates a creamy texture for your dough.
- Granulated sugar: Adds sweetness and contributes to the delightful cookie texture.
- Light brown sugar: It lends a rich, caramel-like flavor making these cookies extra special.
- Egg: Acts as a binder that helps hold the cookies together.
- Pure maple syrup: The star of the show, giving these cookies their signature flavor and sweetness.
- Vanilla extract: This lovely flavor complements the maple syrup beautifully.
- Powdered sugar: Essential for making the fluffy royal icing that decorates the cookies.
- Egg whites or meringue powder: These are used in the icing, providing structure and gloss.
- Food coloring: Use autumn shades to make your cookies vibrant and cheerful!
- Assorted sprinkles: These add a fun, festive touch to your decorated cookies.
- Edible glitter or sugar pearls: Extra sparkle makes everything more magical, especially for kids!
- Mini chocolate chips (optional): For a delightful surprise, you can sprinkle these inside the cookie dough.
For exact measurements, check the bottom of the article where you’ll find a printable version of the recipe. Happy baking!

How to Make Maple Leaf Cookie Kit
Now that we have all our ingredients ready, it’s time to dive into the fun part—making our Maple Leaf Cookie Kit! This whole process is a delightful tapestry of flavors and creativity. Ready? Let’s roll up our sleeves and get started!
Step 1: Prepare the Dry Ingredients
First, grab a medium bowl and whisk together the all-purpose flour, baking powder, and fine sea salt.
This step is key! It helps evenly distribute the baking powder and salt, ensuring your cookies rise perfectly as they bake.
Step 2: Cream the Butter and Sugars
In a large bowl, it’s time to beat that softened unsalted butter together with granulated and brown sugars. Beat until the mixture is light and fluffy.
Picture this: fluffy, creamy goodness! This aeration will give our cookies a delightful texture.
Step 3: Combine Wet Ingredients
Now, add the large egg, pure maple syrup, and vanilla extract to the butter mixture. Beat until everything is well combined.
Your kitchen will soon smell like autumn, filled with warm maple aromas. Trust me—it’s magical!
Step 4: Form the Dough
Gradually add the dry ingredient mix to your buttery wet ingredients. Keep mixing until a soft dough forms.
It should feel smooth and slightly sticky—just perfect for rolling out later!
Step 5: Chill the Dough
Divide your dough into two halves. Shape each half into a disk and wrap it tightly in plastic wrap.
Now, it’s time for a little beauty rest! Refrigerate for about 30 minutes to firm up the dough.
Step 6: Preheat and Prepare Baking Sheets
While the dough chills, preheat your oven to 350°F. Line your baking sheets with parchment paper so those cookies won’t stick!
Preparing your baking sheets in advance makes everything smoother. Less stress means more joy!
Step 7: Roll and Cut Cookies
On a lightly floured surface, roll out one disk of dough to about 1/4 inch thickness. Use a maple leaf cookie cutter to cut out shapes.
Transfer those beautiful cookies to the prepared baking sheets, leaving about an inch between them for spreading.
Step 8: Bake the Cookies
Bake the cookies for about 12 to 15 minutes, or until the edges are lightly golden.
Let them cool on the baking sheet for 5 minutes, then gently move them to a wire rack. They’ll need to cool completely before decorating!
Step 9: Make the Royal Icing
In a clean bowl, beat the powdered sugar with egg whites (or meringue powder mixed with water) until it’s thick and glossy.
This icing is what gives your cookies that stunning finish—smooth and lovely!
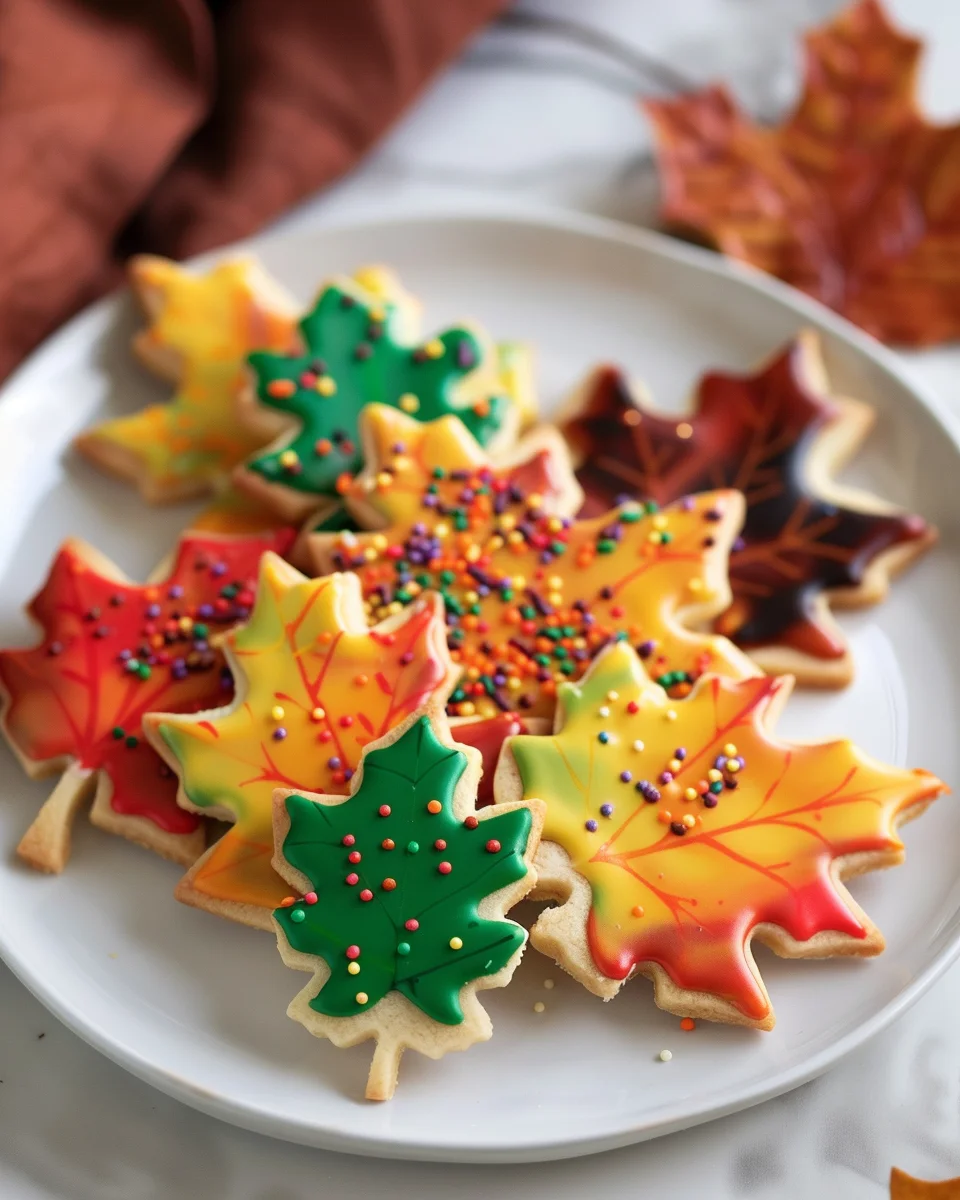
Step 10: Decorate the Cookies
Fill piping bags with your colored icing, and let your creativity shine! Decorate the cooled cookies, adding sprinkles and edible glitter as desired.
Allow the icing to set before storing or serving. Each cookie will look as fabulous as it tastes!
Tips for Success
- Make sure your butter is at room temperature; it should be soft but not melted!
- Before rolling out the dough, lightly flour your surface to prevent sticking.
- Have fun with icing colors; don’t be shy with your creativity!
- Keep your cookies in an airtight container to maintain freshness.
- Don’t rush the cooling process; fully cooled cookies hold icing better.
Equipment Needed
- Mixing bowls: A set of mixing bowls in various sizes will work perfectly.
- Whisk: A hand whisk or electric mixer makes blending a breeze.
- Baking sheets: Standard or insulated baking sheets can be used; parchment paper is a must.
- Cookie cutter: A maple leaf-shaped cutter adds that seasonal charm.
- Piping bags: Zip-top bags can substitute the piping bags for icing decoration.
Variations of Maple Leaf Cookie Kit
- Gluten-Free: Substitute all-purpose flour with a gluten-free blend to accommodate dietary restrictions.
- Maple Walnut Cookies: Mix in chopped walnuts for a delightful crunch and additional maple flavor.
- Spiced Cookies: Add a teaspoon of cinnamon or nutmeg to the dough for a warm spice kick!
- Vegan Version: Use plant-based butter and flax eggs instead of the egg for a vegan-friendly version.
- Chocolate Drizzle: After icing, add a drizzle of melted dark chocolate for a rich flavor twist.
Serving Suggestions for Maple Leaf Cookie Kit
- Pair your maple leaf cookies with a warm cup of apple cider for a truly autumn experience.
- Serve them alongside a scoop of vanilla ice cream for a delightful dessert pairing.
- Present the cookies on a rustic wooden platter adorned with seasonal leaves for a festive touch.
FAQs about Maple Leaf Cookie Kit
Can I freeze the Maple Leaf Cookie Kit cookies?
Absolutely! Once you’ve baked the cookies and cooled them completely, you can freeze them. Just place them in an airtight container with parchment paper between layers. They can last up to three months in the freezer.
How long will the royal icing last?
The royal icing can be stored in an airtight container at room temperature for about a week. Ensure the container is sealed tightly to maintain its texture and freshness. Just give it a quick stir before using if it thickens too much!
Can I customize the decorations on my cookies?
What’s a good way to store the cookies after decorating?
After decorating, allow the icing to completely set before storing your cookies. Then place them in an airtight container. If you’re stacking them, add a layer of parchment paper between them to prevent sticking.
Can I make the dough ahead of time?
Yes! You can make the dough a day ahead and keep it refrigerated. Just let it sit for a few minutes at room temperature before rolling and cutting.
Final Thoughts
Baking the Maple Leaf Cookie Kit isn’t just about cookies; it’s about creating cherished memories. The crisp autumn air fills your home with delicious scents, making every moment special. Your family gathers, engaged in decorating and sharing laughter, fostering bonds that last a lifetime. Every bite of these cookies is a reminder of the warmth of togetherness and the joy of seasonal flavors. Whether enjoyed fresh from the oven or shared with friends, these cookies are a slice of happiness. So, roll up your sleeves and dive into this delightful baking adventure!
Print
Maple Leaf Cookie Kit
- Prep Time: 1 hour
- Cook Time: 15 minutes
- Total Time: 1 hour 15 minutes
- Yield: 24 cookies 1x
- Category: Dessert
- Method: Baking
- Cuisine: American
- Diet: Vegetarian
Description
A delightful Maple Leaf Cookie Kit perfect for seasonal baking, featuring maple-flavored cookies decorated with royal icing and toppings.
Ingredients
- 2 1/2 cups all-purpose flour
- 1/2 teaspoon baking powder
- 1/4 teaspoon fine sea salt
- 1/2 cup unsalted butter, softened
- 1/2 cup granulated sugar
- 1/4 cup packed light brown sugar
- 1 large egg
- 1/3 cup pure maple syrup
- 1 teaspoon vanilla extract
- 3 cups powdered sugar, sifted
- 2 large egg whites or 4 tablespoons meringue powder plus 1/4 cup water
- 1/2 teaspoon vanilla or maple extract
- Food coloring in autumn shades (red, orange, yellow, brown, green)
- Assorted sprinkles
- Edible glitter or sugar pearls
- Mini chocolate chips (optional)
Instructions
- Whisk together flour, baking powder, and salt in a medium bowl.
- Beat unsalted butter, granulated sugar, and brown sugar in a large bowl until light and fluffy.
- Add egg, pure maple syrup, and vanilla extract to the butter mixture and beat until well combined.
- Gradually add the dry ingredient mixture to the wet ingredients, mixing until a dough forms.
- Divide dough into two halves, shape each into a disk, wrap with plastic wrap, and refrigerate for 30 minutes.
- Preheat oven to 350°F. Line baking sheets with parchment paper.
- On a lightly floured surface, roll dough to approximately 1/4 inch thickness.
- Use a maple leaf cookie cutter to cut shapes and transfer cookies to baking sheets, spacing 1 inch apart.
- Bake for 12 to 15 minutes until edges are lightly golden. Cool on baking sheet for 5 minutes then transfer to wire rack to cool completely.
- Beat powdered sugar and egg whites (or meringue powder with water) until thick and glossy. Stir in vanilla or maple extract. Divide into bowls and tint with food coloring.
- Fill piping bags with colored icing and decorate cooled cookies. Add desired toppings and allow icing to set before storing or serving.
Notes
- Ensure your butter is softened for easier creaming.
- Adjust the thickness of icing by adding water or additional powdered sugar as needed.
- For best results, use a cooking thermometer to check if cookies are done.
Nutrition
- Serving Size: 1 cookie
- Calories: 150
- Sugar: 12g
- Sodium: 50mg
- Fat: 6g
- Saturated Fat: 4g
- Unsaturated Fat: 2g
- Trans Fat: 0g
- Carbohydrates: 22g
- Fiber: 1g
- Protein: 2g
- Cholesterol: 25mg


