Introduction to No-Bake Grinch Mousse Pie
As the holiday season approaches, busy moms like me find ourselves juggling countless tasks. Wouldn’t it be great to find a delightful treat that requires little effort? Enter the No-Bake Grinch Mousse Pie! This fun and festive dessert is not only easy to whip up, but it also brings a spark of joy to your gatherings. Each bite is a creamy, dreamy explosion of flavors, perfect for impressing your family and friends. It’s like a sweet hug on a plate, and I can’t wait to share this joyful recipe with you!
Why You’ll Love This No-Bake Grinch Mousse Pie
This No-Bake Grinch Mousse Pie is the ultimate holiday game-changer! It comes together in a snap, so you won’t feel frazzled trying to impress your guests. With its smooth texture and vibrant colors, this pie is a feast for the eyes and the taste buds. Plus, it’s a no-bake wonder, making cleanup a breeze. Simply put, this festive treat combines ease, flavor, and fun in one delicious package!
Ingredients for No-Bake Grinch Mousse Pie
Gathering all the right ingredients is the first step to creating this delightful No-Bake Grinch Mousse Pie. Each component adds a unique touch to this festive treat!
- Red cookie crumbs: Use red velvet Oreos without filling or any red sandwich cookies. These provide the perfect base with a pop of color and rich flavor.
- Melted butter: This helps to bind the cookie crumbs into a sturdy crust. Choose unsalted for better control over the pie’s overall saltiness.
- Cream cheese: Softened and fluffy, this ingredient adds creaminess and richness to the mousse. Make sure it’s at room temperature for easy blending.
- Powdered sugar: It sweetens the mousse perfectly, creating that delightful dessert flavor. You can use less if you prefer a less sweet treat!
- Vanilla extract: A splash of this essential ingredient uplifts the flavors. Opt for pure vanilla for the best taste.
- Whipped topping: Use Cool Whip or your favorite brand. It adds a light, airy texture to the mousse.
- Heavy cream: Whipped to soft peaks, it makes the mousse rich and decadent. For vegan options, consider coconut cream.
- Red heart sprinkles: These tiny hearts sprinkle festive cheer into the mousse. Feel free to get creative with shapes!
- Green nonpareils or green sprinkles: They add that iconic Grinchy green color. Use different shades to add variety.
- Extra whipped topping: This is for decorating the pie and making it look extra festive.
- Neon green gel food coloring: A couple of drops bring that Grinch green to life. Just a little bit goes a long way!
- Regular green gel dye: Mix with the neon green for a fun, vibrant tint that captures the spirit of the season.
- Extra red heart sprinkles: For finishing touches, these add a beautiful pop of color on top and a whimsical look!
All ingredients with exact quantities can be found at the bottom of the article, available for printing. Happy gathering!

How to Make No-Bake Grinch Mousse Pie
Now that you’ve gathered your ingredients, it’s time to bring this festive dessert to life! Follow these straightforward steps, and you’ll have a stunning No-Bake Grinch Mousse Pie ready to impress. Let’s dive in!
Step 1: Make the Red Cookie Crust
First, grab your red cookies! I like to use red velvet Oreos without the filling for a pop of color and flavor. Crush them into fine crumbs using a food processor or by sealing them in a sturdy bag and smashing with a rolling pin.
Next, melt your butter and combine it with the cookie crumbs until everything is evenly coated. It should feel like wet sand! Now, press this mixture firmly into a pie dish to form a sturdy crust. Aim for an even layer to hold the mousse perfectly.
Finally, pop the crust in the fridge. Let it chill for about 20 minutes to set while you prepare the mousse. Trust me, this step is key for a nice, clean slice later!
Step 2: Prepare the Mousse Base
With your crust now firm, let’s create the creamy mousse! In a large mixing bowl, beat the softened cream cheese using an electric mixer until it’s smooth and fluffy. This step is crucial—if the cream cheese isn’t softened, it’ll be lumpy!
Once it’s all whipped up, add the powdered sugar and vanilla extract. Blend these together until combined. Now for the fun part! Gently fold in the Cool Whip and whipped cream until you achieve a thick, fluffy mousse. A spatula works wonders here—be gentle to keep that airiness!
Step 3: Add Festive Sprinkles
Now comes the moment to add some festive cheer! Fold in the red heart sprinkles and green nonpareils into your mousse mixture. This adds not just flavor but a visual delight that catches the holiday spirit.
Spread the mousse evenly over the chilled cookie crust, smoothing it out with a spatula. It should look luscious and inviting already!
Step 4: Chill the Pie
Patience is a virtue, especially in the kitchen! Cover the pie with plastic wrap and refrigerate it for at least four to six hours. I recommend letting it chill overnight for the best results.
This time isn’t just about keeping it cool; it helps the mousse set beautifully, ensuring each slice holds its shape. The wait is tough, but your taste buds will thank you!
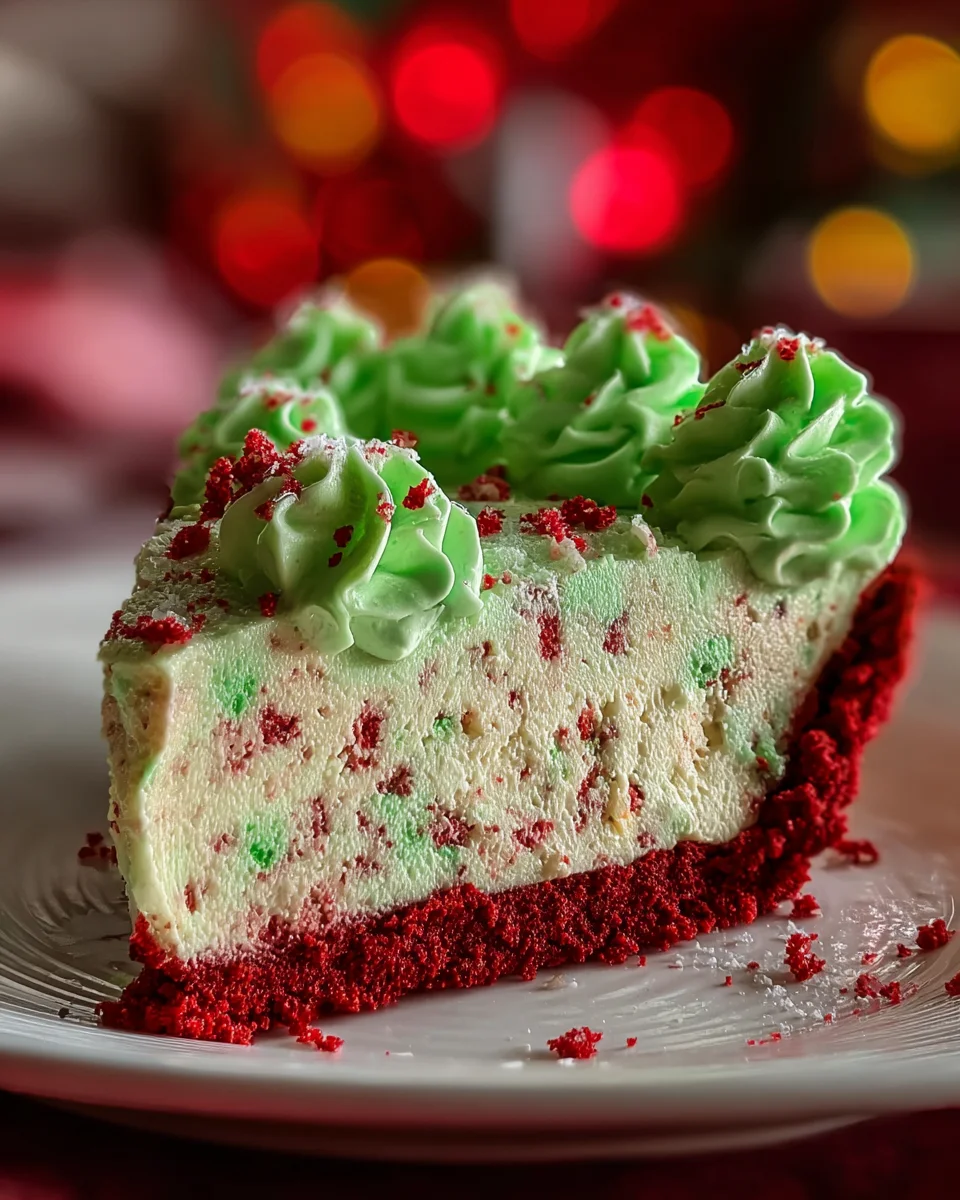
Step 5: Make the Grinch Piped Topping
While you wait, let’s prepare that Grinch green topping! In a bowl, tint your extra whipped topping using the neon and the regular green gel food dye. Mix until you reach a bright, cheerful shade of green!
Transfer this festive whipped topping to a piping bag (or a zip-top bag with the tip cut off). Pipe tall, swirly peaks on top of your beautifully set mousse. This adds height and a whimsical touch—just like what you’d find in Whoville!
Step 6: Decorate
Time to sprinkle some more joy! Get creative with your decorations. Scatter extra small and medium red heart sprinkles atop the green topping. It’ll look like a scene from a holiday wonderland!
This step not only adds a pop of color but also takes your dessert from delightful to absolutely breathtaking.
Step 7: Slice and Serve
When the time comes to serve, use a hot knife to cut neat, beautiful slices. Simply run the knife under hot water, wipe it clean, and slice through the pie. You’ll have clean edges that look like they belong in a bakery!
Serve chilled, and watch as everyone greets this No-Bake Grinch Mousse Pie with smiles. It’s bound to become a festive favorite in your household!
Tips for Success
- Use room temperature cream cheese for a smoother mousse.
- Chilling the pie overnight leads to the best texture and flavors.
- Feel free to add more sprinkles for a festive flair.
- For a creamier topping, whip the heavy cream until just soft peaks form.
- Don’t stress about perfection; it’s all about enjoying the process!
Equipment Needed
- Mixing bowls: Use any large bowl; you can even use your favorite casserole dish if preferred.
- Electric mixer: A hand mixer works great, but a stand mixer can be a fantastic alternative!
- Pie dish: Any pie plate will do; a glass one showcases the beautiful layers.
- Piping bag: If you don’t have one, a zip-top bag with the corner cut works perfectly.
Variations for No-Bake Grinch Mousse Pie
- Chocolate Delight: Substitute half the cream cheese with chocolate cream cheese for a rich and decadent twist.
- Nutty Grinch: Add crushed nuts like almonds or walnuts to the mousse for texture and flavor.
- Vegan Version: Use dairy-free cream cheese and coconut whipped cream to make this dessert plant-based friendly.
- Flavor Infusions: Consider adding peppermint extract to the mousse for a refreshing holiday flavor.
- Fruit-Filled Surprise: Fold in mini marshmallows or diced strawberries for additional sweetness and bursts of fruity flavor.
Serving Suggestions for No-Bake Grinch Mousse Pie
- Pair with peppermint hot chocolate for a cozy holiday treat.
- Serve alongside festive fruit salad for a refreshing contrast.
- Garnish with whipped cream and mint leaves for an elegant touch.
- Present on a colorful holiday-themed platter for added cheer.
FAQs about No-Bake Grinch Mousse Pie
Can I make the No-Bake Grinch Mousse Pie ahead of time?
Absolutely! This pie is perfect for making a day in advance. In fact, chilling it overnight enhances the flavor and texture, making each slice even more delicious!
What can I substitute for red cookie crumbs?
If you can’t find red cookies, don’t worry! You can use crushed graham crackers or regular chocolate sandwich cookies for a different yet tasty crust.
How can I make this pie gluten-free?
To make a gluten-free No-Bake Grinch Mousse Pie, opt for gluten-free red cookies or a gluten-free cookie crust alternative. Just check the ingredients label to ensure they meet your needs.
Can I use homemade whipped cream instead of Cool Whip?
Definitely! Just whip heavy cream to soft peaks with a bit of sugar and vanilla. Homemade whipped cream adds a lovely freshness and rich flavor to the mousse.
What should I do if the mousse is too thick?
If your mousse seems too thick, consider folding in a tiny bit of milk or cream until you reach your desired consistency. It’s important to keep the texture light and fluffy!
Final Thoughts
Creating this No-Bake Grinch Mousse Pie isn’t just about the end result; it’s about the joyful experience it brings to the table. The vibrant colors and delightful flavors combine to evoke the magic of the holiday season. Each slice offers a creamy, luscious treat that warms the heart, reminding us of the joy shared with loved ones during festive gatherings. Plus, the ease of preparation makes it a go-to recipe for busy days. Trust me, this pie will become a cherished tradition in your home, bringing smiles and sweet memories year after year!
Print
No-Bake Grinch Mousse Pie
- Prep Time: 30 minutes
- Cook Time: 0 minutes
- Total Time: 4-6 hours (chill time included)
- Yield: 8 servings 1x
- Category: Dessert
- Method: No-bake
- Cuisine: American
- Diet: Vegetarian
Description
A delightful and festive No-Bake Grinch Mousse Pie that is easy to make and perfect for holiday celebrations!
Ingredients
- 2 cups red cookie crumbs (red velvet Oreos without filling or any red sandwich cookie)
- 5 tablespoons melted butter
- 8 oz cream cheese, softened
- 1 cup powdered sugar
- 1 teaspoon vanilla extract
- 1 cup whipped topping (Cool Whip)
- 1 cup heavy cream, whipped to soft peaks
- ½ cup small red heart sprinkles
- ¼ cup green nonpareils or green sprinkles
- 1½ cups whipped topping or stabilized whipped cream
- 2–3 drops neon green gel food coloring
- 1–2 drops regular green gel dye
- Extra red heart sprinkles
Instructions
- Make the red cookie crust (20 minutes): Crush the red cookies into fine crumbs, mix with melted butter, and press firmly into a pie dish. Chill to set.
- Prepare the mousse base (5 minutes): Beat cream cheese until smooth and fluffy. Add powdered sugar and vanilla. Fold in Cool Whip, then fold in whipped heavy cream to create a thick mousse.
- Add festive sprinkles (3 minutes): Stir in red heart sprinkles and green nonpareils. Spread the mousse evenly into the chilled crust.
- Chill the pie (4–6 hours): Refrigerate until the mousse is firm enough to slice cleanly. Overnight is ideal.
- Make the Grinch piped topping (3 minutes): Tint whipped topping with neon and regular green gel coloring until it becomes bright Grinch-green. Pipe tall swirls on top.
- Decorate (1 minute): Add extra small and medium red heart sprinkles for that perfect Whoville touch.
- Slice and serve (1 minute): Use a hot knife for clean edges. Serve chilled and enjoy!
Notes
- For best results, let the pie chill overnight.
- Use high-quality heavy cream for the best mousse texture.
- Feel free to add more sprinkles for additional festive decoration.
Nutrition
- Serving Size: 1 slice
- Calories: 350
- Sugar: 22g
- Sodium: 150mg
- Fat: 24g
- Saturated Fat: 14g
- Unsaturated Fat: 6g
- Trans Fat: 0g
- Carbohydrates: 30g
- Fiber: 1g
- Protein: 3g
- Cholesterol: 40mg


