Introduction to No Bake Pumpkin Cheesecake Balls
As the leaves begin to turn and the scent of pumpkin spice fills the air, I can’t help but think of delights like No Bake Pumpkin Cheesecake Balls. These little treats are not just easy to whip up; they’re a sweet escape for us busy moms. Whether it’s a quick dessert after dinner or a fun treat to bring to a gathering, they always impress. Plus, who doesn’t love the comforting flavors of fall? Whip up this simple no-bake recipe, and you’ll have the perfect bite-sized indulgence that everyone will adore!
Why You’ll Love This No Bake Pumpkin Cheesecake Balls
If you’re looking for a dessert that combines ease and delightful flavor, these No Bake Pumpkin Cheesecake Balls are a must-try. They come together in just 15 minutes and are perfect for any occasion. With creamy pumpkin goodness rolled in chocolate or nuts, they’re impossible to resist. No baking, no fuss—just pure joy wrapped in a bite-sized treat that will keep everyone coming back for more!

Ingredients for No Bake Pumpkin Cheesecake Balls
To create these mouthwatering No Bake Pumpkin Cheesecake Balls, you’ll need a handful of simple ingredients. Each one plays a vital role in achieving that luscious flavor and texture we all crave. Here’s what you’ll need:
- Cream cheese: The base of our cheesecake, adding that rich and creamy texture.
- Canned pumpkin puree: Provides that signature fall flavor and natural sweetness.
- Powdered sugar: Sweetens the mixture, making every bite perfectly delightful.
- Vanilla extract: A splash of this adds depth and enhances the overall taste.
- Ground cinnamon: Brings warmth and spice, capturing the essence of autumn.
- Ground nutmeg: Just a hint of nutmeg adds a fragrant zest to the mix.
- Ground ginger: For a touch of zing, this ingredient balances the sweetness beautifully.
- Ground cloves (optional): Use sparingly, but they add a lovely aromatic quality.
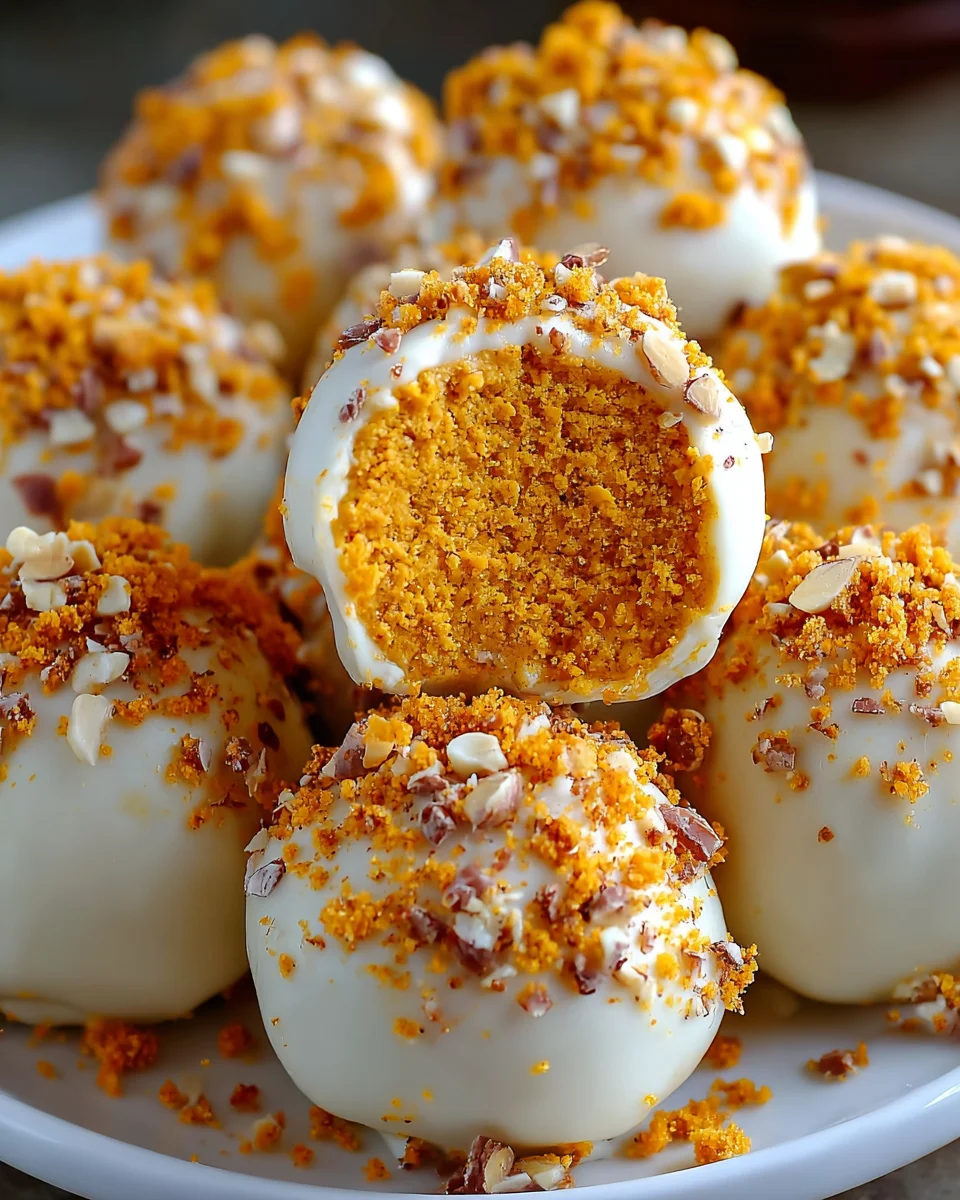
- Graham cracker crumbs: Essential for texture and crafting those perfect cheesecake balls.
- Chocolate chips or candy melts: For coating, adding a delicious layer of sweetness.
- Extra graham cracker crumbs or crushed nuts (optional): Roll the dipped balls in these for added crunch and flavor!
Each of these ingredients can be found at your local grocery store, often right in the baking aisle. Specific measurements are given at the bottom of the article for easy printing. Now, let’s gather everything and start our delightful no-bake pumpkin adventure!

How to Make No Bake Pumpkin Cheesecake Balls
Creating these delightful No Bake Pumpkin Cheesecake Balls is a breeze. With just a few simple steps, you’ll have a fun treat ready to impress your family or guests. Let’s dive into the easy process!
Step 1: Combine the Base Ingredients
Start by grabbing a large mixing bowl. Add the softened cream cheese, canned pumpkin puree, powdered sugar, and vanilla extract. Use a hand mixer or a whisk to blend everything until it’s beautifully smooth. Trust me, the creamy texture at this stage is a joy to behold!
Step 2: Add the Spice Mix
Now comes the magic! Sprinkle in the ground cinnamon, nutmeg, ginger, and optional cloves. Mix these fragrant spices into the creamy base until they’re evenly blended. The aroma will envelop your kitchen and set the perfect fall mood.
Step 3: Incorporate Graham Cracker Crumbs
Next, gradually fold in the graham cracker crumbs. This is where your mixture thickens and begins to take shape. If it feels too soft, don’t worry—just add more crumbs until it’s moldable. You’re aiming for a consistency that’s just right for rolling.
Step 4: Form the Balls
Using a tablespoon or a cookie scoop, take portions of the mixture and roll them into bite-sized balls. Place each one onto a baking sheet lined with parchment paper. Keep your hands slightly damp to prevent the mixture from sticking. This step is where the fun begins!
Step 5: Chill the Balls
To help the balls hold their shape, pop them into the refrigerator for at least one hour. This chilling time is essential—it allows the flavors to meld beautifully, setting you up for a fantastic treat!
Step 6: Melt the Chocolate
While your cheesecake balls are chilling, it’s time to melt the chocolate. Place your chocolate chips or candy melts in a microwave-safe bowl. Heat them in 30-second intervals, stirring after each to ensure they’re silky smooth. Be patient—this step leads to that dreamy chocolate coating.
Step 7: Dip the Balls
Once your balls are chilled and the chocolate is ready, dip each cheesecake ball in the melted chocolate. Use a fork or a dipping tool to make this easier. Let any excess chocolate drip back into the bowl—no one likes a pool of chocolate on their plate. Place them back on the lined baking sheet after dipping.
Step 8: Set and Serve
If you’d like, roll the chocolate-coated balls in extra graham cracker crumbs or crushed nuts before the chocolate sets. Then, return them to the fridge for about 30 minutes to firm up. When you’re ready to serve, enjoy these delicious No Bake Pumpkin Cheesecake Balls chilled. They’ll be the star of any autumn gathering!
Tips for Success
- Make sure your cream cheese is at room temperature for easier mixing.
- If the mixture is too soft, add more graham cracker crumbs gradually.
- Use parchment paper on the baking sheet for easy cleanup and removal.
- Experiment with different chocolate coatings for unique flavors.
- Chill the balls thoroughly to maintain their shape and texture.
Equipment Needed
- Mixing bowl: Any large bowl will do, even a pot can work!
- Hand mixer or whisk: A hand mixer makes it easy, but a good old whisk is great too.
- Cookie scoop or tablespoon: Helps in portioning the mixture evenly.
- Baking sheet: Line it with parchment paper for easy cleanup.
- Microwave-safe bowl: Essential for melting chocolate—glass or ceramic works best.
Variations
- Nutty Delight: Add crushed nuts, such as walnuts or pecans, into the mixture for extra texture and a delightful crunch.
- Vegan Option: Substitute cream cheese with vegan cream cheese and use coconut cream instead of chocolate for a dairy-free treat.
- Spiced Pumpkin: Mix in a tablespoon of pumpkin pie spice for a spicier flavor profile that’s perfect for fall.
- Food Coloring Fun: Use food coloring in the chocolate to make festive, colorful treats for special occasions.
- Chocolate Variations: Experiment with dark chocolate, white chocolate, or even flavored candy melts for a unique twist.
Serving Suggestions
- Pair with a warm cup of spiced chai or apple cider for a cozy fall vibe.
- Serve on a festive platter garnished with cinnamon sticks or small pumpkins for a charming presentation.
- For a crowd-pleaser, arrange on a tiered stand for an impressive dessert display.
- Top with whipped cream or a drizzle of caramel sauce for an extra touch of sweetness.
FAQs about No Bake Pumpkin Cheesecake Balls
Can I make No Bake Pumpkin Cheesecake Balls ahead of time?
Absolutely! These delightful treats can be made a day or two in advance. Just store them in an airtight container in the fridge until you’re ready to serve.
How long do No Bake Pumpkin Cheesecake Balls last?
When stored properly in the refrigerator, these cheesecake balls can last up to five days. However, I can assure you—they’re usually gone much sooner!
Are these cheesecake balls gluten-free?
To make them gluten-free, you can swap regular graham crackers for gluten-free ones. It’s a simple switch that allows everyone to enjoy this treat!
Can I use fresh pumpkin instead of canned puree?
Yes! If you prefer fresh pumpkin, just make sure it’s cooked and pureed until smooth. It gives a wonderful homemade touch to your No Bake Pumpkin Cheesecake Balls.
What’s the best way to store leftover cheesecake balls?
Keep any leftovers in an airtight container in the fridge. If you’ve rolled them in nuts or crumbs, it’s best to store them separately to retain their texture.
Final Thoughts
Creating these No Bake Pumpkin Cheesecake Balls is more than just whipping up a tasty dessert; it’s about embracing the cozy essence of fall in every bite. The joy on my family’s faces as they savor these treats is priceless. Plus, they’re so simple to make that even on my busiest days, I find time to craft them. Whether shared at a gathering or enjoyed after a home-cooked meal, these delightful bites promise a sweet experience. So, gather your ingredients and let the autumn magic unfold in your kitchen this season!
Print
No Bake Pumpkin Cheesecake Balls
- Prep Time: 15 minutes
- Cook Time: 0 minutes
- Total Time: 1 hour 30 minutes
- Yield: 24 balls 1x
- Category: Dessert
- Method: No Bake
- Cuisine: American
- Diet: Vegetarian
Description
Delicious no bake pumpkin cheesecake balls, perfect for a sweet treat during the fall season.
Ingredients
- 225 g cream cheese, softened
- 250 g canned pumpkin puree
- 125 g powdered sugar
- 1 tsp vanilla extract
- 1 tsp ground cinnamon
- 0.5 tsp ground nutmeg
- 0.25 tsp ground ginger
- Pinch of ground cloves (optional)
- 2 cups graham cracker crumbs
- White chocolate, milk chocolate chips, or candy melts (for dipping)
- Extra graham cracker crumbs or crushed nuts (optional, for rolling)
Instructions
- In a large mixing bowl, combine the softened cream cheese, pumpkin puree, powdered sugar, and vanilla extract. Use a hand mixer or a whisk to mix everything until smooth and well combined.
- Add the ground cinnamon, nutmeg, ginger, and optional cloves to the mixture. Stir well until all the spices are evenly incorporated into the creamy base.
- Fold in the graham cracker crumbs gradually. Mix until the mixture becomes thick enough to roll into balls. If it feels too soft, add more graham cracker crumbs as needed for a workable consistency.
- Using a tablespoon or a cookie scoop, portion out the mixture and roll it into bite-sized balls. Place each ball onto a baking sheet lined with parchment paper.
- Refrigerate the rolled balls for at least 1 hour to firm them up for the next step.
- In a microwave-safe bowl, melt the chocolate chips or candy melts. Heat in 30-second intervals, stirring after each interval until completely smooth and melted.
- Using a fork or dipping tool, carefully dip each chilled cheesecake ball into the melted chocolate. Let any excess chocolate drip back into the bowl before placing them back on the lined baking sheet.
- If desired, roll the chocolate-coated balls in extra graham cracker crumbs, crushed nuts, or sprinkles before the chocolate sets.
- Refrigerate the coated cheesecake balls again for about 30 minutes, or until the chocolate is firm.
- Serve the cheesecake balls chilled. Store any leftovers in an airtight container in the fridge for up to 5 days.
Notes
- Ensure cream cheese is softened at room temperature for easier mixing.
- Customize the coating with different types of chocolate or toppings.
- These can be made ahead of time and stored in the fridge.
Nutrition
- Serving Size: 1 ball
- Calories: 120
- Sugar: 10g
- Sodium: 50mg
- Fat: 7g
- Saturated Fat: 4g
- Unsaturated Fat: 2g
- Trans Fat: 0g
- Carbohydrates: 13g
- Fiber: 1g
- Protein: 2g
- Cholesterol: 15mg


