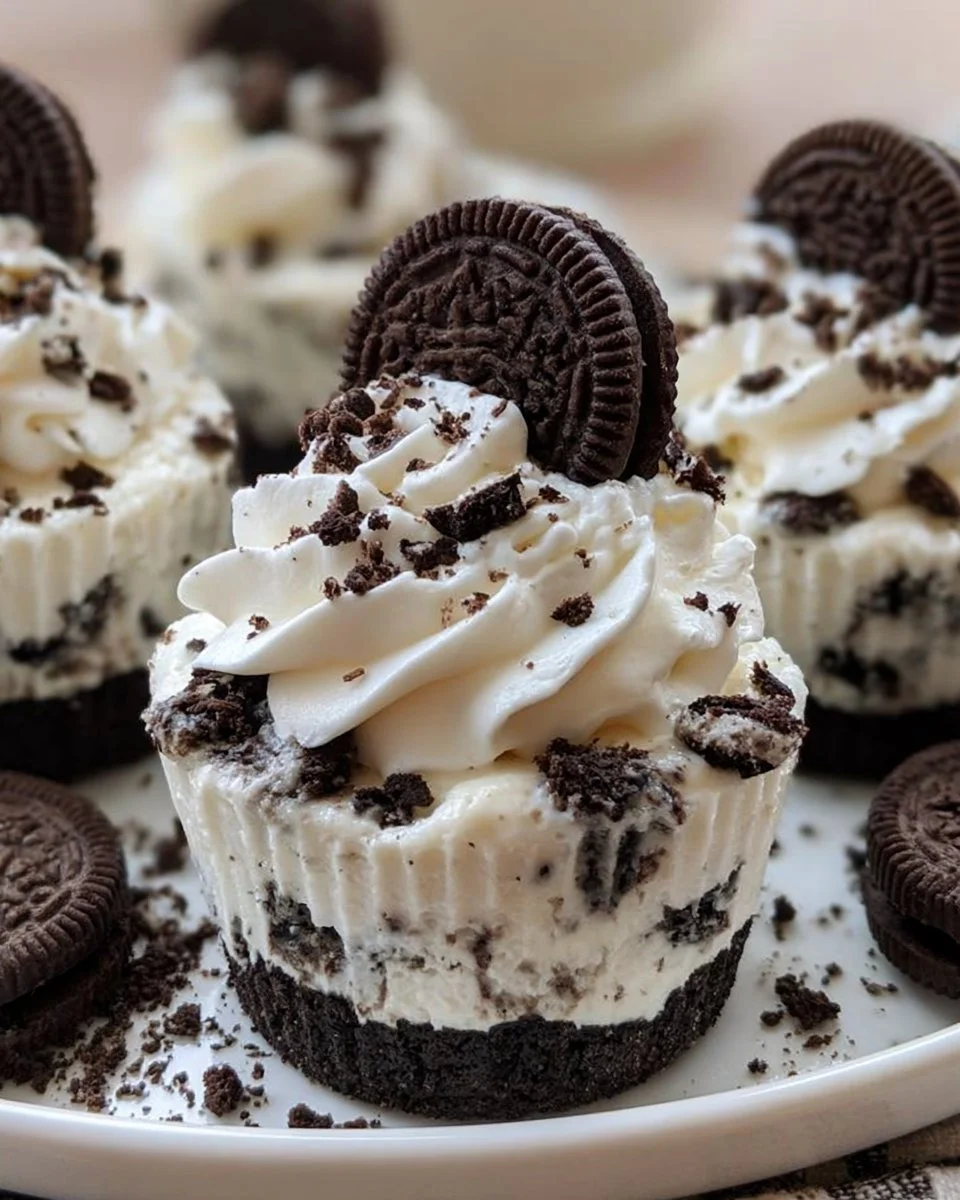
The moment you sink your spoon into an Oreo No-Bake Cheesecake Cup, you discover a hidden world of delectable layers that dance on your taste buds. The contrasting textures of the silky cheesecake filling against the crunchy Oreo base create a symphony of sensations with each bite. The rich and creamy cheesecake envelops you in its embrace, while the familiar crunch of crushed Oreos brings nostalgia, taking you back to childhood treats and carefree afternoons. As you lift the cup to your lips, the warm scent of cocoa mingles with a hint of vanilla, inviting you to dive deeper into this tempting dessert.
Picture it—a gathering of friends, laughter filling the air, as you unveil these charming dessert cups. Each one, a beautifully layered masterpiece, beckons. They are not just a dessert; they are an experience. The sweet, velvety cheesecake atop a chocolaty crust mirrors the joy and camaraderie of the occasion, making every celebration feel just a bit more special. With minimal effort and maximum flavor, you can create a stunning treat that leaves everyone yearning for more.
Why You’ll Love This Oreo No-Bake Cheesecake Cups
Oreo No-Bake Cheesecake Cups are a delightful concoction that brings the best of both worlds: the beloved cookies you adore and the rich, creamy cheesecake that everyone craves. These cups stand out for several reasons. Firstly, they require no baking, making them incredibly accessible—perfect for both novice bakers and seasoned chefs alike. Simply whip up the cream cheese filling, layer it with crushed Oreos, and chill. What could be easier?
Beyond convenience, the flavor profiles blend harmoniously. The sweetness of the cheesecake intricately balances with the rich, dark cocoa notes of the Oreos, producing a dessert that can only be described as heavenly. They are perfect for a variety of occasions—birthdays, parties, or simply a Friday night treat at home. The versatility of these tiny cups means you can easily make them in advance, ensuring that dessert is one less thing to worry about when hosting.
Preparation Phase & Tools to Use
Creating these cheesecake cups requires just a few essential tools that make the process smooth and enjoyable.
- Mixing Bowls: Opt for medium-sized bowls that are sturdy enough to withstand vigorous mixing.
- Electric Mixer: If you want a flawlessly creamy cheesecake filling, a hand or stand mixer is indispensable. It incorporates air into the cream cheese, creating a light and fluffy texture.
- Plastic Ziplock Bag: This handy bag will safely contain your Oreos for crushing while minimizing mess.
- Measuring Cups & Spoons: Precision matters for perfect sweetness and consistency, so keep these close at hand.
- Dessert Cups: Choose transparent ones to showcase the beautiful layers—a feast for both the eyes and the palate!
Preparation Tips: Ensure your cream cheese is completely softened before mixing; this helps in achieving that perfectly smooth texture. Also, when crushing the Oreos, aim for a fine crumb to enhance the overall creamy mouthfeel.
Ingredients for Oreo No-Bake Cheesecake Cups
- 1 (8 oz) block of cream cheese, softened: Cream cheese forms the base of the cheesecake, providing that luscious silkiness. If you’re looking for a lighter option, consider using reduced-fat cream cheese.
- 1 (8 oz) Cool Whip or whipped topping: This adds an airy lightness to the filling. For a homemade approach, you can substitute with freshly whipped cream.
- 2/3 cup powdered sugar: It sweetens the filling beautifully. You may adjust the quantity according to your taste preference.
- 1 teaspoon vanilla extract: Vanilla enhances flavors in the cheesecake, creating a warm backdrop to the sweetness. Always opt for pure vanilla for the best flavor.
- 24-26 Oreo cookies (plus extra for topping): These cookies form the delicious crust and garnish. For a fun twist, try using different flavored Oreos!
How to Make Oreo No-Bake Cheesecake Cups
Embarking on this delicious venture is as easy as 1-2-3. Follow these steps to create your own irresistible Oreo No-Bake Cheesecake Cups.
Crush the Oreos: Place the Oreos in a plastic bag and seal it shut. Take your rolling pin or a sturdy wooden spoon and crush the cookies into fine crumbs, releasing their delightful aroma.
Prepare the Cups: Spoon about 1.5 to 2 tablespoons of the crushed Oreos into the bottom of 6 small dessert dishes (choose dishes that hold at least ¾ to 1 cup). Press gently to form a solid base and set aside.
Mix the Filling: In a mixing bowl, combine the softened cream cheese and powdered sugar. Using your hand or stand mixer, whip until the mixture becomes creamy and smooth. Add in the vanilla and mix until incorporated.
Incorporate the Cool Whip: Gently fold in the Cool Whip, allowing it to blend seamlessly into the mixture. Carefully fold in the remaining crushed Oreos to provide that signature Oreo flavor.
Assemble the Cups: Divide the cheesecake filling evenly among the dessert dishes. Gently press it down over the crushed Oreos to create distinct layers.
Chill and Garnish: Place the cups in the refrigerator for about an hour, allowing the flavors to meld beautifully. When ready to serve, top each one with a dollop of whipped cream and a sprinkle of crushed Oreos for that extra crunch.
Enjoy! With every spoonful, delight in the creamy, crunchy, and sweet layers that make this treat unforgettable.
Chef’s Notes & Helpful Tips
- Make-ahead tips: These cheesecake cups can be prepared a day in advance. The longer they chill, the better the flavors develop. Just be sure to keep them covered in the fridge to maintain freshness.
- Cooking alternatives: While no baking is required, you can also turn this into a baked cheesecake by pouring the filling into a crust and baking it at a low temperature for an entirely different experience.
- Customization ideas: Experiment with flavors! Try adding peanut butter to the filling or swap out Oreos for other cookies like chocolate sandwich cookies or vanilla wafers for a unique twist.
Common Mistakes to Avoid
- Skipping cream cheese softening: Don’t rush this step! If the cream cheese isn’t properly softened, you’ll end up with a lumpy mix instead of a velvety filling.
- Overmixing: Fold in your cool whip gently to retain its airy texture. Overmixing can lead to a dense filling that lacks the desired lightness.
- Not chilling long enough: Allow sufficient time for the cheesecake cups to chill. This step is vital for the filling to set properly and enhances the overall flavor.
What to Serve With Oreo No-Bake Cheesecake Cups
Pairing your cheesecake cups with delightful beverages and sides enhances the overall experience:
- Coffee or Espresso: The rich flavors complement the sweetness beautifully, creating a perfect dessert pairing.
- Milkshakes: A chocolate or vanilla milkshake adds an indulgent twist that appeals to the sweet tooth.
- Fruit Salad: A refreshing fruit salad provides a tangy contrast to the richness of the cheesecake.
- Ice Cream: Consider a scoop of vanilla or cookies and cream ice cream for a double treat.
- Sparkling Water: The bubbles cleanse the palate beautifully between each sweet bite.
- Chocolate Sauce: Drizzling chocolate sauce over the top can intensify the flavor profile, adding richness.
- Cheesecake Brownies: Serve alongside for a decadent dessert duo that chocolate lovers will adore.
Storage & Reheating Instructions
These cheesecake cups store remarkably well in the refrigerator. Keep them tightly covered, and they’ll remain fresh for up to 3 days. If you want to freeze them, transfer the filling into tightly sealed containers and freeze for up to 2 months. Note that the Oreo crust may lose some of its crunch after freezing; enjoy them directly from the fridge for optimal texture.
Estimated Nutrition Information
Each Oreo No-Bake Cheesecake Cup contains approximately 250 calories, 15g of fat, 30g of carbohydrates, and 4g of protein. Please remember that these values can vary based on specific ingredients and portion sizes.
FAQs
Can I use regular whipped cream instead of Cool Whip?
Absolutely! Homemade whipped cream creates a delightful freshness. Just ensure it’s whipped to medium-soft peaks before folding it into the filling.
How do I make these cups gluten-free?
Use gluten-free Oreos or your favorite gluten-free cookie for the crust. The rest of the ingredients are typically gluten-free, but always double-check labels for safety.
Can I substitute cream cheese with a vegan option?
Yes! Vegan cream cheese and dairy-free whipped toppings offer an excellent substitute, allowing everyone to enjoy this dessert.
Is it possible to add flavors like chocolate or fruit?
Definitely! Mix in melted chocolate or fruit puree to the filling before folding in the Cool Whip. Make sure to adjust sugar based on sweetness.
How can I ensure my cheesecake cups remain light and fluffy?
Always fold ingredients gently to prevent deflating the mixture. Also, avoid over-mixing once the Cool Whip is added.
Conclusion
The magic of Oreo No-Bake Cheesecake Cups lies not only in their creamy texture and chocolatey crunch but also in the memories they create. They bring people together and fill every moment with joy, laughter, and sweetness. Whether you’re crafting them for a special occasion or simply indulging in a well-deserved treat, these cups promise to satisfy even the most discerning sweet tooth. So grab your ingredients, gather those you love, and let the celebration of flavors begin. You won’t regret it!