Introduction to Oreo Sushi Rolls Dessert Fusion
Being a mom on the run I know how valuable time is when it comes to preparing goodies for your family. So, here’s that fabulous Oreo Sushi Rolls Dessert Fusion recipe. It’s like ‘dessert meets fun!’ Super innovative and filled with a cream filling combined with the recognizable taste of Oreos. Your children would love these and so would your friends. If you are in a rush and want to prepare a great dessert or are getting ready to shine at an event, this recipe will help you be the bearer of good news.
Why You’ll Love This Oreo Sushi Rolls Dessert Fusion
This dessert is not only interesting in serving but very simple to prepare. If you are as busy as a one-armed wallenda, no baking is probably the flavor in such desserts so beloved that would become your preeminent go-to recipe. And all served in an extremely-tasteful Oreo crust, it’s effectively assured to please even the most finicky of eaters. In just 50 minutes, you’re well on your way to producing a showstopper that turns any old day into a sweet celebration.

Ingredients for Oreo Sushi Rolls Dessert Fusion
Gathering the right ingredients is the first step to success in creating these whimsical Oreo Sushi Rolls Dessert Fusion. Here’s what you’ll need:
- Oreo cookies: The star of the show! These classic chocolate cookies bring their rich flavor and crunch to the rolls.
- Whole milk: This helps bind the Oreo crumbs into a dough. Any milk will do, but I prefer whole for creaminess.
- Cream cheese: Softened for easy mixing, it adds a velvety texture and tangy sweetness to the filling.
- Powdered sugar: This sweetener helps balance the cream cheese and gives the filling a delightful sweetness.
- Vanilla extract: A dash of this aromatic extract enhances the overall flavor profile, making it extra special.
- Dark chocolate: Melted to drizzle over the sushi rolls, this adds richness and depth to each bite.
- Sprinkles or shredded coconut (optional): These make for a fun garnish, adding color and a bit of texture, but can be left out if you prefer a simpler presentation.
For those with dietary needs, feel free to substitute the cream cheese with a non-dairy alternative. You can find options at most grocery stores. Also, for a nut-free version, check that any sprinkles or toppings are free from nuts. The specifics for each ingredient, including exact measurements, are available at the bottom of the article for your convenience!
How to Make Oreo Sushi Rolls Dessert Fusion
Creating these spectacular Oreo Sushi Rolls Dessert Fusion is a delightful journey that I truly enjoy. Follow these steps to bring the fun and flavor home!
Prepare Oreo Crumbs
First things first—let’s separate those Oreo cookies! Carefully twist apart each cookie to scoop the creamy filling into a small bowl. Then, pop the cookie halves into a food processor. Pulse until they turn into fine crumbs, almost like sand. This will be the base of our magical rolls, so make sure no chunks remain!
Make Dough
Now, let’s bring our crumbs to life! In a mixing bowl, combine those fine Oreo crumbs with the whole milk. Mix until it forms a pliable dough. If the dough feels too sticky, don’t panic—just add a tad more crumbs! You want it just right, like playdough that holds its shape for some serious fun.
Roll Out Dough
Time to get rolling—literally! Take the dough and transfer it between two sheets of parchment paper. With a rolling pin, roll the dough into a rectangle that’s about 1/4 inch thick. This will give you a perfect canvas to spread your filling. Just keep it even and smooth, no one wants lumpy sushi!
Prepare Filling
Let’s make that creamy filling sing! In a separate bowl, beat together the Oreo cream you saved, softened cream cheese, powdered sugar, and vanilla extract. Mix until it’s smooth and creamy, like a fluffy cloud of sweetness. This filling is the secret embrace between our sushi layers!
Spread Filling
Spread this heavenly cream cheese mixture evenly over your rolled-out dough. Use a spatula for smooth coverage, but leave a small border around the edges. The thicker layers of filling will make each bite a delightful surprise, and we want you to experience all that goodness!
Form the Roll
Now, it’s time to roll things up! Starting from the shorter side, gently lift the parchment paper and start to roll the dough into a tight log. Think of it like tucking a cozy blanket around a loved one. Use the paper as guidance to help shape it into a beautiful roll.
Chill
For easy slicing, let’s chill this roll for a bit. Pop the log into the refrigerator for about 30 minutes. This step is optional, but oh-so-recommended! A firm log helps when we cut it into perfect sushi pieces.
Slice Rolls
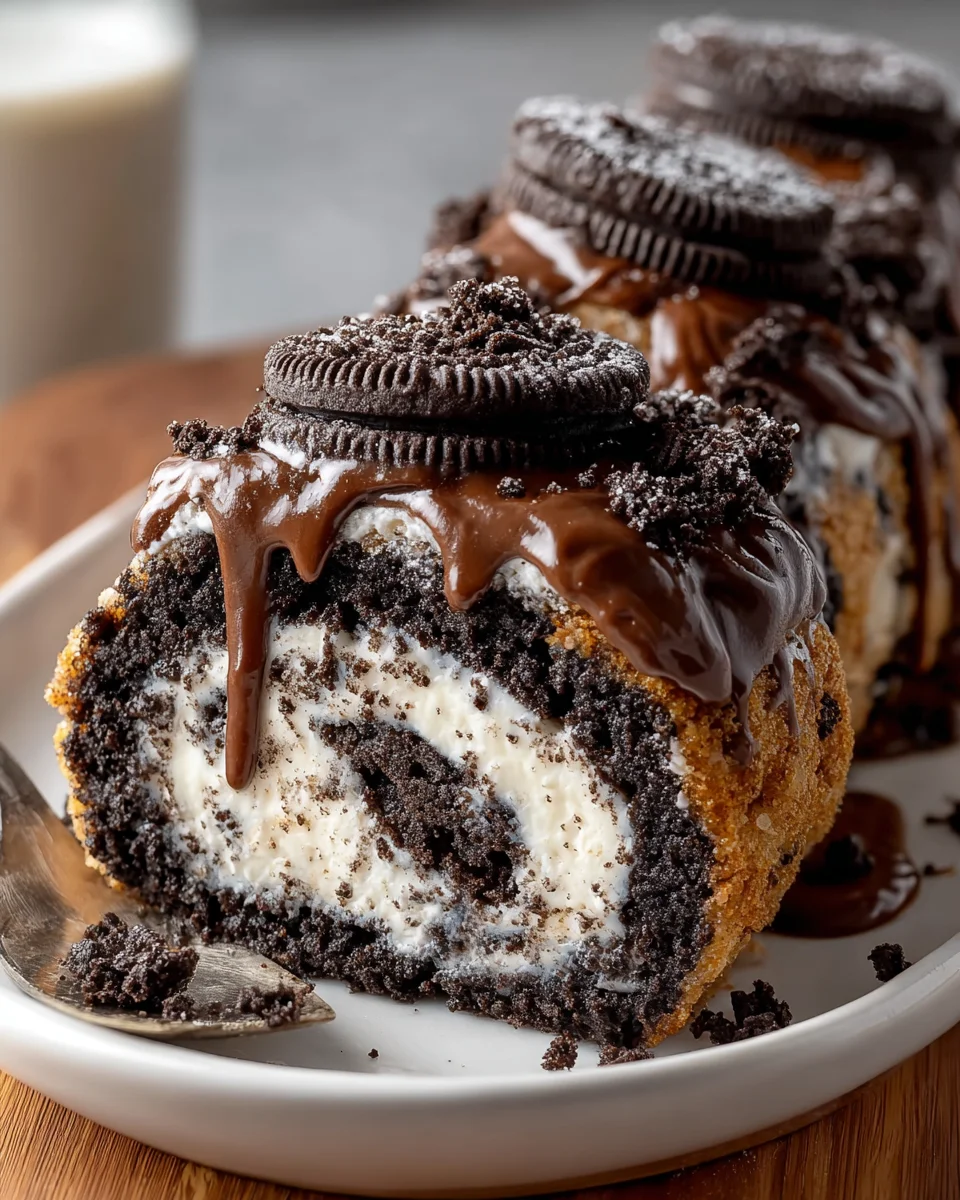
Once chilled, retrieve your roll and grab a sharp knife. Slice it evenly into 12 pieces, about an inch thick. Try to keep the slices clean and tidy to showcase that beautiful swirl of filling inside. Each piece should look just as inviting as the last!
Garnish
Finally, let’s add a touch of flair! Drizzle some melted dark chocolate over each piece, creating a decadent finish. If you’re feeling adventurous, sprinkle on some colorful sprinkles or shredded coconut. These little touches elevate the presentation, turning your Oreo sushi into a true spectacle of flavors!
Tips for Success
- Make sure to use softened cream cheese for easy mixing. It avoids lumps!
- Don’t skip the chilling step! It makes slicing your rolls so much easier.
- Use a sharp knife to cut the rolls; it’ll give you cleaner edges.
- Feel free to get creative with toppings! Different sprinkles can make it festive.
- If dough is too sticky, add a bit more Oreo crumbs gradually.
Equipment Needed for Oreo Sushi Rolls Dessert Fusion
- Food Processor: Essential for turning Oreos into crumbs. A sturdy plastic bag and rolling pin work too!
- Mixing Bowls: You’ll need a couple for mixing the dough and filling. Any large bowl will do.
- Parchment Paper: Helps with rolling the dough smoothly. Wax paper is a fine substitute.
- Rolling Pin: For rolling out the dough. A wine bottle can work in a pinch!
- Sharp Knife: Necessary for slicing. A serrated knife makes cutting easier!
Variations of Oreo Sushi Rolls Dessert Fusion
- Peanut Butter Swirls: Add a layer of creamy peanut butter to the filling for a delicious twist. This pairs wonderfully with the chocolate!
- Fruit Punch Surprise: Incorporate finely chopped strawberries or bananas into the cream cheese mixture for a fruity explosion!
- Minty Fresh: Use mint-flavored Oreos and a splash of peppermint extract in the filling for a refreshing dessert.
- Vegan Delight: Swap cream cheese with a dairy-free alternative and use coconut or almond milk for a vegan-friendly option.
- Gluten-Free Version: Use gluten-free Oreo cookies to make this treat accessible for everyone!
- S’mores Style: Add crushed graham crackers and mini marshmallows to the filling for a fun s’mores-inspired version.
Serving Suggestions for Oreo Sushi Rolls Dessert Fusion
- Pair these creative rolls with a tall glass of cold milk or a hot cup of coffee for a delightful contrast.
- Serve on a colorful platter, garnished with fresh berries for a pop of color.
- Host a dessert night and let everyone choose their favorite toppings for a fun DIY experience!
- Enjoy these rolls as the perfect sweet ending to a family meal or gathering.
FAQs about Oreo Sushi Rolls Dessert Fusion
Curious minds often have questions when it comes to creating the Oreo Sushi Rolls Dessert Fusion. Here are some common queries I’ve gathered along with answers just for you!
Can I make Oreo Sushi Rolls in advance?
Absolutely! You can prepare these rolls a day ahead. Just keep them stored in the refrigerator in an airtight container. They’ll be ready to serve when you need them.
What’s the best way to cut these rolls?
Using a sharp knife is key! A gentle sawing motion helps avoid squishing the rolls. This way, you get those beautiful, rounded edges!
Can I use different cookies for this recipe?
Yes! While Oreos are a classic favorite, feel free to experiment with other sandwich cookies. Chocolate wafer cookies or even vanilla alternatives would work well!
How long do the Oreo Sushi Rolls last?
They can last up to 3 days in the fridge. However, I often find they don’t last that long when my kids are around—everyone loves them!
Can I freeze the Oreo Sushi Rolls?
Yes! Wrap them tightly in plastic wrap and then place them in an airtight container. They’ll keep in the freezer for about a month, making it easy to have a sweet treat on hand!
Final Thoughts
Creating Oreo Sushi Rolls Dessert Fusion brings a wave of joy to my kitchen. It’s more than just a dessert; it’s a canvas for creativity and a moment of togetherness with my family. Each slice carrying a surprise filling is bound to elicit smiles. I cherish the simple pleasures of whipping up treats with my kids, and this recipe is perfect for bonding over. Whether you enjoy them on a cozy night in or share them at gatherings, these adorable rolls will make your heart—and your taste buds—sing with delight!
Print
Oreo Sushi Rolls Dessert Fusion
- Prep Time: 20 minutes
- Cook Time: 0 minutes
- Total Time: 50 minutes (including chilling time)
- Yield: 12 pieces 1x
- Category: Dessert
- Method: No-Bake
- Cuisine: Fusion
- Diet: Vegetarian
Description
Oreo Sushi Rolls Dessert Fusion is a unique and delightful dessert that combines the classic flavors of Oreo cookies with a fun sushi presentation.
Ingredients
- 24 Oreo cookies
- 3 tablespoons whole milk
- 3.5 ounces cream cheese, softened
- 2 tablespoons powdered sugar
- 1/2 teaspoon vanilla extract
- 1.75 ounces dark chocolate, melted
- Sprinkles or shredded coconut (optional)
Instructions
- Prepare Oreo Crumbs: Separate Oreo cookies, reserving the cream filling in a small bowl. Place cookies in a food processor and process to a fine crumb consistency.
- Make Dough: Combine Oreo crumbs and milk in a bowl. Mix thoroughly until a pliable dough forms.
- Roll Out Dough: Transfer dough between two sheets of parchment paper. Roll into a rectangle approximately 1/4 inch thick.
- Prepare Filling: Beat reserved Oreo cream, softened cream cheese, powdered sugar, and vanilla extract in a separate bowl until smooth and creamy.
- Spread Filling: Evenly spread cream cheese mixture across the rolled-out Oreo base.
- Form the Roll: Gently roll the dough from the shorter side into a tight log, using parchment paper for guidance.
- Chill: Refrigerate the log for 30 minutes to set, ensuring easier slicing. This step is optional but recommended.
- Slice Rolls: Slice the chilled log evenly into 12 ‘sushi’ pieces using a sharp knife.
- Garnish: Drizzle each piece with melted dark chocolate and finish with a sprinkling of coconut or sprinkles if desired.
Notes
- For a nut-free version, ensure that any sprinkles or coconut used are also nut-free.
- You can substitute the cream cheese with a non-dairy alternative for a vegan option.
- Experiment with different toppings such as crushed nuts or fruit for additional flavor.
Nutrition
- Serving Size: 1 piece
- Calories: 150
- Sugar: 10g
- Sodium: 50mg
- Fat: 7g
- Saturated Fat: 3g
- Unsaturated Fat: 2g
- Trans Fat: 0g
- Carbohydrates: 22g
- Fiber: 1g
- Protein: 2g
- Cholesterol: 10mg


