Introduction to Peppermint Swirl Cookies
Ah, the holiday season! A time filled with joy, laughter, and, of course, sweet treats. Among the delightful lineup of festive goodies, Peppermint Swirl Cookies hold a special place in my heart. They’re not only visually stunning but also easily baked even on the busiest of days. Imagine sharing these marvelous cookies at your holiday gathering—your loved ones will be enchanted! Whether you’re rushing between errands or hosting a cozy soirée, this recipe is your secret weapon to create something memorable. Plus, these cookies fill your kitchen with the comforting aroma of peppermint and sugar!
Why You’ll Love This Peppermint Swirl Cookies
You’re going to adore these Peppermint Swirl Cookies for so many reasons! First off, they’re super easy to whip up, making them a perfect choice for busy days. Who doesn’t love a quick yet delicious holiday treat? Their delightful taste combines buttery sweetness with a refreshing peppermint twist, and they’re simply stunning on any dessert table. Trust me, these cookies are a crowd-pleaser that will have everyone coming back for more!
Ingredients for Peppermint Swirl Cookies
Let’s dive into the delicious elements that make these Peppermint Swirl Cookies a holiday staple. Don’t worry, you don’t need to memorize everything right now—the exact amounts are at the bottom of the article for easy printing.
- Unsalted Butter: The base of these cookies, butter adds richness and a lovely, creamy texture. Softened, it helps create that fluffy consistency we all love.
- Granulated Sugar: This sweetener plays a key role, bringing that delightful sweetness and aiding in achieving the perfect cookie crunch.
- All-Purpose Flour: The backbone of your cookies! Flour provides structure, ensuring they hold their shape while remaining tender.
- Peppermint Extract: This holiday essential gives the cookies their signature minty flavor. Feel free to adjust the amount for a more intense taste!
- Red and Green Food Coloring: Festive colors make these cookies eye-catching. Use gel food coloring for vibrant swirls, or keep it simple with liquid coloring.
- Salt: Just a pinch enhances all those wonderful flavors, balancing the sweetness perfectly.
Now, if you’re looking for a little twist, consider adding chocolate chips or crushed candies for extra fun. Happy baking, friends! Your kitchen will smell like a holiday wonderland in no time.

How to Make Peppermint Swirl Cookies
Now the fun part begins! Making Peppermint Swirl Cookies is not only a delightful journey but also a chance to let your creativity shine. Let’s navigate through these simple steps together.
Step 1: Cream Together the Butter and Sugar
Start by placing your softened unsalted butter and granulated sugar in a mixing bowl. Using an electric mixer, beat them together until the mixture is light and fluffy. This step is key! When it’s airy, you invite that melt-in-your-mouth texture that we all crave. Think of it like putting a soft cloud in a cookie form!
Step 2: Add Peppermint Extract and Salt
Next, gently mix in that fabulous peppermint extract and a sprinkle of salt. The salt may seem small, but it’s a flavor hero! It enhances the sweetness, making every bite a perfect balance of flavors—like a delightful duet in a holiday choir!
Step 3: Combine Flour Gradually
Time to add the all-purpose flour! I recommend doing this gradually—maybe half a cup at a time. This method prevents a cloud of flour from exploding in your kitchen. Mix until just combined; we don’t want to overwork the dough. Trust me, it’ll make all the difference in keeping your cookies tender and delightful.
Step 4: Divide and Color the Dough
Once your dough is ready, divide it into two equal portions. Here comes the fun part! Grab your red and green food coloring. Start with a few drops in one portion and knead it until the color is vibrant. Repeat this with the other portion. If you’re feeling festive, add a drop more for extra boldness! It’s like creating your own holiday art project.
Step 5: Roll and Twist the Dough
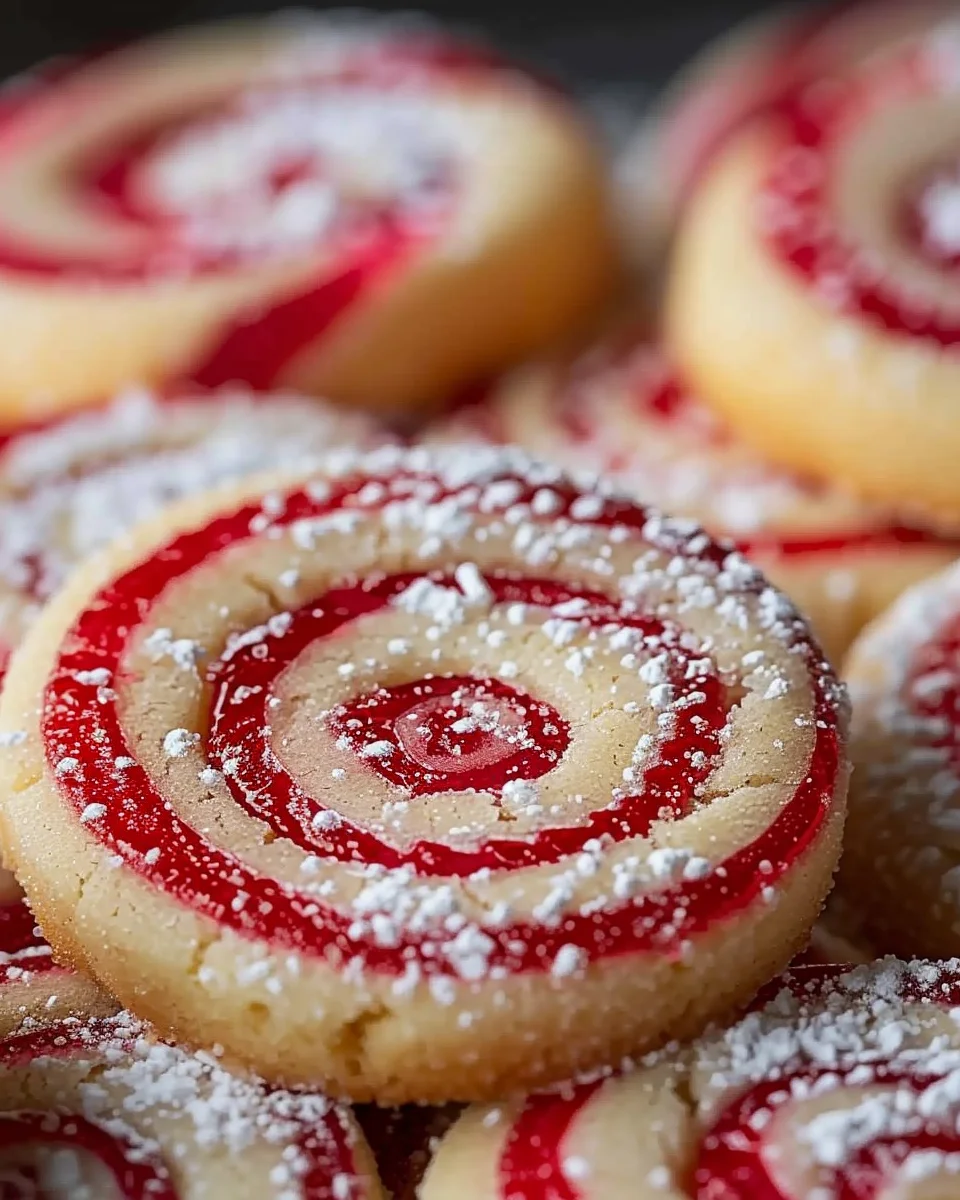
Now, roll each colored dough into a log about 1 inch in diameter. Place the logs next to each other and gently twist them together. This is where the magic happens! The beautiful swirls will create a stunning visual once baked. Take your time—this part is crucial to achieving that iconic peppermint swirl!
Step 6: Chill the Dough
Wrap your twisted dough in plastic wrap and pop it in the fridge for about 30 minutes. Chilling helps firm up the dough, which is essential for easy slicing later on. Think of it as giving the dough a little timeout to gather its thoughts. A must for those perfect cookie rounds!
Step 7: Preheat the Oven
While the dough is chilling, preheat your oven to 350°F (175°C). Preheating is important! It ensures your cookies bake evenly. No one wants a doughy center or burnt edges—definitely not on our holiday baking checklist!
Step 8: Slice and Bake
Now that your dough is chilled, take it out and slice it into rounds about 1/4 inch thick. Spread them on a baking sheet lined with parchment paper. Bake the cookies for 10-12 minutes or until the edges turn golden. You’ll know they’re done when your kitchen fills with that glorious peppermint aroma!
Step 9: Cool Before Serving
Once baked, let the cookies cool on the baking sheet for a few minutes before transferring them to a wire rack. This cooling time allows the flavors to deepen and meld together, creating a more enjoyable cookie experience. Plus, who can resist that warm, pepperminty heaven?
Tips for Success
- Soften butter properly for easier creaming—leave it out for about an hour.
- Use gel food coloring for more vibrant swirls.
- Chill the dough long enough to ensure clean slicing.
- Don’t overcrowd the baking sheet—leave space for cookies to spread.
- Keep an eye on baking time; ovens can vary!
Equipment Needed
- Mixing Bowl: A large, sturdy bowl for mixing ingredients. A stand mixer can also speed things up!
- Electric Mixer: Perfect for creaming butter and sugar. If you don’t have one, a sturdy whisk works too.
- Parchment Paper: Helps prevent sticking on your baking sheets. Aluminum foil is a good alternative!
- Plastic Wrap: For wrapping the dough while it chills. You can use reusable containers if preferred.
Variations
- Chocolate Peppermint Swirl: Add chocolate cocoa powder to one half of the dough for a delicious twist!
- Nut-Free Option: Simply omit any nuts and double-check your peppermint extract to ensure it’s nut-free.
- Gluten-Free: Substitute the all-purpose flour with a 1:1 gluten-free flour blend for a tasty alternative.
- Colorful Holiday Cookies: Use different food colorings to create stripes or fun patterns—be creative!
- Decorative Toppings: After baking, drizzle with melted chocolate or sprinkle crushed candy canes to elevate the festive look!
Serving Suggestions
- Pair your Peppermint Swirl Cookies with a hot cup of cocoa or peppermint tea for that cozy vibe.
- Arrange cookies on a festive platter and garnish with fresh mint leaves for an eye-catching presentation.
- Consider serving alongside vanilla ice cream—cookies in ice cream sandwiches are always a hit!
FAQs about Peppermint Swirl Cookies
Have some questions about making Peppermint Swirl Cookies? Don’t worry! I’ve gathered some common queries that might help you out.
Can I make the dough ahead of time?
Absolutely! You can prepare the dough ahead and store it in the fridge for up to a week. Just remember to let it sit at room temperature for a few minutes before slicing.
What can I do if I don’t have peppermint extract?
No peppermint? No problem! You can substitute it with vanilla extract for a different flavor. Keep in mind—you’ll miss that festive peppermint kick!
Can I freeze the cookies?
Yes, you can freeze these cookies! After baking, allow them to cool completely. Then, store them in an airtight container or freezer bag for up to three months. They taste great even after a freeze!
How can I ensure my cookies turn out perfectly?
For perfect cookies, follow the instructions closely. Make sure to measure your ingredients accurately, and don’t skip the chilling step. It helps achieve that nice slice!
What toppings can I add to my Peppermint Swirl Cookies?
Feel free to get creative! Drizzling melted chocolate or adding crushed candy canes on top enhances the festive flair. It adds a delightful crunch and a pop of extra flavor!
Final Thoughts
Every time I bake these Peppermint Swirl Cookies, I’m reminded of the joy and warmth that the holiday season brings. From the sweet aroma that dances through my home to the delightful smiles on my loved ones’ faces, these cookies are truly a labor of love. They’re not just treats; they’re tiny pieces of joy wrapped in vibrant swirls. Whether you’re making them for a holiday gathering or just to spread a bit of cheer, I hope these cookies bring you as much happiness as they have for me. Enjoy every bite and create wonderful memories!
Print
Peppermint Swirl Cookies
- Prep Time: 15 minutes
- Cook Time: 12 minutes
- Total Time: 42 minutes
- Yield: 24 cookies 1x
- Category: Dessert
- Method: Baking
- Cuisine: American
- Diet: Vegetarian
Description
Delicious and festive peppermint swirl cookies perfect for the holiday season.
Ingredients
- 1 cup unsalted butter, softened
- 1 cup granulated sugar
- 2 cups all-purpose flour
- 1 teaspoon peppermint extract
- Red and green food coloring
- 1/2 teaspoon salt
Instructions
- Cream the butter and sugar together until fluffy.
- Mix in the peppermint extract and salt.
- Add in the flour gradually until combined.
- Divide the dough into two portions and add food coloring to each.
- Roll out each color and twist them together to form a log.
- Chill the dough for 30 minutes before slicing.
- Preheat the oven to 350°F (175°C).
- Slice the dough into rounds and bake for 10-12 minutes.
- Let cool before serving.
Notes
- For a stronger peppermint flavor, add more peppermint extract.
- The dough can be made ahead and stored in the fridge.
Nutrition
- Serving Size: 1 cookie
- Calories: 120
- Sugar: 10g
- Sodium: 50mg
- Fat: 6g
- Saturated Fat: 4g
- Unsaturated Fat: 2g
- Trans Fat: 0g
- Carbohydrates: 15g
- Fiber: 0g
- Protein: 1g
- Cholesterol: 20mg


