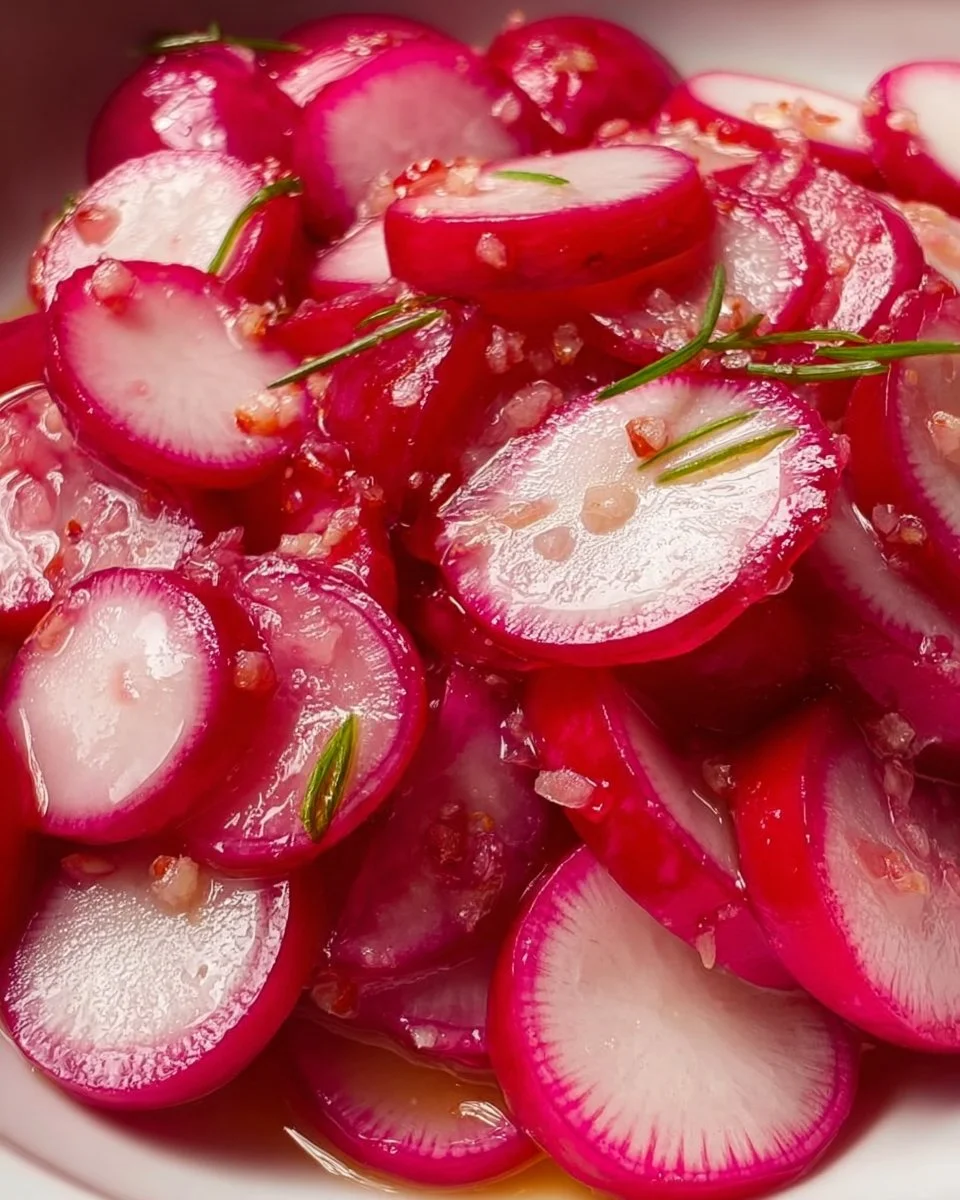
There’s something transformative about a simple vegetable like a radish. They start off as humble little roots, cradled in the earth, but with just a touch of vinegar and a dash of seasoning, they morph into a crunchy, zesty delight. Picture this: you crack open a jar and breathe in the tangy aroma wafting from the vibrant pink slices. That’s the magic of pickled radishes. Each bite bursts with sharp, savory flavor, a refreshing contrast to your palate that tingles all the way down to your toes.
The pickled radishes shine with their brilliant hue, inviting you to dive in and discover their delightful crunch. They evoke memories of sun-soaked summer picnics and friendly gatherings, bringing a sense of warmth and joy to any meal they accompany. Whether nestled atop a taco, tossed into a fresh salad, or enjoyed as a healthy snack all on their own, these vibrant pickles provide a burst of flavor that’s impossible to resist.
Why You’ll Love This Pickled Radishes
Pickled radishes stand out in the bustling world of condiments and side dishes for several reasons. First and foremost, their crunch delivers a satisfying texture that complements creamy dishes perfectly. The bright, tangy flavor elevates any plate, adding not just taste but character. Imagine a soft taco filled with savory meat, topped with these bright pink slices—the contrast is both delightful and mouthwatering.
Additionally, these pickles are fantastically versatile. They fit seamlessly into almost any culinary landscape, making them perfect for gatherings or quiet dinners at home. The burst of flavor mixed with the crispness of the radish creates a delightful experience that your taste buds will crave time and again. Plus, they’re extremely simple to make, requiring minimal time and only a few basic ingredients that you likely already have in your kitchen.
Preparation Phase & Tools to Use
Preparing pickled radishes doesn’t require an elaborate setup. You’ll need just a few essential tools that help streamline the process and ensure that your radishes turn out perfectly every time.
-
A Sharp Knife or Mandoline: You need a tool that will provide uniform slices, ensuring an even pickling effect. Using a mandoline can achieve perfect, thin rounds that crunch beautifully.
-
Saucepan: A medium-sized saucepan allows you to combine your brine ingredients comfortably and simmer them just enough to meld the flavors.
-
Jar for Storage: A clean glass jar (preferably one with a tight-sealing lid) is essential. It not only holds your pickles but also allows the flavors to meld beautifully as they marinate in the fridge.
-
Measuring Spoons: Accurate measurements will yield consistent results. Precision guarantees that your pickled radishes maintain their perfect balance of sweetness and acidity.
Ingredients for Pickled Radishes
-
1 bunch fresh radishes: Look for vibrant, firm radishes. If you can’t find them, consider using daikon radish as an alternative.
-
1 cup vinegar (white or apple cider): Vinegar is key in pickling; apple cider vinegar adds a fruity richness, while white vinegar gives a sharper bite.
-
1/2 cup water: This balances the acidity, softening the intense tanginess of the vinegar.
-
2 tablespoons sugar: Sugar acts as a counterpoint to the vinegar, creating a harmonious flavor profile. Use maple syrup as a substitute for a unique twist.
-
1 tablespoon salt: Salt creates a brine environment that helps preserve the radishes and enhances their natural flavors.
-
2 cloves garlic, sliced: Garlic injects aromatic flavor, taking the pickles to a new level of deliciousness.
-
1 teaspoon peppercorns: These little jars of flavor provide tangy notes that complement the crunchy radishes perfectly.
-
1 teaspoon mustard seeds: Mustard seeds add a gentle warmth and texture, rounding out the flavor experience.
How to Make Pickled Radishes
-
Clean and Prepare the Radishes: Rinse your radishes under cold water, removing any dirt. Slice them into thin rounds (about 1/8 inch) using a sharp knife or mandoline. This ensures they pickle evenly for that perfect crunch.
-
Create the Brine: In your saucepan, combine the vinegar, water, sugar, and salt. Heat this mixture over medium heat, stirring until the sugar and salt dissolve completely into the liquid. Bring it to a gentle boil to meld the flavors.
-
Cool the Brine: Once boiling, remove the saucepan from the heat and allow the brine to cool slightly for about 10 minutes. You want it warm but not hot when pouring over the radishes.
-
Layer in the Jar: In a clean glass jar, layer the radish slices with the sliced garlic, peppercorns, and mustard seeds, creating a vibrant, colorful display.
-
Pour the Brine Over the Radishes: Carefully pour the cooled brine over the radish layers, ensuring that all of them are fully submerged. This step is critical for a consistent pickling effect.
-
Seal and Refrigerate: Close the jar tightly and place it in the refrigerator. Allow the radishes to pickle for at least 1 hour. The longer they sit, the stronger the flavor! For optimal freshness, enjoy them within two weeks.
Chef’s Notes & Helpful Tips
-
Make Ahead: Pickled radishes taste even better after a few days in the fridge. Make a batch when you’re prepping for the week ahead, and enjoy their vibrant crunch as a handy side.
-
Cooking Alternatives: If you want to switch things up, try roasting the radishes before pickling them! This will give a unique depth of flavor that’s equally delicious.
-
Customization Ideas: Mix it up with additional spices like a pinch of chili flakes for heat, or toss in a sprig of fresh dill for a herby twist.
Common Mistakes to Avoid
-
Using Warm Radishes: Always let your brine cool slightly before pouring it over radishes; pouring hot brine can cook them, resulting in a mushy texture.
-
Not Using Enough Salt or Sugar: Adjust to personal taste, but don’t skimp on seasoning! Too little, and the pickles can taste bland.
-
Overcrowding the Jar: Ensure that your radishes have enough space to pickle evenly. A tightly packed jar might lead to uneven flavor distribution.
What to Serve With Pickled Radishes
-
Tacos: Elevate your taco night by adding these zesty pickles just before you dig in.
-
Bowl Meals: Mix them into grain bowls alongside quinoa, roasted veggies, and protein for a refreshing crunch.
-
Sandwiches: Add a few slices onto sandwiches for that extra crunch and piquant flavor.
-
Salads: Toss these pickles into salads for additional texture and pop.
-
Cheese Plates: Use them in cheese and charcuterie boards to provide a balanced flavor against rich cheeses and meats.
-
Banh Mi: Incorporate pickled radishes into this Vietnamese classic for a burst of flavor and color.
-
Rice Dishes: Mix into fried rice or serve alongside sushi for a delightful counterpoint.
-
Snack Time: Simply enjoy them as a snack, straight from the jar, for a crunchy treat any time of the day!
Storage & Reheating Instructions
Store your jar of pickled radishes in the fridge, where they’ll maintain their crunchy texture for up to two weeks. They don’t require reheating—enjoy them cold or at room temperature. If you’d like to enjoy them longer, consider freezing for several months, but beware that freezing can change their texture.
Estimated Nutrition Information
Approximating values can vary based on serving sizes and specific ingredients used, but here’s a rough guide for one serving (about 1/4 cup):
- Calories: 30
- Carbohydrates: 7g
- Fiber: 1g
- Sugars: 4g
- Sodium: 300mg
Note: Always consult a nutritionist for precise dietary advice tailored to your needs.
FAQs
-
How long should I wait before eating pickled radishes?
Waiting at least one hour after preparation allows the radishes to absorb the brine. However, they taste even more intense and flavorful the next day. -
Can I use other vegetables for pickling?
Absolutely! Carrots, cucumbers, and even red onions turn out fantastic when pickled. Just adjust the pickling time as needed, as different veggies require different soaking times. -
What can I use if I don’t have vinegar?
If you’re out of vinegar, consider using lemon juice as a bright, acidic substitute. The flavor will differ slightly, but the result will still be tangy and delicious. -
Are pickled radishes good for my health?
Yes! Radishes are low in calories, high in fiber, and packed with nutrients. Pickling retains many of these benefits while enhancing flavor, making for a healthy condiment. -
Can I adjust the sweetness in pickled radishes?
Definitely! If you prefer a less sweet profile, reduce the amount of sugar or swap it with a natural sweetener like honey or agave to suit your taste.
Conclusion
The experience of making pickled radishes brings a sense of accomplishment that intertwines with the joy of enjoying them. With their beautiful crunch, vibrant color, and delightful zing, these tangy treats deserve a spot in your culinary repertoire. So grab those fresh radishes, follow this simple process, and delight your friends and family with a flavor explosion that brightens any meal—you’re sure to be the star of your kitchen!
Print
Pickled Radishes
- Prep Time: 15 minutes
- Cook Time: 10 minutes
- Total Time: 25 minutes
- Yield: 4 servings 1x
- Category: Condiment
- Method: Pickling
- Cuisine: American
- Diet: Vegan
Description
Crisp and tangy pickled radishes that elevate any dish with their vibrant flavor and crunch.
Ingredients
- 1 bunch fresh radishes
- 1 cup vinegar (white or apple cider)
- 1/2 cup water
- 2 tablespoons sugar
- 1 tablespoon salt
- 2 cloves garlic, sliced
- 1 teaspoon peppercorns
- 1 teaspoon mustard seeds
Instructions
- Clean and prepare the radishes: Rinse your radishes under cold water and slice them into thin rounds (about 1/8 inch).
- Create the brine: In a saucepan, combine the vinegar, water, sugar, and salt. Heat over medium heat, stirring until dissolved.
- Cool the brine: Remove from heat and let cool for about 10 minutes.
- Layer in the jar: In a clean glass jar, layer radish slices with garlic, peppercorns, and mustard seeds.
- Pour the brine over the radishes, ensuring they are fully submerged.
- Seal and refrigerate the jar. Let the radishes pickle for at least 1 hour.
Notes
Pickled radishes taste even better after a few days. Avoid using hot brine and overcrowding the jar.
Nutrition
- Serving Size: 1/4 cup
- Calories: 30
- Sugar: 4g
- Sodium: 300mg
- Fat: 0g
- Saturated Fat: 0g
- Unsaturated Fat: 0g
- Trans Fat: 0g
- Carbohydrates: 7g
- Fiber: 1g
- Protein: 1g
- Cholesterol: 0mg