Introduction to Pistachio & Raspberry Cheesecake Domes
There’s something truly magical about dessert, isn’t there? It can turn an ordinary day into an extraordinary one. I was thrilled when I discovered these delightful Pistachio & Raspberry Cheesecake Domes. Not only are they breathtaking to look at, but they bring together the creamy richness of pistachio cheesecake with a burst of tangy raspberry in every bite. Imagine impressing your family after a long day with a treat that feels special yet is surprisingly simple to whip up! Trust me, whether it’s for a weekday dessert or a special gathering, these domes are sure to steal the show.
Why You’ll Love This Pistachio & Raspberry Cheesecake Domes
If you’re searching for a dessert that’s both easy and stunning, look no further! These Pistachio & Raspberry Cheesecake Domes offer vibrant colors and mouthwatering flavors without consuming your entire day. The creamy cheesecake filling and the tart raspberry center dance together like a perfectly choreographed ballet. Plus, they can be made ahead of time, giving you one less thing to worry about when hosting friends or family!
Ingredients for Pistachio & Raspberry Cheesecake Domes
Gathering the right ingredients is crucial to creating delectable Pistachio & Raspberry Cheesecake Domes that will wow your loved ones. Here’s what you’ll need:
- Cream cheese: Softened for a smooth cheesecake filling, it’s the creamy backbone of this dessert.
- Powdered sugar: Adds sweetness without the graininess of granulated sugar, ensuring a silky texture.
- Pistachio paste: This gives the cheesecake its signature nutty flavor, so choose a high-quality one for the best taste.
- Vanilla extract: Enhances all the flavors in this dessert, bringing a warm, comforting essence.
- Heavy cream: Cold and ready to whip, it’ll add lightness and richness to the cheesecake filling.
- Fresh raspberries: These sweet-tart gems provide the delightful raspberry center that perfectly balances the flavors.
- Sugar: Used in the raspberry center to enhance its natural sweetness.
- Lemon juice: A splash of acidity to brighten up the raspberry’s flavor and cut through the richness of the cheesecake.
- Cornstarch: This thickens the raspberry center, creating a perfect jam-like consistency.
- Eggs: They provide structure and stability to the sponge base, ensuring it holds its shape.
- Sifted flour: Essential for the sponge base, it adds lightness when gently folded in.
- Baking powder: Helps the sponge rise, giving it that airy texture we all love.
- White chocolate: This luxurious ingredient is melted into the mirror glaze, providing a rich finish.
- Green food coloring: Optional, but it can enhance the visual appeal of the pistachio aspects.
- Crushed pistachios and fresh raspberries: Both are for decoration, adding vibrant color and crunch.
For those of you with dietary restrictions, don’t hesitate to get creative! Substitute vegan cream cheese for a dairy-free version or use gluten-free flour to make it safe for gluten sensitivities. Remember, all ingredient quantities can be found at the bottom of the article and are printable for your convenience!

How to Make Pistachio & Raspberry Cheesecake Domes
Now that you have all your ingredients ready, let’s dive into the fun part—making these stunning Pistachio & Raspberry Cheesecake Domes! Follow these simple steps, and you’ll soon have an elegant dessert that will wow your guests.
Step 1: Make the Raspberry Center
The raspberry center is the star of the show! Start by combining fresh raspberries, sugar, and lemon juice in a saucepan over medium heat. Cook until the berries break down and become soft, about 5 minutes. Stir in your cornstarch slurry to thicken the mixture. Cook for another minute, and then pour this beautiful concoction into small silicone molds. Freeze until solid, about 2 hours, for an easy yet impressive surprise inside your cheesecake dome.
Step 2: Prepare the Cheesecake Filling
Now comes the creamy part! In a bowl, beat together the softened cream cheese, powdered sugar, pistachio paste, and vanilla extract until you achieve a smooth texture. The secret to a perfectly creamy filling is to ensure your cream cheese is at room temperature—no lumps allowed! In a separate bowl, whip your cold heavy cream until stiff peaks form. Gently fold this whipped cream into the pistachio mixture. This step is crucial; be careful not to overmix, as we want to keep that airy lightness in our filling.
Step 3: Assemble the Domes
Let’s put it all together. Grab your silicone dome molds and spoon some of the cheesecake filling at the bottom, pressing it gently up the sides. Now carefully take your frozen raspberry centers from the freezer and place one in the center of each dome. Top with more cheesecake filling to fully enclose the raspberry. Smooth the tops with a spatula for a polished look and pop them back into the freezer until firm, about 2 hours. It’s like tucking in your little surprise!
Step 4: Create the Sponge Base
The sponge base adds a delightful texture to your cheesecake domes. Preheat your oven to 350°F (175°C). Whisk together the eggs and sugar until the mixture becomes pale and fluffy—this is key for a light sponge! Gently fold in the sifted flour and baking powder. Spread this mixture evenly onto a lined baking tray, creating a thin layer that bakes for only 8 to 10 minutes. Once cooled, cut rounds that fit your dome bases. Press these sponge circles onto your frozen domes for a solid foundation.
Step 5: Prepare the Mirror Glaze
Time to shine with your mirror glaze! In a small saucepan, heat the heavy cream until it simmers gently. Pour it over the white chocolate and stir until it melts into a luscious glaze. Add in the pistachio paste, incorporating it well. If you want that pop of color, mix in a few drops of green food coloring. Allow the glaze to cool until it thickens slightly but remains pourable, like a silky waterfall. This will create that beautiful glossy finish.
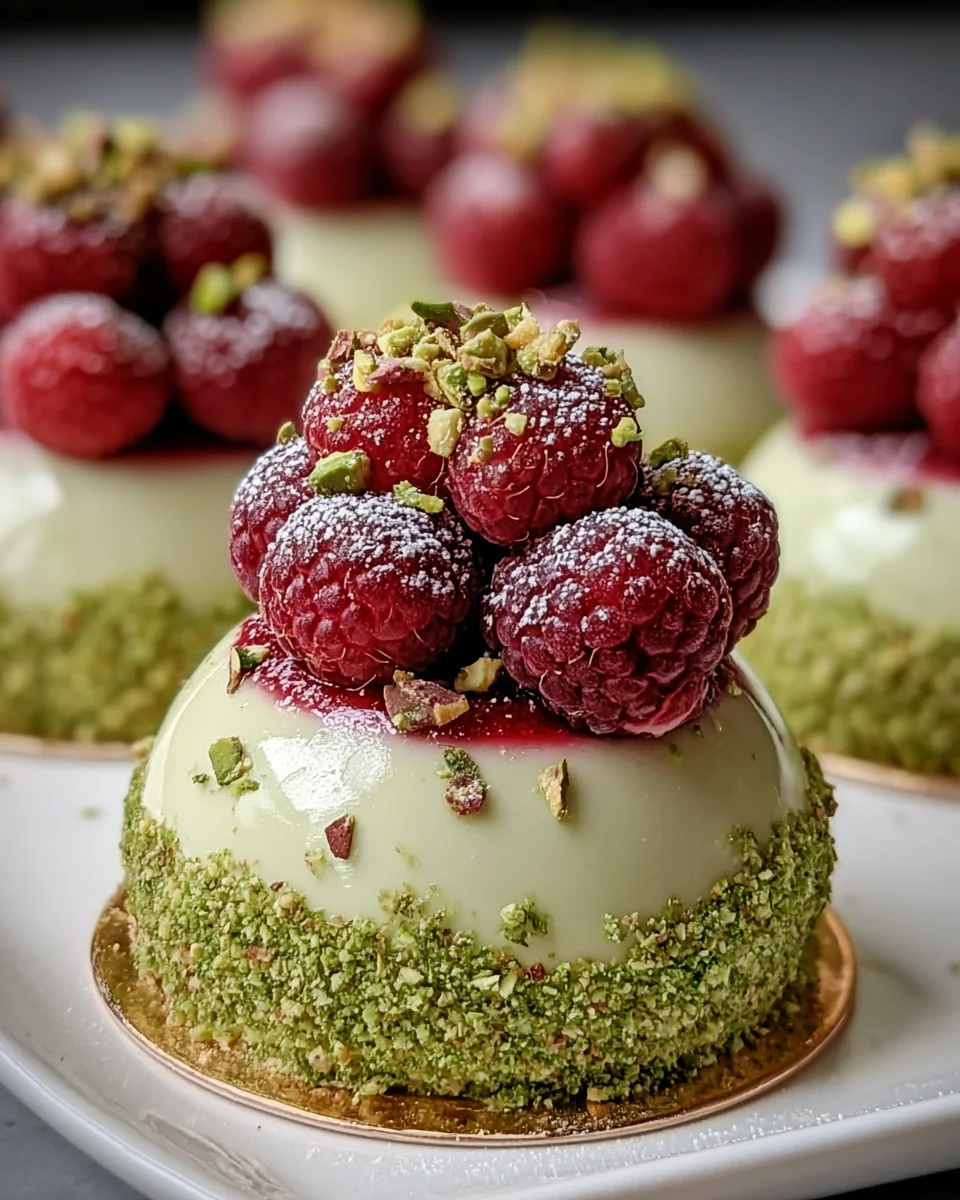
Step 6: Glaze and Decorate
Finally, the magic touch! Carefully unmold the cheesecake domes and place them on a wire rack. Pour the mirror glaze over each dome, ensuring they are fully coated. Place them on a serving plate with a little finesse. For a lovely presentation, sprinkle with crushed pistachios and arrange fresh raspberries on the sides. Chill them again until you’re ready to serve—if you can resist the temptation!
Tips for Success
- Ensure your cream cheese is at room temperature for easy blending.
- Freeze the raspberry centers for a few hours to achieve the best texture.
- When glazing, let the domes set for a minute or two after pouring for a smooth finish.
- Use high-quality white chocolate for a stunning mirror glaze.
- Don’t rush; let each layer freeze completely before moving to the next step.
Equipment Needed
- Silicone dome molds: Flexible and easy to use, great for creating evenly shaped domes.
- Whisk: A good whisk is essential for achieving fluffy egg and cream mixtures.
- Baking tray: A lined tray for baking the sponge base easily.
- Pans and spatulas: Useful for preparing the raspberry center and glazing.
- Measuring cups and spoons: For accurate ingredient portions, even when you’re in a hurry.
Variations of Pistachio & Raspberry Cheesecake Domes
- Chocolate Lover’s Delight: Swap out the pistachio paste for chocolate hazelnut spread for a rich twist that chocolate lovers will adore.
- Berry Bliss: Experiment with other berries like blueberries or blackberries for the filling. Each berry adds a different zing of flavor!
- Nut-Free Version: For those with nut allergies, replace pistachio paste with sunflower seed butter or a smooth vanilla cream for a lovely taste.
- Vegan Option: Use vegan cream cheese and coconut cream instead of heavy cream to enjoy a plant-based version of these delightful domes.
- Gluten-Free Treat: Substitute all-purpose flour with almond flour or a gluten-free blend to create a delicious version for gluten-sensitive friends.
Serving Suggestions
- Pair your Pistachio & Raspberry Cheesecake Domes with a dollop of freshly whipped cream for extra indulgence.
- Serve alongside a light raspberry coulis for a delicious contrast and splash of color.
- Complement with a cup of rich espresso or a sparkling Prosecco for a perfect finishing touch.
- Present on a beautiful cake stand, garnished with fresh mint leaves for an elegant touch.
FAQs about Pistachio & Raspberry Cheesecake Domes
Let’s tackle some questions you might have while creating these stunning Pistachio & Raspberry Cheesecake Domes. Whether it’s about substitutions or serving, I’ve got the answers for you!
Can I use frozen raspberries instead of fresh?
Absolutely! Frozen raspberries are a great alternative and can actually give you a richer flavor when cooked down. Just remember to thaw them slightly before cooking.
How can I store leftover cheesecake domes?
These delightful domes can be stored in an airtight container in the freezer for up to a month. Just let them thaw in the fridge before serving for best results.
Can I make the cheesecake filling in advance?
Yes, you can prepare the cheesecake filling a day ahead. Just cover it tightly and keep it in the fridge until you are ready to assemble and freeze your domes.
What can I use if I don’t have silicone molds?
If you don’t have silicone molds, you can use muffin tins lined with cupcake liners. Just make sure to adjust accordingly while smoothing the filling and embedding the raspberry centers.
Is there a vegan version of these domes?
Definitely! Substitute the cream cheese with vegan cream cheese and use coconut cream in place of heavy cream for a delicious plant-based delight.
Final Thoughts
Creating these Pistachio & Raspberry Cheesecake Domes is not just about making a dessert; it’s about crafting a delightful experience. Each bite brings a burst of flavors that can evoke memories of cherished gatherings and special moments with loved ones. The satisfaction of seeing them enjoy something you’ve made is simply unmatched. Whether it’s a quiet evening or a lively celebration, these domes add a touch of elegance and joy. So why not treat yourself and your family to this delightful dessert? You’ll find they make every occasion feel a little more special.
Print
Pistachio & Raspberry Cheesecake Domes
- Prep Time: 30 minutes
- Cook Time: 10 minutes
- Total Time: 4 hours
- Yield: 8 domes 1x
- Category: Dessert
- Method: Baking, Freezing
- Cuisine: International
- Diet: Vegetarian
Description
Pistachio & Raspberry Cheesecake Domes are delightful desserts that combine a creamy cheesecake filling with a tangy raspberry center, all encased in a sponge base and topped with a luscious mirror glaze.
Ingredients
- 250g cream cheese, softened
- 100g powdered sugar
- 100g pistachio paste
- 1 tsp vanilla extract
- 200ml heavy cream, cold
- 200g fresh raspberries
- 50g sugar
- 1 tsp lemon juice
- 1 tsp cornstarch, dissolved in 1 tbsp water
- 2 eggs
- 50g sugar
- 50g sifted flour
- ½ tsp baking powder
- 200g white chocolate
- 100ml heavy cream
- 2 tbsp pistachio paste
- Green food coloring (optional)
- Crushed pistachios for decoration
- Fresh raspberries for decoration
Instructions
- Make the raspberry center: In a saucepan, combine raspberries, sugar, and lemon juice. Cook over medium heat until soft. Stir in cornstarch slurry and cook until thickened. Pour into small silicone molds and freeze until solid.
- Make the cheesecake filling: Beat cream cheese, powdered sugar, pistachio paste, and vanilla extract until smooth. In a separate bowl, whip heavy cream until stiff peaks form. Fold into the pistachio mixture gently.
- Assemble domes: Spoon some cheesecake filling into silicone dome molds, pressing it up the sides. Insert a frozen raspberry center into each and top with more cheesecake to fill. Smooth tops and freeze until firm.
- Make the sponge base: Preheat oven to 350°F (175°C). Beat eggs and sugar until pale and fluffy. Gently fold in flour and baking powder. Spread into a thin layer on a lined baking tray. Bake for 8–10 minutes. Cool and cut into rounds that fit the bottom of each dome. Press onto frozen domes and return to freezer.
- Prepare mirror glaze: Heat heavy cream until just simmering. Pour over white chocolate and stir until smooth. Add pistachio paste and green food coloring (if using). Cool until glaze is slightly thick but pourable.
- Glaze and decorate: Unmold domes and place on a wire rack. Pour glaze over each dome to coat. Transfer to serving plate. Garnish with crushed pistachios and fresh raspberries. Chill until ready to serve.
Notes
- Make sure the cream cheese is at room temperature for easier mixing.
- You can adjust the sweetness of the raspberry center by changing the amount of sugar.
- Let the mirror glaze cool to the right consistency before pouring over the domes.
- Freeze the domes for several hours to ensure they hold their shape when unmolded.
Nutrition
- Serving Size: 1 dome
- Calories: 350
- Sugar: 25g
- Sodium: 120mg
- Fat: 25g
- Saturated Fat: 12g
- Unsaturated Fat: 10g
- Trans Fat: 0g
- Carbohydrates: 30g
- Fiber: 2g
- Protein: 6g
- Cholesterol: 80mg


