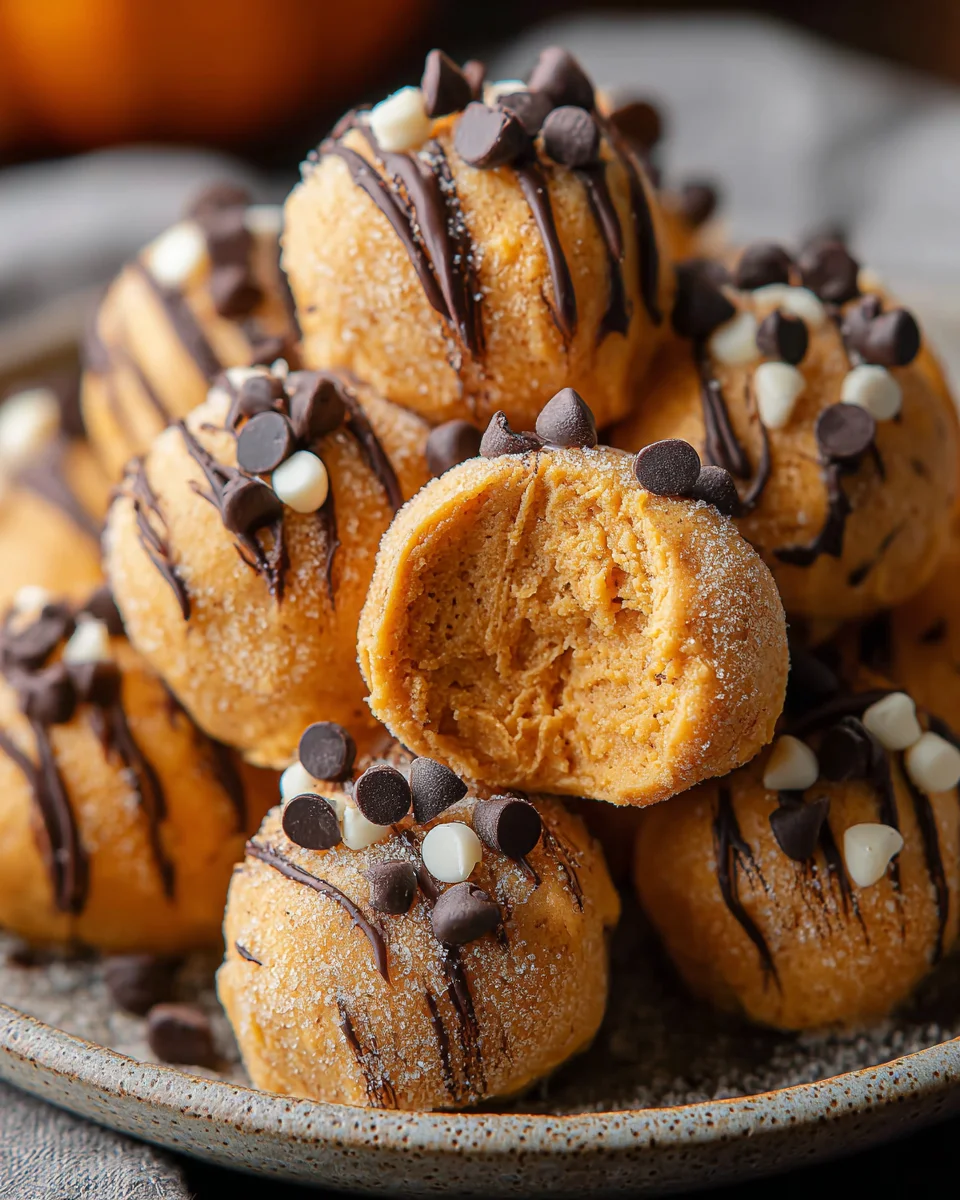
Introduction to Pumpkin Cheesecake Truffles
Oh, the magic of fall. Cool breezes, vibrant leaves, and the taste of something sweet and warm all seem to call your name. That’s where these pumpkin cheesecake truffles come in handy. They’re not just small bites of goodness; they’re bundles of autumn in childhood sweet memories. Great for those jam-packed days, these truffles let you present a high-end pastry without a lot of work. Imagine, on your next get-together, effortlessly offering your pumpkin-tinged creamy delights to your loved ones that will leave them wowed in every sense while holding onto a recipe all season long!
Why You’ll Love This Pumpkin Cheesecake Truffles
Pumpkin Cheesecake Truffles are the shortcut to culinary bliss. Fast to make, and full of flavor without being like the season; these are your new favorite snacks. All it is going to take to have them are a few, simple steps, and you will be indulging in these yummy treats in no time. The creaminess of cheesecake along with the warmth of pumpkin – there’s no way these fail to make you smile. Fall in love with them as your very own fall dessert!
Ingredients for Pumpkin Cheesecake Truffles
Understanding your ingredients is half the fun in making these Pumpkin Cheesecake Truffles! Each one plays a vital role in creating those delightful flavors and textures. Here’s what you’ll need:
- Unsalted butter: This gives a rich flavor and helps bind the ingredients together smoothly.
- Cream cheese: The star of the show! It adds the creaminess that makes these truffles taste like cheesecake.
- Canned pumpkin puree: This provides that wonderful, vibrant flavor of fall and keeps the truffles moist.
- Sweetened condensed milk: Adds sweetness and makes the mixture luxuriously creamy.
- Pumpkin pie spice: A blend of warm spices that brings out the essence of fall, adding warmth and a hint of nostalgia.
- Graham cracker crumbs: These create a delightful crunch and mimic the traditional cheesecake crust.
- White chocolate chips: They melt beautifully into the mixture, contributing sweetness and a touch of richness.
- Orange food coloring: Totally optional, but it can enhance the visual appeal, making these truffles even more festive.
- Granulated sugar: This is for rolling the truffles, giving them a sweet, sugary exterior.
- Chocolate chips: Add these as the finishing touch on top to resemble pumpkin stems for a cute presentation!
Remember, if you want to get creative or adapt for dietary restrictions, there are plenty of options out there! You may find that using low-fat cream cheese or sugar substitutes can yield delicious results too. For exact quantities, scroll down to the bottom of the article where you’ll find everything neatly laid out and ready for printing!
How to Make Pumpkin Cheesecake Truffles
Now for the fun part—making your Pumpkin Cheesecake Truffles! This step-by-step guide will walk you through each stage. Don’t worry; it’s easier than you think. Let’s dive in and create these autumnal delights!
Step 1: Melt the Mixture
Start by melting the unsalted butter in a skillet over medium heat. It will soon fill your kitchen with a warm, inviting aroma. Once the butter has melted, add the softened cream cheese, canned pumpkin puree, sweetened condensed milk, and pumpkin pie spice. Stir continuously. You want a smooth and creamy mixture.
Step 2: Combine Key Ingredients
As the mixture warms up, it’s time to add the graham cracker crumbs and white chocolate chips. Keep stirring until the chips melt into the mix, creating a luscious texture. This process is like watching magic happen right before your eyes! It also gives you a taste of what’s to come.
Step 3: Thicken the Mixture
Continue cooking the mixture, stirring frequently. You’ll know it’s ready when it pulls away cleanly from the sides and bottom of the skillet. This is when it becomes thick enough to roll into truffles—pure bliss in the making!
Step 4: Refrigerate the Mixture
Once you’ve achieved that perfect thickness, spread the mixture evenly onto a butter-greased baking sheet. This is where the magic transforms into shape. Let it chill in the refrigerator for at least two hours, or overnight if you can resist the temptation!
Step 5: Shape the Truffles
After the mixture has set, rub a little butter on your hands to prevent sticking. Now, roll the chilled mixture into small balls. Think of them as little bites of pumpkin cheesecake joy! Aim for about an inch in diameter.
Step 6: Coat the Truffles
Once you’ve rolled all the truffles, it’s time for the sweet touch. Roll each ball in granulated sugar to give it that classic truffle finish. This step adds both sweetness and a lovely shimmer, perfect for a festive presentation!
Step 7: Add the Finishing Touches
Here comes the creative part! Grab a toothpick and gently create ridges in each ball. This simulates the shape of a pumpkin and adds texture. It’s a fun way to let your artistic side shine. Cap it off by placing a chocolate chip on top to resemble the pumpkin stem.
Step 8: Serve and Enjoy!
Finally, it’s showtime! Serve your Pumpkin Cheesecake Truffles immediately or refrigerate until you’re ready to share. Either way, they’ll be the star of your autumn spread. Each bite is filled with creamy goodness, just waiting to delight your taste buds!
Tips for Success
- Use room temperature cream cheese for a smoother mixture; it blends in easily!
- Don’t rush the chilling process. The firmer the mixture, the easier it’ll be to roll.
- Feel free to adjust the spice level. Add more pumpkin pie spice for a bolder flavor.
- Experiment with different toppings. A sprinkle of cinnamon can elevate your truffles!
- Make these truffles ahead of time; they taste even better after chilling overnight.
Equipment Needed
- Skillet: A non-stick skillet works best, but any frying pan will do.
- Spatula: Use a rubber spatula for easy mixing and scraping.
- Baking sheet: A regular baking sheet is perfect for chilling the mixture.
- Measuring cups and spoons: Essential for accuracy when crafting your treats.
- Toothpick: Great for adding decorative touches to your truffles.
Variations of Pumpkin Cheesecake Truffles
- Gluten-Free: Substitute graham cracker crumbs with gluten-free options like almond flour or gluten-free cookie crumbs for a safe indulgence.
- Dairy-Free: Use dairy-free cream cheese and coconut cream instead of sweetened condensed milk to create a delectable vegan version.
- Spiced Up: Add a hint of cayenne pepper or chopped pecans for a spicy, nutty twist that enhances the flavor profile.
- Chocolate Lover’s Delight: Swap white chocolate chips for dark chocolate chips to intensify the flavor and make it richer. You can also dip them in melted chocolate for an irresistible chocolate coating!
- Mini Pumpkin Cheesecake Bites: Instead of rolling into truffles, press the mixture into mini muffin cups and freeze for an elegant bite-sized treat.
Serving Suggestions
- Pair with a warm cup of spiced chai or pumpkin spice latte for the ultimate autumn experience.
- Serve alongside caramel apple slices for a sweet and savory platter that invites sharing.
- Garnish with cinnamon sticks or cute autumn-themed plates for delightful presentation!
- For an extra touch, sprinkle crushed graham crackers around the truffles on the serving platter.
FAQs about Pumpkin Cheesecake Truffles
Got questions? I’ve got answers! Here are some of the most common queries about these delightful Pumpkin Cheesecake Truffles:
Can I make Pumpkin Cheesecake Truffles ahead of time?
Absolutely! These truffles can be made a day in advance. Just store them in an airtight container in the refrigerator for the best flavor. They may even taste better after chilling!
How should I store the truffles?
Keep your Pumpkin Cheesecake Truffles in the fridge. They stay fresh for up to a week. If you’re storing for longer, consider freezing them in a single layer, then transfer them to a freezer-safe bag for up to three months.
Can I use fresh pumpkin instead of canned?
While canned pumpkin puree is super convenient, you can definitely use fresh pumpkin. Just ensure it’s cooked until soft and blended until smooth. This can take a bit longer, but the flavor is often worth the effort!
What can I do if the mixture is too sticky?
If you find your mixture is too sticky to roll, don’t panic! Chill it for a bit longer in the fridge. Cold hands help too! Just rub them with a little butter before rolling, and you’ll be all set.
How can I make these truffles gluten-free?
It’s simple! Just swap the graham cracker crumbs for gluten-free alternatives, like almond flour or crushed gluten-free cookies. Your friends won’t even notice the difference!
Final Thoughts
Stepping into the world of Pumpkin Cheesecake Truffles is like welcoming cozy fall evenings filled with laughter and sweet aromas. Each bite is a celebration of creamy cheesecake and the warm spices of autumn, making them a perfect companion for any gathering. As you share these delightful treats, you’ll feel the joy of creating something special that brings everyone together. So, gather your loved ones, serve these truffles, and let each moment encase the warmth of fall. Trust me, you won’t just satisfy your sweet cravings; you’ll also create memories that linger long after the last truffle is gone!
Print
Pumpkin Cheesecake Truffles
- Prep Time: 30 minutes
- Cook Time: 15 minutes
- Total Time: 2 hours 45 minutes (including chilling time)
- Yield: Approximately 24 truffles 1x
- Category: Dessert
- Method: Stovetop and Refrigeration
- Cuisine: American
- Diet: Vegetarian
Description
These Pumpkin Cheesecake Truffles are a delightful fall treat that combines the rich flavors of pumpkin and cream cheese, rolled in sugary sweetness, making them perfect for any autumn gathering.
Ingredients
- 1 tablespoon unsalted butter
- 4 ounces cream cheese, softened
- ½ cup canned pumpkin puree
- 1 (14-ounce) can sweetened condensed milk
- 1 ½ teaspoons pumpkin pie spice
- ½ cup graham cracker crumbs
- ⅓ cup white chocolate chips
- Orange food coloring, optional
- Granulated sugar, for rolling
- Chocolate chips, for topping
Instructions
- In a skillet over medium heat, melt butter and add cream cheese, pumpkin puree, condensed milk, and pumpkin pie spice. Stir continuously until the mixture thickens and becomes smooth.
- Stir in graham cracker crumbs and white chocolate chips until the chocolate melts and the ingredients are well combined. Add food coloring if desired.
- Continue cooking the mixture until it pulls away cleanly from the sides and bottom of the skillet.
- Spread the mixture evenly onto a butter-greased baking sheet and refrigerate for at least 2 hours or overnight until firm.
- Rub butter on your hands, then roll the chilled mixture into small balls.
- Roll each ball in granulated sugar to coat thoroughly.
- Use a toothpick to create ridges in each ball to mimic the shape of a pumpkin.
- Place a chocolate chip on top of each truffle to serve as the stem.
- Serve immediately or refrigerate until ready to enjoy.
Notes
- For a deeper color, adjust the amount of food coloring according to your preference.
- These truffles can be made a day in advance; just store them in an airtight container in the refrigerator.
- Feel free to experiment with different chocolate toppings like dark or milk chocolate.
Nutrition
- Serving Size: 1 truffle
- Calories: 120
- Sugar: 9g
- Sodium: 45mg
- Fat: 6g
- Saturated Fat: 3g
- Unsaturated Fat: 2g
- Trans Fat: 0g
- Carbohydrates: 15g
- Fiber: 0g
- Protein: 2g
- Cholesterol: 15mg
