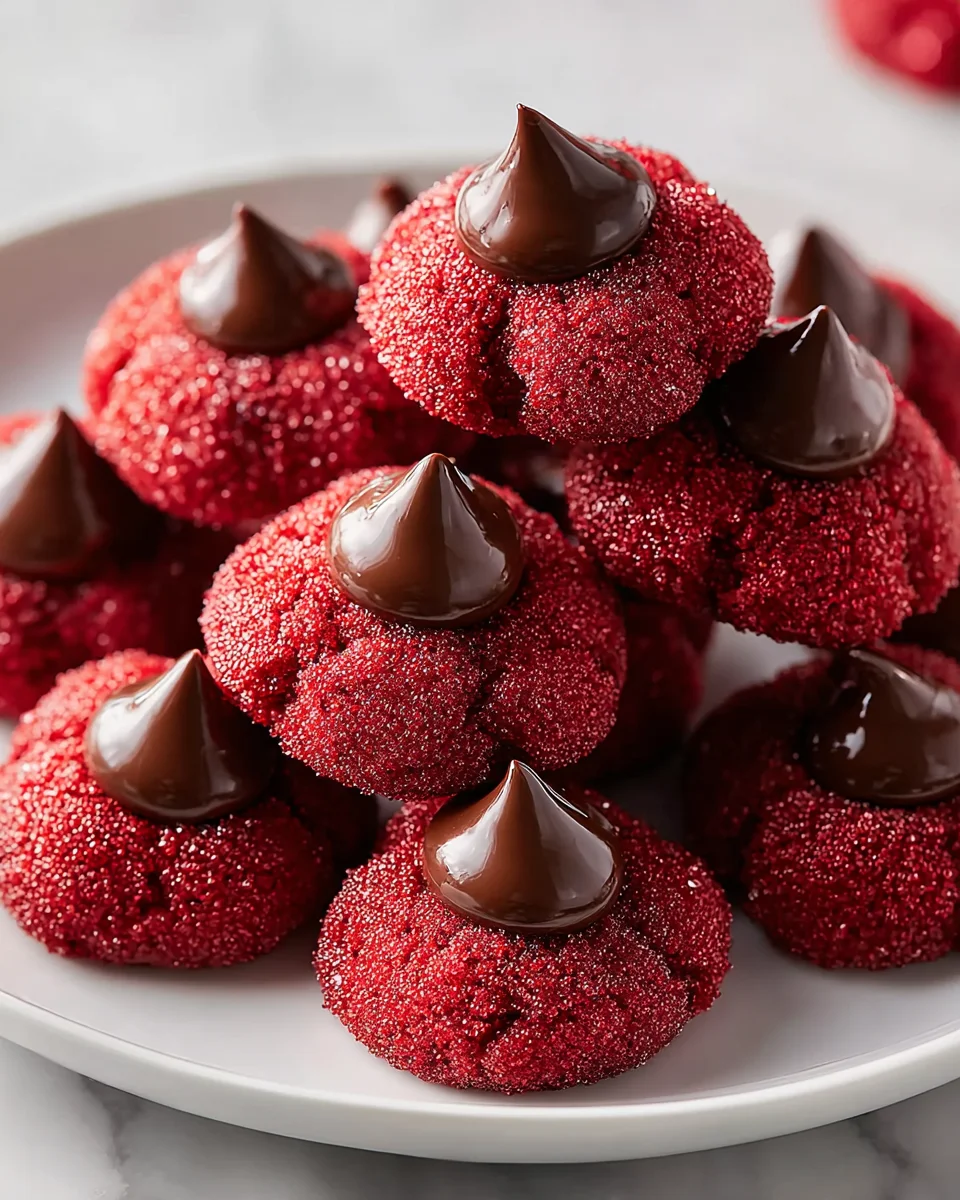
Introduction to Red Velvet Blossom Cookies
Hey there, fellow cookie lovers! If you’re anything like me, you know that life can get hectic. Between work, family, and trying to keep everyone happy, finding time to bake feels like a luxury. That’s where my Red Velvet Blossom Cookies come in handy! These delightful, festive treats are quick to whip up and will absolutely impress your loved ones. With their rich red hue and cute Hershey’s Kiss topping, they’re the perfect combination of indulgence and fun. Trust me, once you try these, they’ll become a go-to favorite in your kitchen!
Why You’ll Love This Red Velvet Blossom Cookies
These Red Velvet Blossom Cookies are a dream come true for busy moms and professionals alike. They’re not only super easy to make but also come together in less than 30 minutes! Imagine the smiles on your family’s faces when they bite into that soft, chewy cookie topped with a chocolatey Hershey’s Kiss. The taste? It’s a delightful blend of cocoa and vanilla that’ll have everyone asking for seconds!
Ingredients for Red Velvet Blossom Cookies
Let’s get baking with the essential ingredients for these gorgeous Red Velvet Blossom Cookies! I love the simplicity of this recipe, and each ingredient plays an important role in creating that signature flavor and vibrant color.
- Butter: Softened butter is the starter for any good cookie. It helps achieve that deliciously chewy texture.
- Brown Sugar: This adds moisture and a hint of caramel flavor, balancing perfectly with the cocoa.
- Granulated Sugar: For sweetness and that delightful crispiness on the edges.
- Vanilla Extract: A splash of vanilla enhances every bite, making the flavors really pop.
- Egg Yolk: The yolk provides richness and helps bind everything together, giving the cookies their tender crumb.
- Red Gel Food Coloring: This is what transforms our cookies into a vibrant red masterpiece. Gel food coloring gives the best color without diluting the mix.
- All-Purpose Flour: This is the foundation of our cookies, providing structure and stability.
- Cocoa Powder: A key player that brings in that rich chocolate flavor, making these cookies irresistibly good.
- Baking Powder: This ingredient is essential for helping our cookies rise just right.
- Salt: A pinch of salt enhances the sweetness, creating a more balanced flavor.
- Red Sanding Sugar: For rolling the dough, it adds a delightful crunch and festive sparkle.
- Hershey’s Kisses: The pièce de résistance! These chocolatey gems are pressed into the center to provide that perfect finishing touch.

How to Make Red Velvet Blossom Cookies
Step 1: Preheat the Oven
First things first, we need to preheat that oven to 350°F (175°C). This ensures our Red Velvet Blossom Cookies will bake evenly and come out just right. While the oven warms up, line a large baking sheet with parchment paper. It keeps the cookies from sticking and makes clean-up a breeze. Trust me, this little step saves time later!
Step 2: Cream the Butter and Sugars
Next up, grab a mixing bowl and add that softened butter. You’ll want to cream the butter together with the brown and granulated sugars until the mixture is smooth and light. I like to use a hand mixer for this, but a good old-fashioned whisk works too—just know it’ll take a little elbow grease. The fluffier the mix, the softer your cookies will be, so don’t rush this step!
Step 3: Combine Wet Ingredients
Once your butter and sugars are a dreamy consistency, it’s time to add in the wet ingredients. Toss in the egg yolk, vanilla extract, and that vibrant red gel food coloring. Mix it all together until fully blended and colorful. This is where those warm scents start to fill your kitchen, making your heart swell with anticipation!
Step 4: Mix Dry Ingredients
In a separate bowl, whisk together the all-purpose flour, cocoa powder, baking powder, and salt. This step is key to evenly distributing the dry ingredients. Gradually add this dry mix to your wet ingredients. Stir until just combined—don’t overmix! You want to keep that soft texture we talked about. Soon, you’ll see the dough come together, and oh, it already smells divine!
Step 5: Form the Dough
Now for the fun part! Portion the dough into 18 equal pieces. I like to use a cookie scoop for this. Roll each piece into a ball and then roll them in the glorious red sanding sugar. This adds a nice sparkle and extra crunch to your cookies. Place them on the prepared baking sheet, spacing them a few inches apart. They’ll spread out a bit, so give them breathing room!
Step 6: Bake and Add Hershey’s Kisses
Time to pop those cookies in the oven! Bake them for about 10 minutes. You’ll know they’re ready when the edges are set but the centers still look a tad soft. Immediately press a Hershey’s Kiss into the center of each cookie right after taking them out of the oven. This step is crucial! Allow the cookies to cool on the baking sheet for about 10 minutes before transferring them to a wire rack to finish cooling.
Tips for Success
- Make sure your butter is softened to room temperature for the best texture.
- Don’t skip the rolling in red sanding sugar; it gives a festive crunch!
- Keep an eye on your cookies as they bake; ovens can vary significantly.
- Let the cookies cool slightly before moving them to avoid any breakage.
- Store leftovers in an airtight container for up to a week—if they last that long!
Equipment Needed
- Mixing Bowls: A set of various sizes is perfect. Use a large one for the cookie dough and smaller ones for mixing wet and dry ingredients.
- Hand Mixer or Whisk: If you have a hand mixer, great! Otherwise, a sturdy whisk will do just fine.
- Cookie Scoop: This makes uniform cookies easy! A tablespoon works too if you don’t have one.
- Baking Sheet: Just one will do! If you have multiple, use them to speed up the process.
- Parchment Paper: Essential for easy clean-up—your cookies will slide right off!
Variations
- Nutty Delight: Add chopped nuts, like walnuts or pecans, for a crunchy texture and a nutty flavor boost.
- Gluten-Free Option: Substitute all-purpose flour with a 1:1 gluten-free baking blend for a gluten-friendly treat.
- Caramel Twist: Instead of Hershey’s Kisses, try using caramel-filled chocolates for a gooey surprise!
- Spice It Up: Add a pinch of cinnamon or chili powder to the dough for an unexpected warm flavor.
- Frosted Bliss: After cooling, top the cookies with cream cheese frosting for an indulgent and savory twist!
Serving Suggestions
- Serve these Red Velvet Blossom Cookies alongside a tall glass of cold milk for a classic treat.
- Pair them with a warm cup of coffee or hot cocoa—so cozy!
- Present on a beautiful platter, garnished with fresh berries for a pop of color.
- These cookies make a delightful addition to any holiday dessert table.
FAQs about Red Velvet Blossom Cookies
I’m so glad you’re curious about these delightful Red Velvet Blossom Cookies! Here are some common questions I’ve encountered, along with answers to help you navigate your baking adventure.
Can I use a different type of chocolate for the topping?
Absolutely! While I adore the classic Hershey’s Kiss, you could use any chocolate candy you prefer. Try milk chocolate, dark chocolate, or even a chocolate-covered caramel candy for a delicious twist.
How should I store my Red Velvet Blossom Cookies?
These cookies can be stored in an airtight container at room temperature for up to a week. If you want to keep them fresher for longer, try refrigerating them! Just remember to let them warm up a bit before enjoying.
Can I freeze the dough for later use?
Yes! You can freeze the cookie dough balls, well-wrapped, for up to three months. When you’re ready to bake, just let them thaw in the refrigerator before baking. A fresh cookie on demand? Yes, please!
What if I don’t have red gel food coloring?
If you’re in a bind, feel free to use liquid food coloring instead. Just know that it might alter the consistency a bit. You could also try beet juice for a natural coloring, but the flavor and brightness may vary.
How can I make these cookies less sweet?
For a less sweet version, reduce the amount of granulated sugar or skip the red sanding sugar. You could also balance the sweetness with a dash of sea salt or even add some unsweetened cocoa powder for a deeper flavor!
Final Thoughts
Whipping up these Red Velvet Blossom Cookies is not just about baking; it’s creating sweet memories. The joy of watching your loved ones unwrap those warm, shiny cookies never gets old. Each bite is like a special hug, full of warmth and love. Whether for a holiday celebration or just because, these cookies are bound to bring smiles and spark conversations. So, roll up your sleeves, get that flour dusted on your apron, and dive into this delightful baking adventure. You’ll find that every cookie tells a story, and I can’t wait to hear yours!
Print
Red Velvet Blossom Cookies
- Prep Time: 15 minutes
- Cook Time: 10 minutes
- Total Time: 25 minutes
- Yield: 18 cookies 1x
- Category: Dessert
- Method: Baking
- Cuisine: American
- Diet: Vegetarian
Description
Delicious and festive Red Velvet Blossom Cookies topped with a chocolate Hershey’s Kiss.
Ingredients
- 7 tbsp butter, softened
- 1/2 cup brown sugar
- 2 tbsp granulated sugar
- 1 tsp vanilla extract
- 1 large egg yolk
- 1/4 tsp red gel food coloring
- 1 cup all-purpose flour
- 1 tbsp cocoa powder
- 1/2 tsp baking powder
- 1/4 tsp salt
- 1/4 cup red sanding sugar, for rolling
- 18 Hershey’s Kisses, unwrapped
Instructions
- Preheat the oven to 350°F (175°C). Line a large baking sheet with parchment paper.
- Cream the softened butter, brown sugar, and granulated sugar together until smooth and slightly fluffy.
- Add the egg yolk, vanilla extract, and red gel food coloring, then mix until fully combined and evenly colored.
- In a separate bowl, whisk together the flour, cocoa powder, baking powder, and salt. Add to the wet ingredients and mix until the dry ingredients disappear.
- Portion the dough into 18 equal pieces, roll into balls, and roll each ball in red sanding sugar before placing on the prepared baking sheet.
- Bake for 10 minutes, or until the edges are set but the centers are still soft.
- Press a Hershey’s Kiss into the center of each cookie immediately after baking, then let cool on the baking sheet for 10 minutes before transferring to a wire rack.
Notes
- Ensure the butter is softened for easy mixing.
- Do not overbake; cookies should be soft in the center.
- Red gel food coloring gives the best color without adding too much liquid.
Nutrition
- Serving Size: 1 cookie
- Calories: 120
- Sugar: 8g
- Sodium: 80mg
- Fat: 5g
- Saturated Fat: 3g
- Unsaturated Fat: 2g
- Trans Fat: 0g
- Carbohydrates: 17g
- Fiber: 0g
- Protein: 1g
- Cholesterol: 15mg


