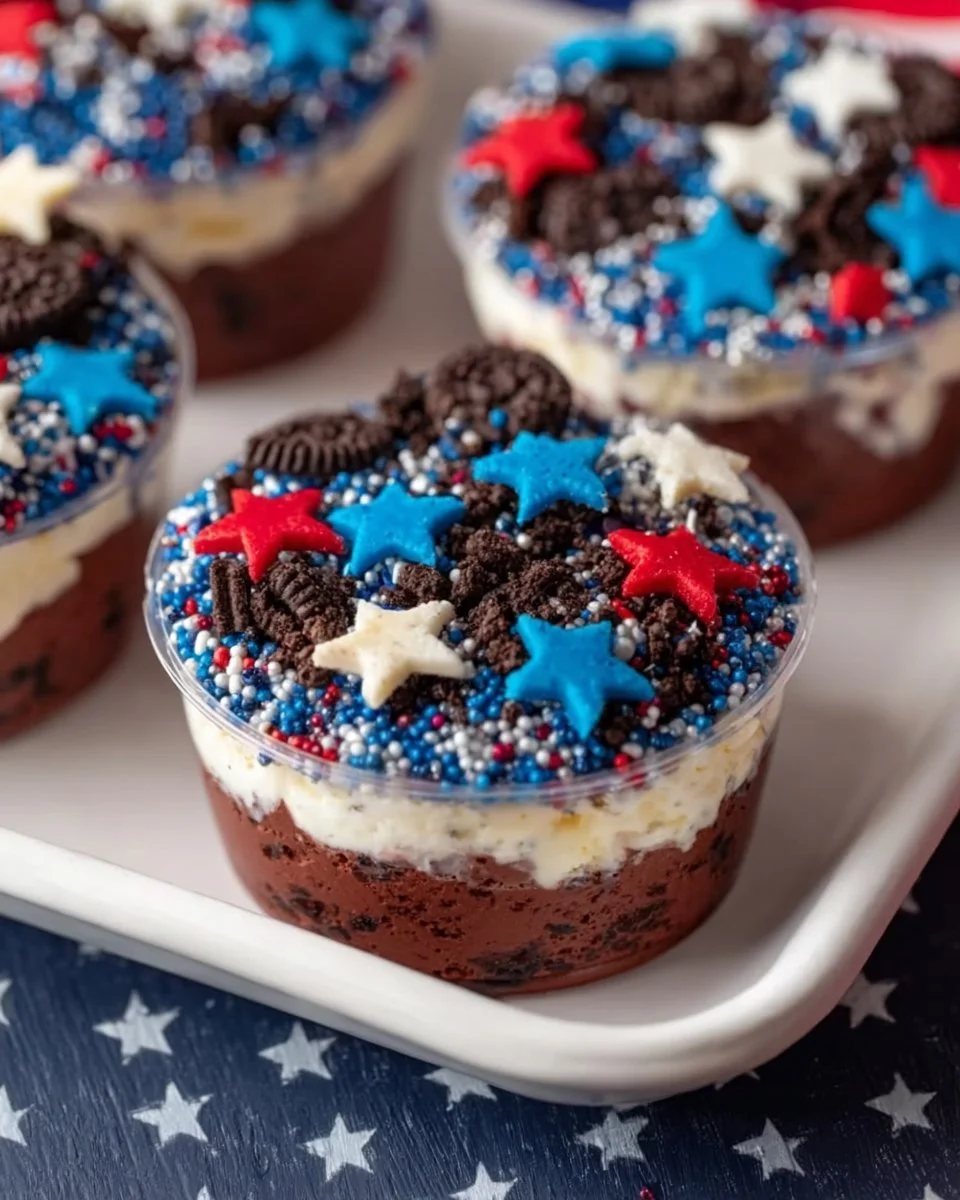
As summer sun filters through the leaves, the scent of freshly cut grass embraces the air, reminding us of cheerful gatherings and outdoor celebrations. Those vibrant moments, where laughter dances with the breeze, and the promise of sweet treats stirs excitement, deserve a dessert that captures their spirit. Enter the Red, White, and Blue Dirt Cups—a delightful celebration of flavors, textures, and colors that not only satiate the sweet tooth but also encapsulate the joy of every festive occasion.
Imagine sinking your spoon into a glorious cup layered with crushed chocolate cookies, smooth and creamy white chocolate pudding, and bright bursts of red and blue pudding. Each spoonful delivers a satisfying crunch from the cookies, followed by a velvety richness that melts effortlessly on your tongue. The playful combination of textures creates a symphony of delight, while the vibrant hues evoke a playful, childlike wonder. These cups are not just desserts; they are the embodiment of celebration, nostalgia, and sheer fun.
Why You’ll Love This Red White and Blue Dirt Cups
These Red, White, and Blue Dirt Cups shine in their versatility. Whether you’re celebrating the Fourth of July, a birthday, or a casual summer picnic, they stand out as a dazzling centerpiece. Their playful presentation evokes smiles, while the irresistible flavor profile caters to both young palettes and mature ones. Every layer of this dessert tells a story—decadent chocolate, sweet creaminess, and vibrant colors encapsulated in each cup.
Crafting these cups requires minimal effort but promises maximum flavor impact, making them as enjoyable to prepare as they are to devour. The combination of creaminess and crunch, along with the festive theme, transforms any gathering into a memorable celebration. With just a handful of ingredients, you can indulge in a fun, whimsical treat that becomes the star of your table.
Preparation Phase & Tools to Use
The beauty of this recipe lies not only in its taste but also in its simplicity. A few essential tools ensure a streamlined preparation process that allows you to focus on what truly matters—the joy of creating and sharing a delightful dessert.
Food Processor: This tool simplifies the task of crushing cookies to create that lovely dirt layer. A few quick pulses break them down to the perfect crumbly texture.
Mixing Bowls: Having several bowls on hand allows for easy mixing of the pudding and whipped topping, keeping your process organized and efficient.
Whisk: A sturdy whisk ensures that your pudding mix becomes perfectly smooth and free of lumps, blending effortlessly with the milk.
9-oz Disposable Cups: These cups not only make for easy serving but also contribute to the festive presentation of the dessert.
To enhance your preparation experience, ensure your whipped topping is thawed, and your pudding mixture is prepared in a serene space where laughter can flow freely.
Ingredients for Red White and Blue Dirt Cups
Gathering the right ingredients is crucial to achieving the perfect balance of flavor and texture. Here’s what you’ll need:
13.9-ounce pack of chocolate sandwich cookies: These provide that delightful crunch and richness, making up the “dirt” layer.
4 cups cold milk: Essential for giving the pudding its luscious, creamy texture.
2 (3.4 ounce) boxes instant white chocolate pudding mix: This provides both flavor and consistency.
1 (8 ounce) container whipped topping, thawed: For a light and fluffy layer that complements the denser cookie crumbs and pudding.
Festive sprinkles: Add a touch of whimsy and celebration to the final presentation.
Gummy stars: These fun additions add a playful touch, perfect for capturing the festive spirit.
Red and blue food coloring: The secret to creating those vibrant layers that define this dessert.
8 (9-ounce) disposable cups: To beautifully showcase each layered cup of joy.
For substitutions, consider using gluten-free cookies if needed or experimenting with different pudding flavors.
How to Make Red White and Blue Dirt Cups
With your ingredients ready, let the fun begin! Here’s a step-by-step guide to creating these strikingly beautiful cups:
Crush the Cookies: Use your food processor to blend the chocolate sandwich cookies into a fine crumb. Alternatively, place the cookies in a Ziploc bag and use a rolling pin to crush them. The goal is to create that delightful “dirt” texture.
Whisk the Pudding: In a large bowl, combine the cold milk and instant white chocolate pudding mix. Whisk them together until smooth and creamy—this step is pivotal for achieving the perfect pudding consistency.
Divide the Pudding: Split the pudding mixture equally into three separate bowls. This separation allows for the coloring that creates our patriotic layers.
Add Color: To one bowl, add red food coloring until the desired hue is achieved; repeat with blue food coloring in the second bowl.
Incorporate the Whipped Topping: Gently fold the whipped topping into each bowl of pudding, creating a light and airy mixture for each layer. Stir until fully combined for a smooth finish.
Layer It Up: Start layering in the disposable cups. Begin with a scoop of cookie crumbs, then blue pudding, followed by more cookie crumbs, white pudding, additional crumbs, red pudding, and finish with a generous layer of cookie crumbs on top.
Decorate: Top each cup with festive sprinkles and gummy stars, adding that touch of magic.
Chef’s Notes & Helpful Tips
Make-Ahead Tips: These cups can be prepared a day in advance. Store them in the refrigerator, covered, until you’re ready to serve.
Cooking Alternatives: While the recipe shines as is, you can adapt the cookie-crushing process using an air fryer for a quick treat, if time is pressing.
Customization Ideas: For a twist, consider adding layers of fresh fruit like strawberries or blueberries, or experiment with flavored pudding mixes for a unique taste experience.
Common Mistakes to Avoid
Overmixing the Pudding: Lightly fold ingredients together instead of vigorously mixing to preserve the airy texture of the whipped topping.
Not Letting the Whipped Topping Thaw: This can lead to a dense and less enjoyable cup. Ensure it’s fully thawed for the best results.
Skipping the Layers: Layers are key for both aesthetics and flavor. Don’t rush—it’s all part of the fun!
What to Serve With Red White and Blue Dirt Cups
Elevate the experience by serving these delightful cups with complementary dishes:
Grilled Hot Dogs: A staple at any summer gathering, their smoky flavor pairs beautifully with the dessert’s sweetness.
Charcuterie Board: Offer assorted meats, cheeses, and fruits to balance the sweetness of the dirt cups.
Fresh Berry Salad: Light and refreshing, this salad enhances the fruity elements in the dessert.
Ice-Cold Lemonade: A classic summer quencher that cuts through the richness of the pudding.
Sparkling Water with Fruit Garnish: Infusing water with fresh strawberries or blueberries echoes the dessert’s colors.
BBQ Chicken Sliders: These savory bites provide a satisfying contrast to the sweetness of the dirt cups.
Storage & Reheating Instructions
Store any leftover dirt cups in an airtight container in the refrigerator for up to three days. They’re best enjoyed cold, so there’s no need to reheat. Just grab and enjoy straight from the fridge!
Estimated Nutrition Information
Approximate values per serving (1 cup):
- Calories: 320
- Total Fat: 12g
- Saturated Fat: 7g
- Cholesterol: 20mg
- Sodium: 300mg
- Total Carbohydrates: 52g
- Dietary Fiber: 1g
- Sugars: 30g
- Protein: 4g
Nutrition values may vary based on specific ingredient brands and portion sizes.
FAQs
Can I use different flavors of pudding?
Absolutely! Feel free to experiment with other flavors like chocolate or vanilla. Just ensure they complement the overall dessert theme.
How can I make this recipe gluten-free?
Simply opt for gluten-free chocolate sandwich cookies, and you can enjoy this dessert without worry.
Can I make these cups ahead of time?
Yes! They can be prepared a day in advance, making them perfect for parties. Just keep them covered in the refrigerator until serving.
Could I use fresh fruit instead of gummy stars?
Definitely! Fresh blueberries or strawberries can enhance the flavor and provide a beautiful, natural touch.
How many servings does this recipe yield?
This recipe typically yields about 8 cups, perfect for sharing at your next gathering!
Conclusion
Creating these Red, White, and Blue Dirt Cups provides a delightful culinary adventure, and I wholeheartedly encourage you to make them part of your celebration. Each cup radiates brightness and summery joy, transforming even the simplest gathering into a spectacular occasion. Dive into making these whimsical desserts, and let every bite evoke the laughter and memories that accompany warm days and starry nights. With every spoonful, you create not just a dessert but a moment of joy to be shared. Happy indulging!
Print
Red, White, and Blue Dirt Cups
- Prep Time: 20 minutes
- Cook Time: 0 minutes
- Total Time: 20 minutes
- Yield: 8 servings 1x
- Category: Dessert
- Method: No-Cook
- Cuisine: American
- Diet: Vegetarian
Description
A delightful layered dessert featuring crushed chocolate cookies, white chocolate pudding, and vibrant red and blue layers, perfect for summer celebrations.
Ingredients
- 13.9-ounce pack of chocolate sandwich cookies
- 4 cups cold milk
- 2 (3.4 ounce) boxes instant white chocolate pudding mix
- 1 (8 ounce) container whipped topping, thawed
- Festive sprinkles
- Gummy stars
- Red food coloring
- Blue food coloring
- 8 (9-ounce) disposable cups
Instructions
- Crush the Cookies: Use your food processor to blend the chocolate sandwich cookies into a fine crumb.
- Whisk the Pudding: In a large bowl, combine the cold milk and instant white chocolate pudding mix. Whisk until smooth.
- Divide the Pudding: Split the pudding mixture into three separate bowls.
- Add Color: To one bowl, add red food coloring, and to another, add blue food coloring.
- Incorporate the Whipped Topping: Fold the whipped topping into each pudding bowl until combined.
- Layer It Up: In the cups, layer cookie crumbs, blue pudding, cookie crumbs, white pudding, cookie crumbs, red pudding, and top with more cookie crumbs.
- Decorate: Top each cup with festive sprinkles and gummy stars.
Notes
Make-ahead tips: These cups can be prepared a day in advance and stored in the refrigerator.
Nutrition
- Serving Size: 1 cup
- Calories: 320
- Sugar: 30g
- Sodium: 300mg
- Fat: 12g
- Saturated Fat: 7g
- Unsaturated Fat: 5g
- Trans Fat: 0g
- Carbohydrates: 52g
- Fiber: 1g
- Protein: 4g
- Cholesterol: 20mg