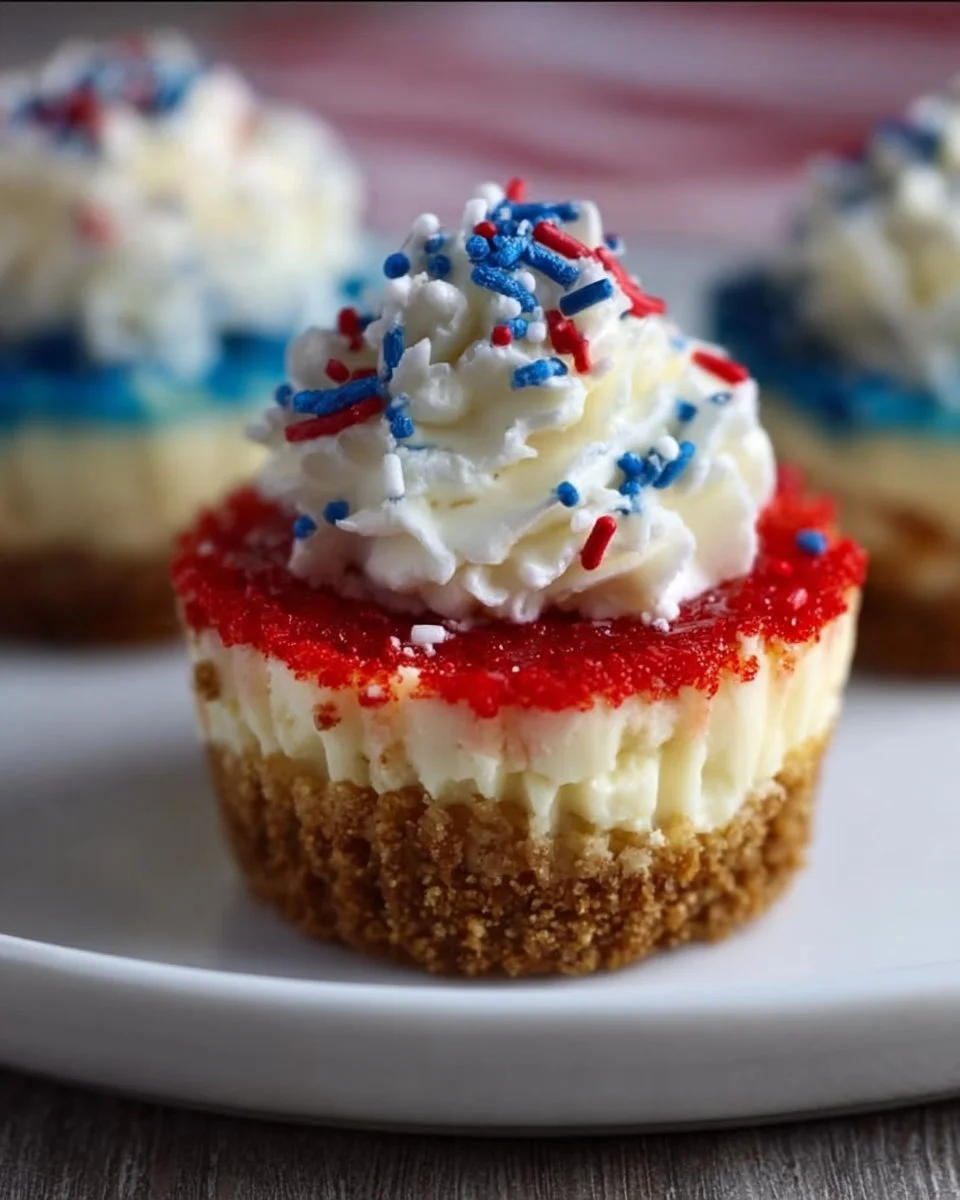
Indulging in a dessert that irresistibly captures the spirit of celebration is truly a delightful experience, and Red, White, and Blue Mini Cheesecakes do just that. These adorable creations burst with vibrant colors and flavors, promising a tantalizing fusion of creaminess and crunch. Picture yourself biting into these petite cheesecakes, the smooth texture enveloping your palate while the buttery graham cracker crust provides a delightful contrast. As you savor each layer—velvety white nestled between striking red and blue—you know these mini treats are perfect for any festive occasion, especially those celebrating summer festivities, Independence Day, or any gathering where joy is in the air.
The aroma wafting from your oven as these cheesecakes bake creates a warm, inviting atmosphere, sure to leave your guests enchanted. The combination of cream cheese, sweetness from the sugar, and a kiss of vanilla captures the essence of indulgence, while the pops of color create an eye-catching centerpiece that beckons guests to take a bite. Each cheesecake becomes not just a dessert, but a moment to celebrate—an edible canvas representing unity and joy, lovely for a picnic or a family reunion.
Why You’ll Love This Red, White and Blue Mini Cheesecake
What truly makes these Red, White, and Blue Mini Cheesecakes shine is the delightful balance of texture and flavor. Whether you’re hosting a patriotic gathering or simply looking for a sweet treat to enjoy with friends, these mini cheesecakes elevate the dessert game effortlessly. Their rich creaminess fills you with satisfaction while the edible artistry captivates the eyes. Each bite delivers a symphony of flavors; the sweet and tangy filling harmonizes with the crunchy crust, bringing both comfort and delight.
These cheesecakes also offer versatility. Customize them for every season with different colors or toppings—spring with pastels, fall with earthy tones. Their individual sizes make them easy to transport, perfect for picnics or potlucks, and no one can resist their charm! Plus, they keep beautifully in the refrigerator. It’s impossible not to fall in love with such a delightful combination of festive presentation and decadent taste!
Preparation Phase & Tools to Use
Preparing these mini cheesecakes is as enjoyable as eating them, requiring only a few essential tools to create your masterpiece. Ensure you have the following:
- Muffin Tin: A 12-cup muffin tin helps shape the cheesecakes perfectly. Opt for one with non-stick properties to ease the removal process later.
- Cupcake Liners: These keep your cheesecakes neat and enhance the presentation. Choose colorful ones for a festive vibe.
- Mixing Bowls: Have a variety of sizes handy to mix your crust and cheesecake batter separately.
- Electric Mixer: For a smooth and creamy filling, an electric mixer works wonders, allowing you to whip up the ingredients with ease.
- Piping Bag: Perfect for applying the whipped cream topping with finesse, a piping bag adds an elegant finishing touch.
Before you dive into the mixing, ensure your cream cheese and sour cream are at room temperature to achieve a silky texture. Clearing your space and measuring out ingredients in advance smooths out the preparation process, making it feel like a breeze rather than a chore.
Ingredients for Red, White and Blue Mini Cheesecakes
- 1 ½ cups graham cracker crumbs: These form the crunchy base. Substitute with crushed cookies or gluten-free variants for dietary needs.
- 2 tablespoons salted butter, melted: This binds the crust and adds richness. Coconut oil can serve as a dairy-free alternative.
- 16 ounces cream cheese, room temperature: Provide a creamy filling that’s essential for the cheesecake. Use full-fat for best results; low-fat options may compromise texture.
- ¾ cup granulated sugar: Sweetness that balances the tanginess of cream cheese; you can use a sugar substitute if preferred.
- 2 tablespoons all-purpose flour: This stabilizes the filling. For gluten-free, substitute with almond flour.
- ½ cup sour cream, room temperature: Adds tang and creaminess; you can replace it with Greek yogurt for a similar effect.
- 1 teaspoon vanilla extract: Enhances the flavor; opt for pure vanilla extract for a more aromatic result.
- 2 large eggs: Provides structure to the cheesecake. For a vegan alternative, use flax eggs.
- 2 drops red gel food coloring: Creates a vibrant red layer. Natural food dye is a wonderful substitution.
- 2 drops blue gel food coloring: Adds a striking blue layer; similarly, use natural dye options.
- 1 cup heavy whipping cream, cold: For a luscious whipped cream topping; coconut cream can be an excellent dairy-free substitute.
- 6 tablespoons powdered sugar: Sweetens the whipped cream; consider a sugar alternative for lighter options.
- Sprinkles or flags for decoration: These add festive flair and celebrate any occasion!
How to Make Red, White and Blue Mini Cheesecakes
Preheat your oven to 325°F (163°C) and prepare a 12-cup muffin tin with cupcake liners. For added security, spray the liners with non-stick baking spray.
In a bowl, combine the graham cracker crumbs with the melted butter. Stir until fully blended to create a sandy texture. Press this mixture firmly into the bottom of each liner, providing a solid crust. Bake for 5 minutes and allow to cool in the pan.
Lower the oven temperature to 300°F (149°C). In a large mixing bowl, beat cream cheese, sugar, and flour until smooth. Ensure to scrape the sides of the bowl as you mix.
Add in the sour cream and vanilla extract, mixing until fully incorporated. Now, introduce the eggs one by one, ensuring that you mix the batter well after each addition for a creamy result.
Divide the cheesecake batter into three bowls. Keep one portion plain (white), tint the second red with food coloring, and the last blue. Mix well until you achieve the desired colors.
Begin layering the colors in each crust. Start with about one tablespoon of blue batter, followed by the white, and top with the red batter. Repeat this for all 12 mini cheesecakes.
Bake for about 15 minutes, then turn off the oven, letting the cheesecakes sit inside for another 10 minutes with the door closed. This gentle cooling helps to prevent cracks.
Once cooled, transfer the cheesecakes to a wire rack for approximately 20 minutes before refrigerating to cool completely. The cheesecakes need a couple of hours to chill after this.
To prepare the whipped cream topping, whip the cold heavy cream with powdered sugar until stiff peaks form. Pipe it generously onto each cooled cheesecake, and finish by sprinkling with red, white, and blue decorations.
Store the cheesecakes in an airtight container in the refrigerator for up to 3 days, ensuring they remain fresh and delicious.
Chef’s Notes & Helpful Tips
- Make-ahead Tips: You can prepare the crust and batters in advance, storing them sealed in the fridge overnight for easy assembly the next day.
- Cooking Alternatives: For a quicker method, you could use an air fryer; adjust the time and temperature accordingly, checking frequently for doneness.
- Customization Ideas: Experiment with flavors! Add a hint of lemon or orange zest for a citrus twist, or fold in crushed berries into the batter for added fruitiness.
Common Mistakes to Avoid
- Overmixing the Batter: While you want a smooth filling, overmixing can incorporate excess air, leading to cracks during baking. Mix just until combined.
- Not Using Room Temperature Ingredients: Cold ingredients can create a lumpy batter. Make sure both cream cheese and sour cream are prepped ahead of time.
- Skipping the Cooling Time: Letting the cheesecakes cool gradually in the oven reduces the risk of cracking. Never rush this step!
What to Serve With Red, White and Blue Mini Cheesecakes
- Fresh Berries: Strawberries, blueberries, or raspberries are wonderful companions that complement your cheesecakes visually and flavor-wise.
- Mint Leaves: Fresh mint adds a green pop and an invigorating aroma that pairs fabulously with the cheesecake.
- Fresh Fruit Salad: A colorful fruit salad offers a contrast in texture and provides a refreshing palate cleanser.
- Coffee or Tea: The rich creaminess of the cheesecakes pairs wonderfully with a cup of espresso or a fragrant herbal tea.
- Sparkling Water: Effervescent drinks pique the senses, cleansing the palate after indulging in these rich desserts.
- Chocolate Sauce: Drizzling a little chocolate sauce brings an indulgent twist to your cheesecakes.
- Caramel Drizzle: Sweet caramel enhances the flavor profile beautifully with a hint of richness.
- Ice Cream: Pair these cheesecakes with a scoop of vanilla or strawberry ice cream for an extra touch of decadence.
Storage & Reheating Instructions
- Fridge: Keep the mini cheesecakes in an airtight container in the refrigerator. They’ll retain their quality for up to three days.
- Freezer: If you want to keep them longer, freeze the cheesecakes wrapped individually in plastic wrap, then place them in an airtight container. They last up to a month.
- Reheating: Thaw in the fridge overnight, then serve chilled. Reheating these cheesecakes isn’t necessary—they are delightful cold!
Estimated Nutrition Information
Approximately per cheesecake:
- Calories: 250
- Protein: 4g
- Fat: 18g
- Carbohydrates: 20g
- Sugar: 15g
Disclaimer: Nutrition values are approximations and can vary based on specific ingredient brands and accurate serving sizes used.
FAQs
Can I use a different crust for these mini cheesecakes?
Absolutely! You can experiment with crushed cookies like Oreos or Nilla Wafers, or even a nut-based crust for a gluten-free option. Just ensure it crumbles well and adheres together.
What if I don’t have gel food coloring?
You can use liquid food coloring if needed, but remember you’ll need to use more to achieve the desired shade. Alternatively, pureed berries can be an excellent natural coloring agent.
Can I make these mini cheesecakes without eggs?
Yes, you can substitute eggs with flax eggs or silken tofu for a plant-based version. Ensure you have the correct ratios to maintain structure.
How do I prevent the cheesecakes from cracking?
To avoid cracks, use room-temperature ingredients, mix gently, and cool the cheesecakes slowly in the oven. A water bath can also help maintain moisture during baking.
Can I use flavored cream cheese?
Certainly! Flavored cream cheeses such as strawberry or vanilla will impart unique flavors to your cheesecakes. Just balance the sweetness in the batter.
Conclusion
Sinking your teeth into a Red, White, and Blue Mini Cheesecake feels like a small celebration all on its own. The harmony of colors and flavors brings a vibrant twist to any event, making you the star of the dessert table. They are not just cheesecakes; they’re a festive experience, a treat that delights the eyes and the palate alike. Gather your ingredients, spread a little joy, and make these delightful mini cheesecakes for your next gathering. You will create memories and smiles, one colorful bite at a time!
Print
Red, White, and Blue Mini Cheesecakes
- Prep Time: 20 minutes
- Cook Time: 25 minutes
- Total Time: 1 hour 15 minutes
- Yield: 12 servings 1x
- Category: Dessert
- Method: Baking
- Cuisine: American
- Diet: Vegetarian
Description
Festive mini cheesecakes layered with vibrant red, white, and blue colors, perfect for summer celebrations and gatherings.
Ingredients
- 1 ½ cups graham cracker crumbs
- 2 tablespoons salted butter, melted
- 16 ounces cream cheese, room temperature
- ¾ cup granulated sugar
- 2 tablespoons all-purpose flour
- ½ cup sour cream, room temperature
- 1 teaspoon vanilla extract
- 2 large eggs
- 2 drops red gel food coloring
- 2 drops blue gel food coloring
- 1 cup heavy whipping cream, cold
- 6 tablespoons powdered sugar
- Sprinkles or flags for decoration
Instructions
- Preheat your oven to 325°F (163°C) and prepare a 12-cup muffin tin with cupcake liners.
- Combine the graham cracker crumbs with the melted butter and press into the bottom of each liner.
- Bake for 5 minutes and allow to cool in the pan.
- Lower the oven temperature to 300°F (149°C).
- Beat cream cheese, sugar, and flour until smooth.
- Add in the sour cream and vanilla extract, and mix until fully incorporated.
- Introduce the eggs one by one, mixing well after each addition.
- Divide the batter into three bowls; keep one plain, tint the second red, and the last blue.
- Layer the colors in each crust with blue first, then white, and finish with red.
- Bake for about 15 minutes, then turn off the oven and let the cheesecakes sit inside for another 10 minutes.
- Transfer to a wire rack for about 20 minutes and refrigerate to cool completely.
- Whip the heavy cream with powdered sugar until stiff peaks form and pipe onto each cheesecake.
- Decorate with sprinkles or flags.
Notes
Ensure all dairy ingredients are at room temperature for the best texture. Store in an airtight container in the refrigerator for up to 3 days.
Nutrition
- Serving Size: 1 mini cheesecake
- Calories: 250
- Sugar: 15g
- Sodium: 250mg
- Fat: 18g
- Saturated Fat: 10g
- Unsaturated Fat: 6g
- Trans Fat: 0g
- Carbohydrates: 20g
- Fiber: 0g
- Protein: 4g
- Cholesterol: 55mg